Flow Studioの使い方のコツ!上手くできないときの対処法は?

映像制作の世界が、AIの力で一変します。あなたが手掛ける映像に、リアルなCGキャラクターを簡単に追加できるようになったらどうでしょう?それが、Flow Studioの提供する革新的な可能性です。
この記事では、Flow Studioの使い方を徹底解説し、上手くできないときの対処法もご紹介します。素材の撮影からレンダリング、出力まで、一歩一歩詳しく解説します。さらに、よくある質問とその解決策もまとめています。Flow Studioを活用したい方はぜひ参考にしてみてください。
Flow Studioで実写合成動画を簡単に!
Flow Studioは、実写映像にCGキャラクターを自動でアニメーションし、ライティングし、合成することができる革新的なAIツールです。高品質なCG映像の制作を、手間とコストを大幅に削減して可能にします。
最大の特徴は、高価なモーションキャプチャー機材や複雑な3Dソフトウェア、高価な制作用ソフトが不要で、必要なのはカメラだけ。アーティストはクリエイティブな作業に時間を費やすことができます。
Flow Studioに関する詳細な解説については、下記の記事をご覧ください。

Flow Studioで使いやすい素材を撮るためのテクニック
Flow Studioで最高の結果を得るためには、素材撮影時のいくつかのテクニックを覚えておくと便利です。以下に、そのテクニックをいくつか紹介します。
シャッタースピードを高めに設定する
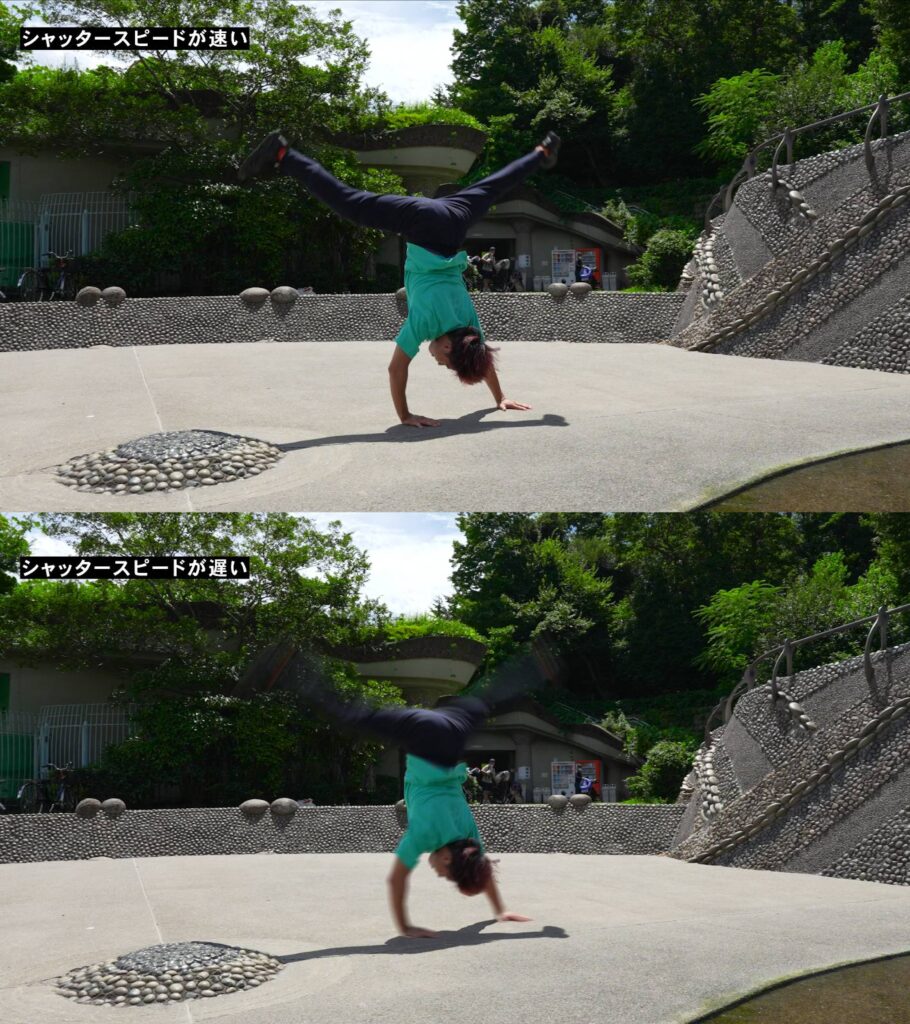
シャッタースピードとは、カメラのシャッターが開いている時間のことを指します。シャッタースピードを高めに設定すると、シャッターが開いている時間が短くなります。これにより、動きのある被写体でもブレやぼやけを抑えて、鮮明な画像を撮影することができます。特に、Flow Studioでは実写映像から被写体を分析してCGキャラクターを生成するため、ブレやぼやけが少ないほど精度の高い結果が得られます。
具体的なシャッタースピードの設定値は、撮影するシーンや環境光の量によりますが、1/500以上くらいがトラッキングしやすいです。
ただし、必要以上に高速なシャッタースピードを設定すると、画像が暗くなったりISO感度が上がり過ぎてノイズが多く乗る為、バランスを考えて設定しましょう。
FPSを高めに設定する
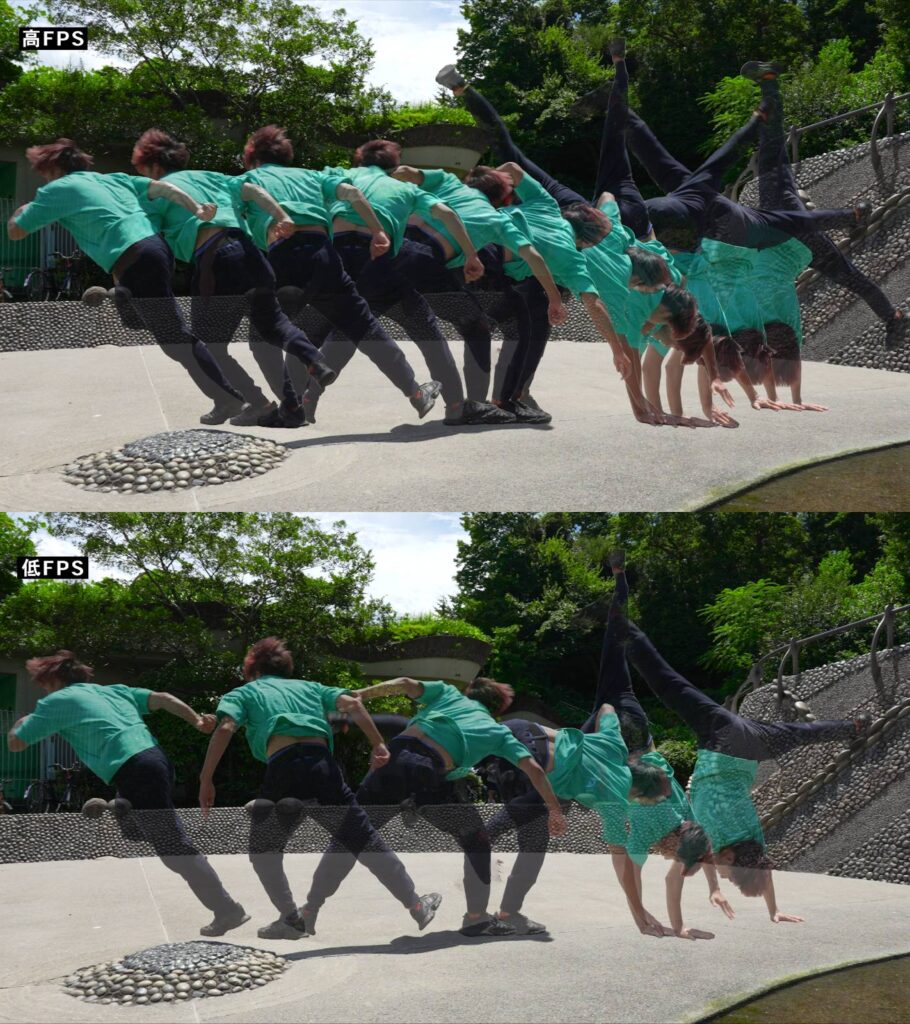
FPS(フレームレート)とは、1秒あたりに表示されるフレーム(画像)の数を指します。FPSが高いほど、動きが滑らかに見え、よりリアルな映像を作成することができます。
Flow Studioでは、実写映像からCGキャラクターを生成します。そのため、FPSが高いと、動きの細かな部分まで正確に捉えることができ、よりリアルな動きのCGキャラクターを生成することが可能になります。また、高いFPSで撮影された映像は、スローモーションにするときにも有利です。
具体的なFPSの設定値はシャッタースピード同様、撮影するシーンや目的によりますが、60FPSがおすすめの範囲です。
ただし、より滑らかな動きを求める場合や、スローモーションを考慮する場合には、120FPSや240FPSといったより高い設定を選択することもあります。FPSを上げるとデータ量が増えるため、ストレージの容量やデータ管理に注意も必要です。
なるべく遮蔽物をなくす
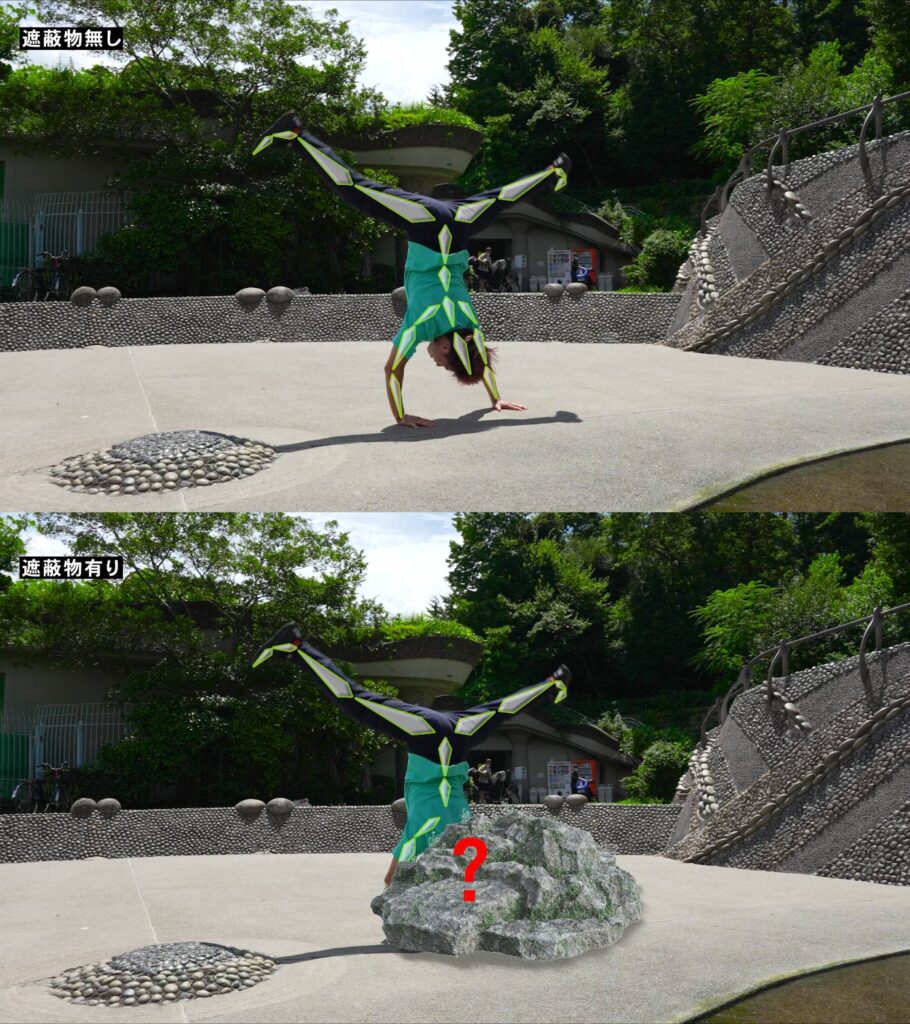
Flow StudioではAIが実写映像からCGキャラクターを生成します。そのため、CGキャラクターに置き換えるアクターが遮蔽物に隠れないように撮影すると、AIが正確に被写体の動きを解析しやすくなり、より精度の高い結果が得られます。
また、遮蔽物が多いと、その都度、Blenderなどの3Dソフトウェアで手動で編集する必要があります。これは、特に複雑なシーンや多くの遮蔽物が存在する場合、時間と労力がかかる作業になります。
したがって、撮影時にはなるべく遮蔽物をなくし、アクターを明確に映すことが推奨されます。
2025年に入り、アップデートにより遮蔽物があっても問題なくトラッキングできるようになりました。ですが、これはAIによる予測に基づくため、完璧なトラッキングを行うにはやはり遮蔽物はなるべく避けることが望ましいでしょう。
人型をはっきり映す
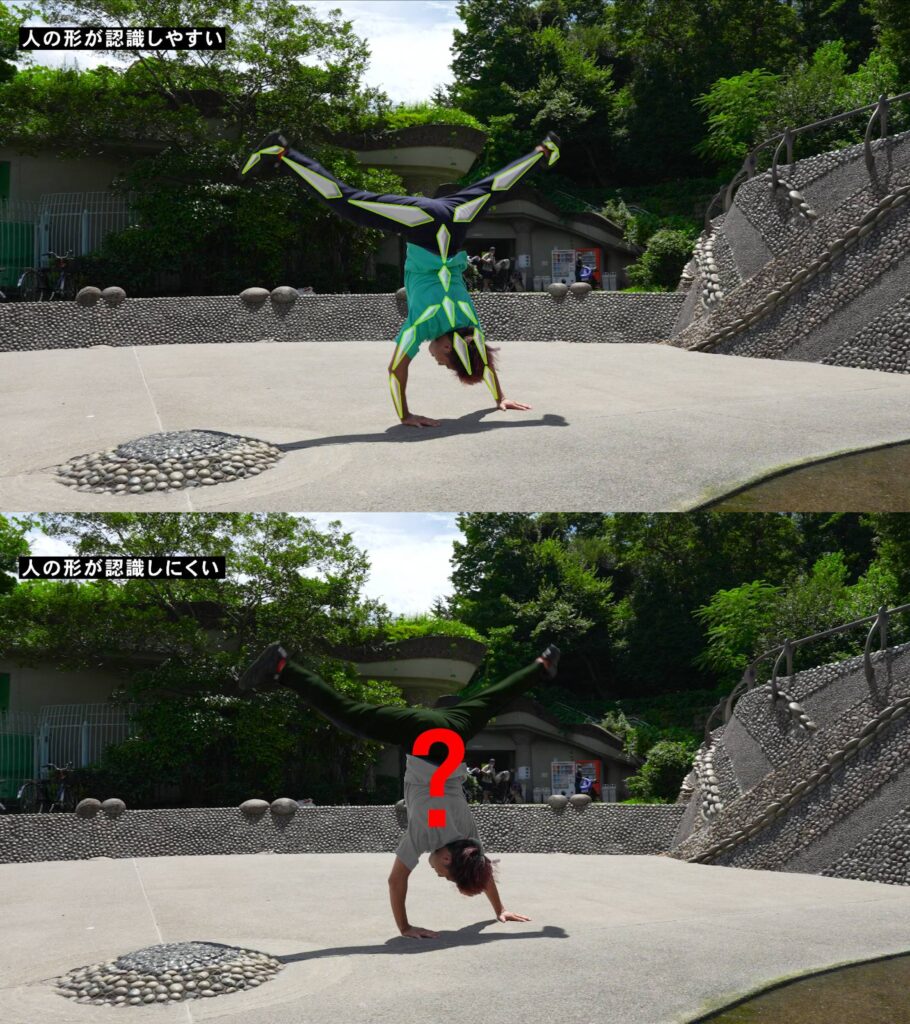
Flow Studioでは、実写映像からCGキャラクターを生成します。そのため、撮影する人型がはっきりと映っているほど、AIは正確にその動きを解析し、リアルなCGキャラクターに置き換えることができます。
具体的には、人型の全体がフレーム内に収まるように撮影し、特に手や足、頭部などの特徴的な部分ははっきりと映すようにしましょう。
また、被写体が暗い場所にいる場合や、背景と被写体の色が似ている場合などは、被写体がはっきりと映らない可能性があるため、ライティングや背景の調整も重要です。
人型がはっきりと映っていないと、後でBlenderで手動で編集する必要があります。これは、特に複雑なポーズや動きをしている場合、手間のかかる作業になってきます。
そのため、撮影時には被写体がはっきりと映るように服装、背景等に注意し、必要に応じてライティングや背景を調整すると良いでしょう。
Flow Studioの使い方
前述のテクニックでFlow Studioで扱いやすい素材を撮影できたら、実際に編集作業を進めていきます。
アクターをCGキャラクターに置き換える際、細かい設定などもあるのでぜひ覚えておきましょう。
Step1:新しいプロジェクトを作成

まずはじめに、新しいプロジェクトを作成します。Flow Studioのダッシュボードにログインしたら、「Create New Project (新しいプロジェクト)」ボタンをクリックします。
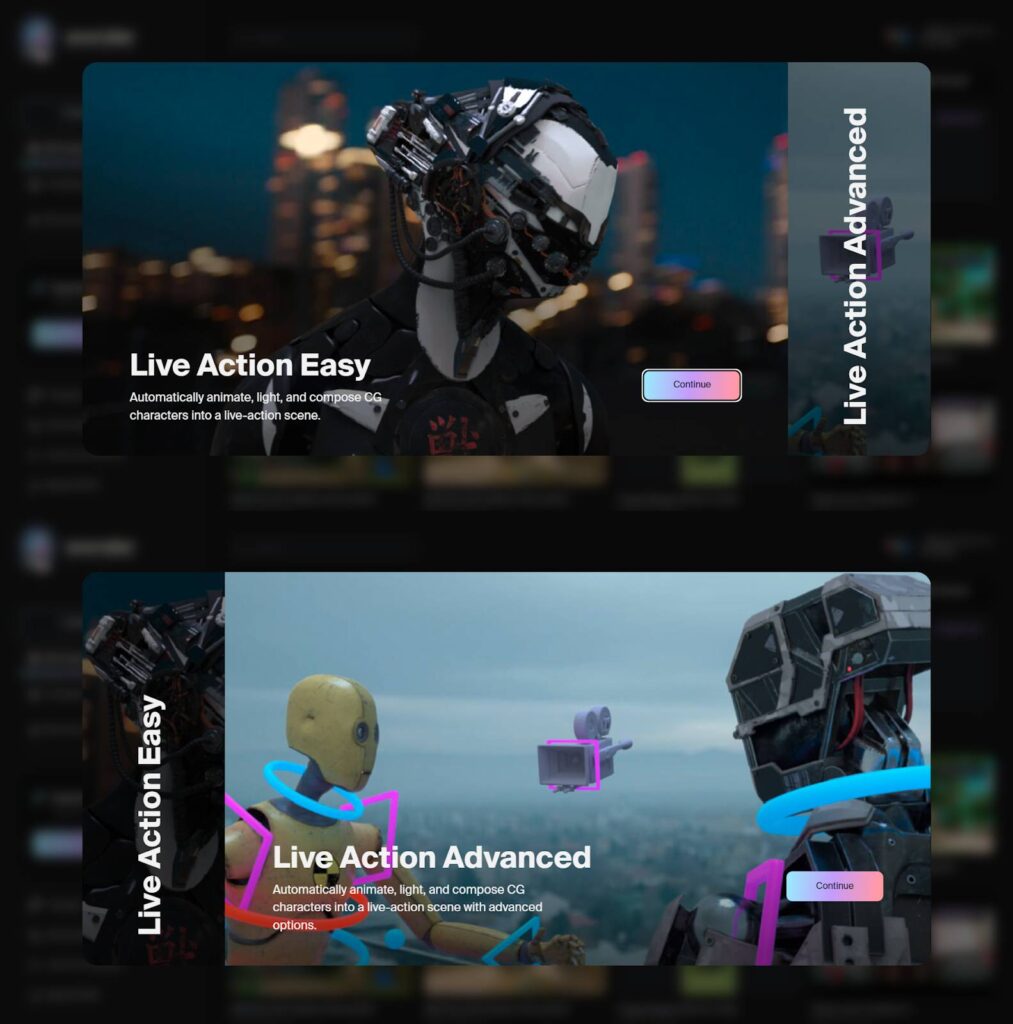
次のステップは非常に重要です。Live Action EasyおよびLive Action Advancedのどちらかの方法を選ぶことができます。
- Live Action Easy:自動的にモーションキャプチャ、トラッキングから合成までを行う
- Live Action Advanced:キャラクターのスケールや置き換えの方法等のオプションを選択してモーションキャプチャ、トラッキングから合成までを行う
Team HENSHINでは、より柔軟に置き換えできる、Live Action Advancedをお勧めしております。
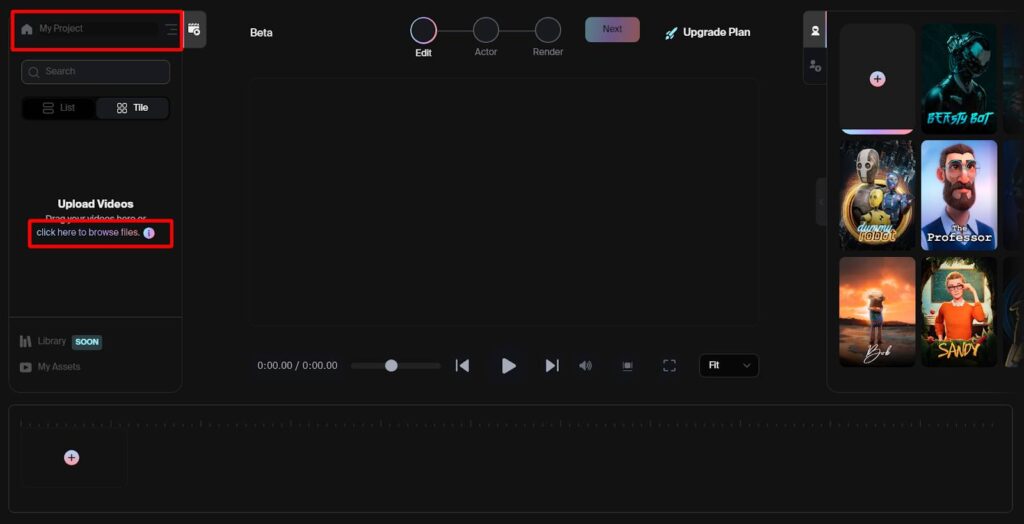
次にプロジェクト名を決めて、キャラクターを合成したいファイルをドラッグアンドドロップ、もしくはClick here to browse filesを選択してアップロードしましょう。これで、制作の準備が整います。
Step2:CGキャラに置き換えるアクターを選択する
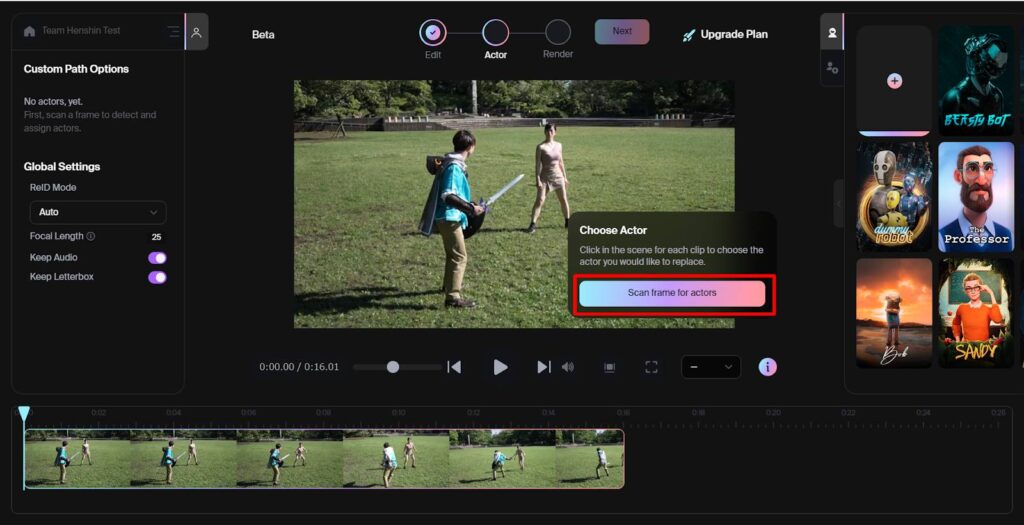
まずは、「Scan frame for actors」を選択し、アクターを解析しましょう。これにより、Flow Studioが動画内の人物を自動で解析し、選択できるようになります。
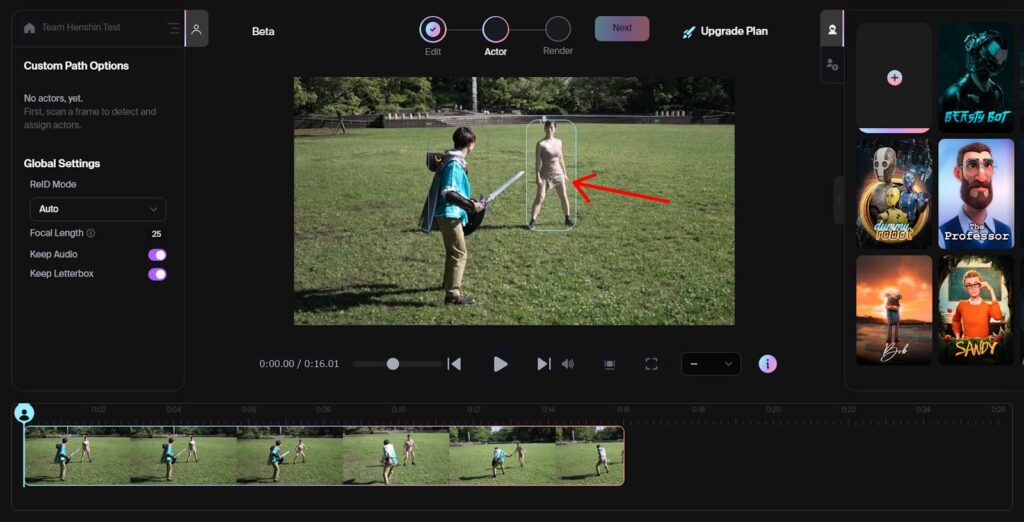
次に、CGキャラクターに置き換えるためのアクターを選択します。これは、実写映像の中からCGキャラクターに変換したい人物を指定する作業です。
複数人のアクター選択
Flow Studioでは、一つの映像から複数のアクターを選択し、それぞれを異なるCGキャラクターに置き換えることも可能です。
ただし、複数のアクターを選択する場合は、それぞれのアクターがはっきりと映っていること、またアクター同士が重なっていない方が望ましいです。これは、AIが正確にアクターの動きを解析し、それぞれを異なるCGキャラクターに置き換えるためです。
そのため、格闘シーンなどはFlow Studioで出力したデータをBlenderで後から編集する作業が必要になります。
Step3:CGキャラを選択してレンダリングする
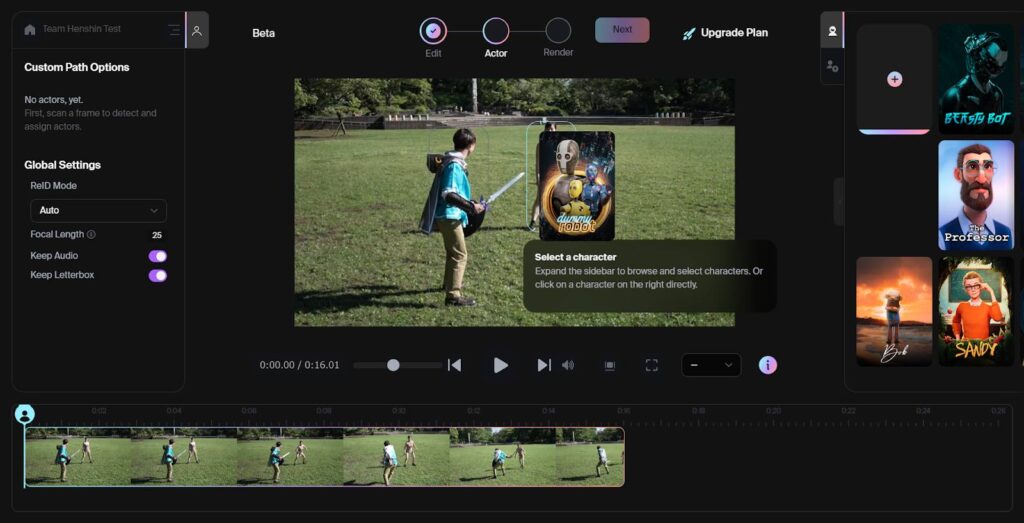
アクターの選択が完了したら、次にCGキャラクターを選択します。Flow Studioでは、あらかじめ用意されたライブラリからキャラクターを選択することができます。また、自分で作成したカスタムキャラクターをアップロードして使用することも可能です。
アクターを選択すると、Select a characterになります。
表示されたキャラクターライブラリから、使用したいキャラクターを選択してドラッグ&ドロップ。または、「My Characters」から、自分で作成したキャラクターを選択してドラッグ&ドロップします。
キャラクターの選択が完了したら「Next」ボタンをクリック。これにより、選択したアクターがCGキャラクターに置き換えられ、レンダリングが開始されます。
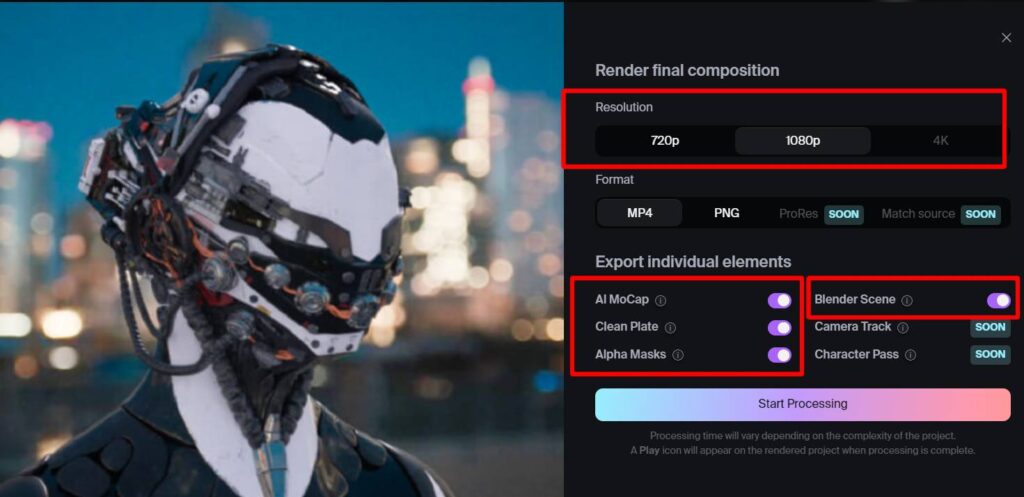
この時、Resolution (画質)をなるべく高画質に設定することと、各素材の出力 (Export indivisual elements) をONにしておくことを忘れないようにしましょう。
また、この時に書き出したい形式をONにしておかないと、その形式で書き出せないので注意しましょう。
キャラのスケール・アライメントの調整
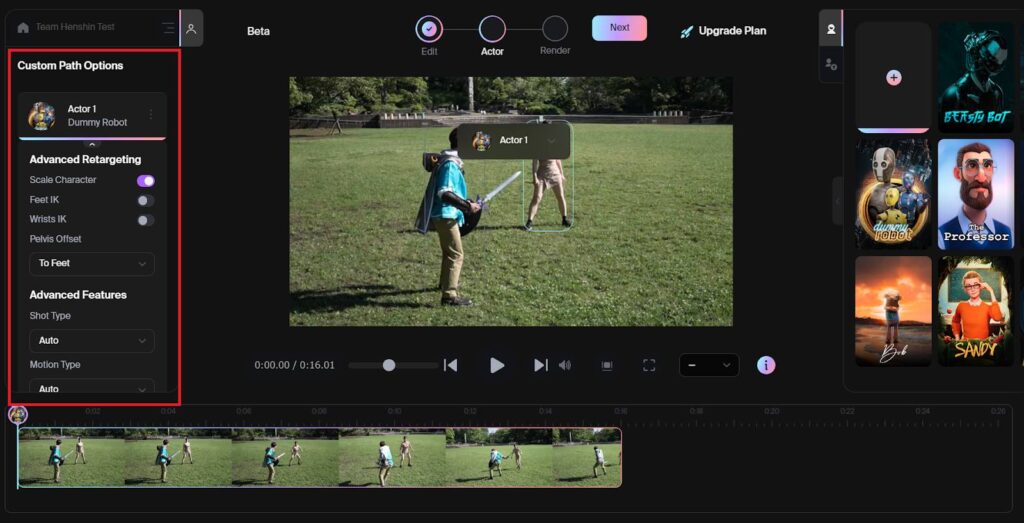
キャラクターを選択した後、そのスケール(大きさ)やアライメント(位置・向き)を調整することができます。これにより、キャラクターが自然に映像に合うように調整することが可能です。
キャラクターを選択した後、画面上の「スケール・アライメントを調整」ボタンをクリック
スライダーや入力ボックスを使用して、キャラクターの大きさや位置、向きを調整
具体的な調整オプションとしては以下のようなものがあります。
Scale Character
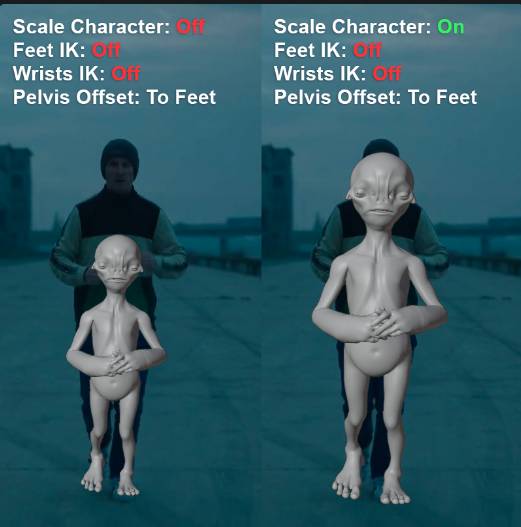
このオプションを使用すると、選択したCGキャラクターのスケールを、置き換える対象となるアクターのサイズに合わせることができます。
Feet IK / Wrists IK
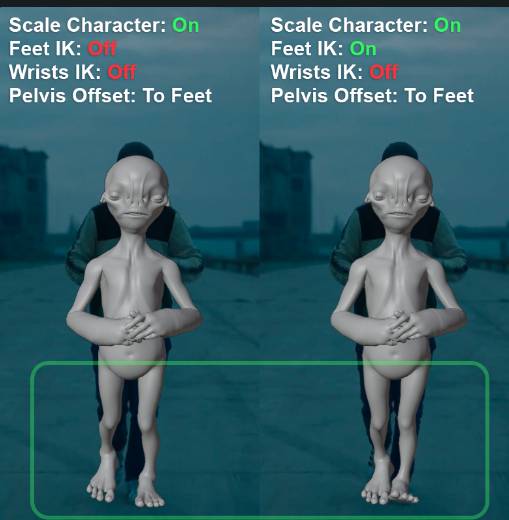
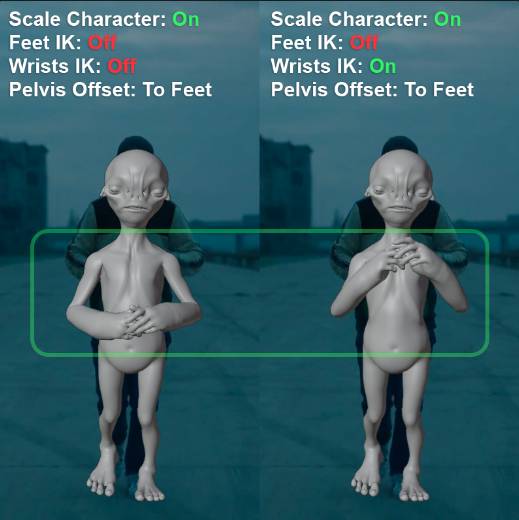
Feet Inverse Kinematics や Wrists Inverse Kinematics を有効にすると、キャラクターの足や手首がアクターのそれと一致するように調整されます。これは、キャラクターとアクターの体系が異なる場合や、キャラクターの足や手首の位置に正確に配置したい場合に有効です。
Pelvis Offset
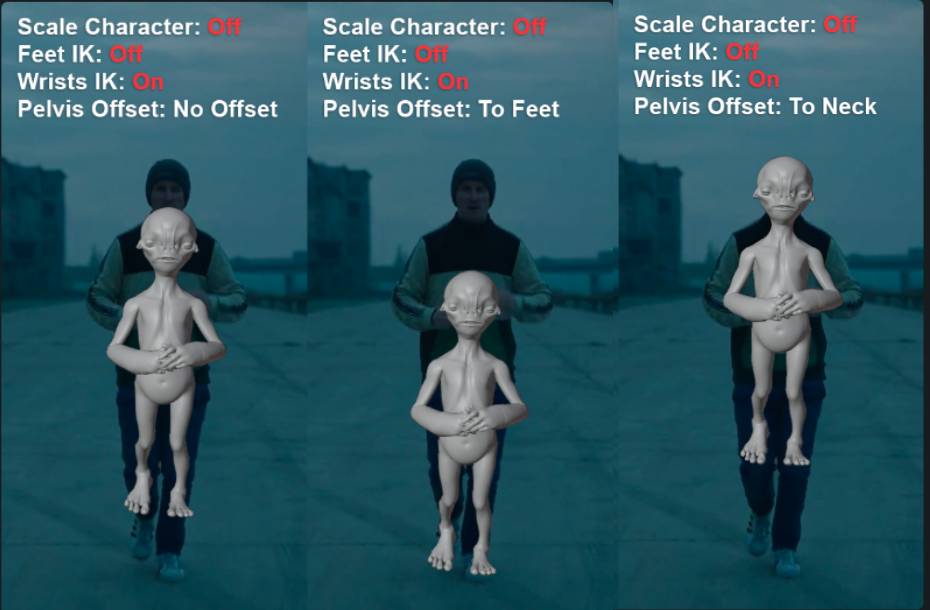
Pelvis Offset を使用すると、キャラクター全体を移動させてより自分の好ましい位置に配置することができます。これらの操作により、CGキャラクターが自然に映像に合うように調整することができます。これにより、よりリアルな映像制作が可能になります。
Step4:出力結果のダウンロード
レンダリングが完了したら、出力結果をダウンロードします。Flow Studioでは、以下のような様々な形式で出力結果をダウンロードすることができます。
プロジェクトが完了したら「My Projects」ページに移動。完了したプロジェクトは「In Progress」セクションに表示され、一度表示すると「My Projects」セクションに移動する
プロジェクトをクリックすると、ビデオを表示し、レンダリング設定で有効にした要素をエクスポートするウィンドウが開く。エクスポートしたい要素をクリックしてダウンロード。
各3Dソフトのデータ取得
Flow Studioでは、主要3Dソフトで読み込めるデータでエクスポートできます。対応しているソフトは下記です。
- Blender
- Maya
- Unreal Engine
- USD
なお、どの書き出し形式が利用できるかは登録しているサブスクリプションのプランによって変わります。Blender、Mayaはフリープランでも可能です。Unreal EngineはLiteプラン以上のプランで書き出し可能です。USDはStandard以上のプランで書き出し可能です。
どのプランでどの書き出し形式が可能なのかは下記の記事で解説しているので、こちも併せて御覧ください。

モーションキャプチャーデータの取得
モーションキャプチャーデータは、アクターの動きを捉えたデータをエクスポートすることができます。これにより、他のCGキャラクターに同じ動きを適用したり、動きを詳細に分析したりすることが可能になります。
アルファマスクの取得
アルファマスクは、CGキャラクターと背景を分離するためのマスクデータをエクスポートすることができます。これにより、後処理でCGキャラクターと背景を別々に編集したり、CGキャラクターを他の映像に合成したりすることが可能になります。
PNG画像の取得
PNG画像は、レンダリングしたキャラクターの動きを1枚1枚の画像の形式で書き出すことが可能です。
キャラクターパスの取得
キャラクターパスは、背景透過でレンダリングしたキャラクターのアニメーションをダウンロードできます。後からカラーやライティングの変更を行いたい場合などには最適です。
カメラトラッキングデータの取得
3D空間でカメラの位置と焦点距離を自動で一致させたトラッキングデータをダウンロードできます。手動でやると細かい部分で手間取ったりするため、非常に便利だと言えるでしょう。
人を取り除いた動画(空舞台)の取得
人を取り除いた動画(空舞台)は、アクターを取り除いた映像をエクスポートすることができます。これにより、他の映像素材と組み合わせたりすることが可能になります。
Flow Studioに関するよくある質問
Flow Studioを使用して映像制作を行う際に、ユーザーからよく寄せられる質問とその解決策を以下にまとめました。
キャラをアップロードしても読み込みに失敗します
キャラクターをアップロードする際に読み込みに失敗する場合、ファイル形式やサイズ、キャラクターの構造などが原因である可能性があります。
Flow Studioがサポートしているファイル形式とサイズを確認し、それに合わせてキャラクターをアップロードしてみてください。
また、キャラクターの構造が複雑すぎる場合も読み込みに失敗することがありますので、必要に応じてキャラクターの構造を簡略化してみてください。
詳しくはこちらの記事をご覧ください。

-320x180.webp)
途中でCGキャラが消えてしまいます
CGキャラクターが途中で消えてしまう場合、アクターの動きが急すぎるか、カメラの視野からアクターが消えてしまっている可能性があります。アクターの動きをスムーズにするか、カメラの視野にアクターが常に入るように撮影しましょう。
また、アクターを選択してキャラクターを反映するポイントを増やすのも手です。アクターの動きが変わるタイミングで指定すると良いでしょう。
どうしても途中で消えてしまう場合は、Blenderファイルで出力した後に手動で調整することが必要です。
キャラが背景に馴染んでいません
キャラクターが背景に馴染まない場合、Flow Studio内でのライティングや合成がうまくいっていない可能性が高いです。Blender fileを書き出し、ライティング等を見直して再度レンダリングしてください。
更に人を取り除いた空舞台の映像をダウンロードして、AfterEffectsなどの合成ツールを用いて、Blenderで書き出したキャラクターを合成してください。
キャラが何かを持っているような映像にしたいです
アクターに何かを持たせて撮影すると、その部分まで消えてしまったり、キャラクターの前腕にくっついてたりなど上手くいかない場合が多いです。
モデルにアイテムをもたせるようにすると、持っている状態で動画が完成します。ただし、アイテムは動かないので注意が必要です。
確実なのは、Blenderのデータで書き出して、そこにアイテムを追加するやり方が最適だと言えるでしょう。
Flow Studioでの動画制作にお困りの方へ
Flow Studioでの動画制作に関して、何か問題や困難に直面している場合は、私たちTeam HENSHINがサポートいたします。私たちはFlow Studio公式ではありませんが、ツールの理解を深めるべく、情報収集や様々なテストに励んでいます。
モデルの追加やFlow Studio上での設定、Flow Studioの効果的な使用方法のアドバイスなど、幅広くサポートいたします。
Flow Studio以外でも、VFXやCGに関するサポートも可能です。
下記の実績をご覧いただき、お困りごとがあればお気軽にご連絡ください。
Flow Studioの効果を最大限高めよう!
この記事では、Flow Studioの使い方と、その効果を最大限に引き出すためのテクニックを詳しく解説しました。Flow Studioは、実写映像にCGキャラクターを簡単に合成できる強力なツールです。しかし、その機能を最大限に活用するためには、適切な素材の撮影方法、キャラクターの選択と調整、そして出力結果の適切な利用が重要です。
また、Flow Studioを使用する際に遭遇する可能性のある問題についても触れました。これらの問題は、適切な手順と注意点を理解することで解決可能です。そして、何か問題に直面した場合でも、私たちTeam HENSHINが全力でサポートします。
Flow Studioは、映像制作の新たな可能性を開くツールです。その機能を理解し、適切に活用することで、あなたの映像制作は新たな次元へと進化します。今回学んだ知識を活用し、Flow Studioの効果を最大限に高めてください。


