VFXとは?CGとの違いや映像制作における特徴、学び方について解説
ryo
HENSHIN Lab


映像制作業界においてCGキャラクターを実写の人物に置き換えることが可能なAIツール「Flow Studio」。そんな革新的なツールであるFlow Studioでは、オリジナルキャラクターを作成し、それを実写映像に組み込むことが可能になります。しかし、Flow Studioに対応したキャラクターモデルの制作が意外と難しいものです。
この記事では、Flow Studioで使えるキャラクターモデルの制作方法や、実際に追加する方法について解説しています。そして、もし制作過程で困難に直面した場合でも、私たちTeam HENSHINがあなたのサポートをします。
Flow Studioを最大限に活用したいと考えている方は、ぜひ参考にしてみてください。
CGキャラクターを人物と置換して、誰でも簡単に実写合成のCG動画が制作が可能なFlow Studio。
そんなFlow Studioでは、最初からいくつかのキャラクターモデルが用意されていますが、オリジナルのキャラクターモデルを追加して使用することが可能です。これにより、従来の制作工程を短縮して映像制作が可能です。
ここではモデルの追加方法について詳しく解説していますが、そもそもFlow Studioがどのようなものか、どのように使うのかという内容については下記の記事をご覧ください。

Flow Studioでは、オリジナルのキャラクターモデルを追加して使用することが可能ですが、その際には以下の条件を満たす必要があります。
なお、ご紹介している条件は2023年7月の条件となっています。今後対応できる形式や柔軟性も増えていく可能性があります。
Flow Studioの公式ガイドラインではキャラクターモデルに関して、下記の制限があります。
最大サイズは500MBで、必要なファイル数は1つです。サポートされているファイル形式は.blendまたは.fbxです。
全テクスチャファイルの合計サイズは2GBで、テクスチャファイルの最大数は200、最小数は1です。サポートされているファイル形式は.png、.jpg、.jpeg、.tiff、.tif、.exrです。
Mayaで作成されたキャラクターにのみ必要です(Blender使用時は必要ありません)。このファイルはMayaキャラクターエクスポートスクリプトによって自動的に生成されます。必要なファイル形式は.jsonです。
また、以下の要件も満たす必要があります。
これらの制限は、Flow Studioのプラットフォームでキャラクターが正しく動作するために必要なものです。要件を抑えて、正しく動作するモデルを制作して追加するようにしましょう。
Flow Studioは、主に人型(二足歩行)のモデルに対応しています。これは、モデルが人間の動きを再現するためのボーン構造を持っていることが前提となるためです。
四足歩行の動物や、人間とは大きく形状が異なるキャラクターは、基本的には対応していません。
また、人形であっても、腕が伸びたりするようなモーションはFlow Studio上では再現できません。ただし、Blenderファイルで出力して手動でモーションを加える事は可能です。したがって、基本の動きをFlow Studioで作成し、Blenderで細かいモーションを作成する事で対応できます。
これが現在、最も重要な技術的条件です。 公式アドオン「Flow Studio Character Validation」に含まれるチェック機能をクリアする必要があります。
具体的には以下の点がチェックされます。
Flow Studioは、基本的に人間の体型を基にしたモデルに対応しています。そのため、人間には存在しない尻尾や触手、翼などの部位は対応していません。ただし、動きが着かないだけでモデルにボーンやウェイトを組み込むことはできます。
したがって、こちらもBlenderファイルで出力して手動でモーションを加える事で対応可能です。
Flow Studioでは、実際のアクターの動きをキャプチャして、それをモデルに適用するとで動きを再現します。そのため、アクターとモデルの体型が大きく異なる場合に、どのように3Dモデルにモーションを適用するかを選べるようになっています。
Scale CharacterをOFFに設定する事で、モデルの大きさをそのまま使用してモーションを適用することが可能です。
Scale CharacterをONに設定する事で、モデルの大きさをアクターの大きさに合わせて自動調整できます。

ここで重要なのが、モデリングをするときにはなるべくそのモデルの設定通りの大きさに沿って作成する事です。それにより、Flow Studio内で使用するときに適切な大きさになります。
書き出す際の詳細な設定については、下記の記事で解説しているので、こちらも併せて御覧ください。

Flow Studioでオリジナルキャラクターを作成し、それをプラットフォームで使用するためには、特定のスキルが必要となります。以下に、その主なスキルを示します。
Sketchfab等からダウンロードしたモデルを使うにしても、自分で作成したモデルを使うにしても、一通りのキャラクターモデリングの知識があったほうがスムーズです。
下記はTeam HENSHINのYouTubeで解説しているリギング入門講座です。まずはここからリギングについて学んでみてください。
Flow Studioにモデルを入れる際、最も重要なスキルです。リギングは、3Dモデリングにおける重要なステップであり、キャラクターに動きをつけるための骨格(ボーン)を入れて、スキンにウェイティングを設定する作業を指します。
Flow Studioでは、特定の命名規則に従ったボーン構造を持つモデルが要求されます。
そのため、リギングの基本的な知識と、ボーンの設定や命名、スキニング(ボーンとメッシュの関連付け)などの技術が必要となります。
Flow Studioの公式ガイドラインや、多くの3Dモデリングツール、リギングツールは英語で提供されています。また、多くのチュートリアルやフォーラムも英語で書かれています。
そのため、これらの情報を理解し、問題を解決するためには、英語を読み解くスキルが必要となります。
翻訳ソフトを使って対処することも可能ですが、翻訳に時間がかかったり、不自然な翻訳から理解するのに時間がかかることも多いです。
ここからは、実際にFlow Studioにオリジナルキャラクターを追加する方法を解説していきます。
また、ここで解説しているのは、完成したモデルをWeb上のFlow Studioにアップする方法です。
アドオンを用いてモデルを制作して、そこから直接アップロードすることもできます。こちらについては後述します。
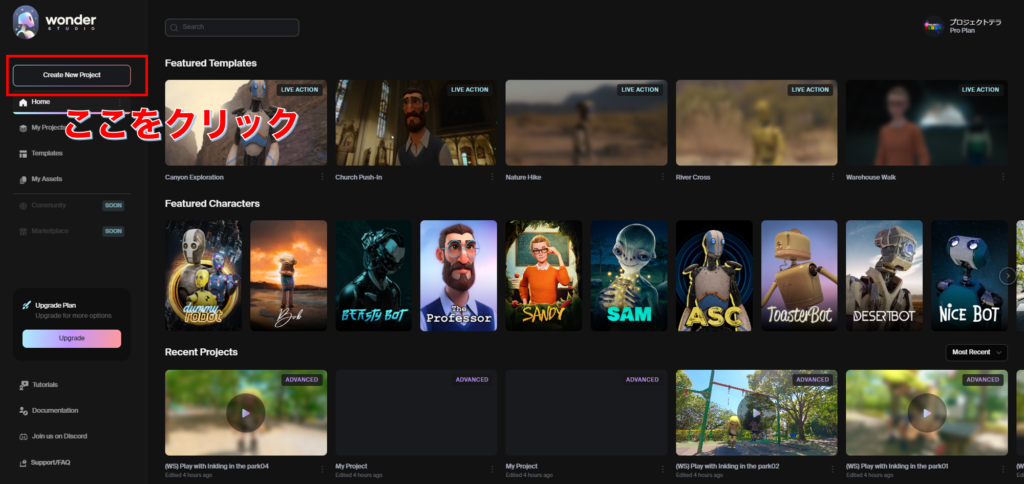
まず、Flow Studioのウェブサイトにアクセスし、左上の「Create New Project」をクリックします。
その後、「Continue」をクリックして新しいプロジェクトを作成します。
次に、元となる動画を指定します。画面上の「click here to browse files」を選択し、中央のエリアに動画ファイルをドラッグ&ドロップします。
プロジェクトを作成して動画を配置できたら、「Scan frame for actors」を選択し、CGキャラクターに置き換えたい人物を選択します。
一度に置き換えられる人物の数はプランによって異なります。各プランの比較について、詳細は下記をご覧ください。
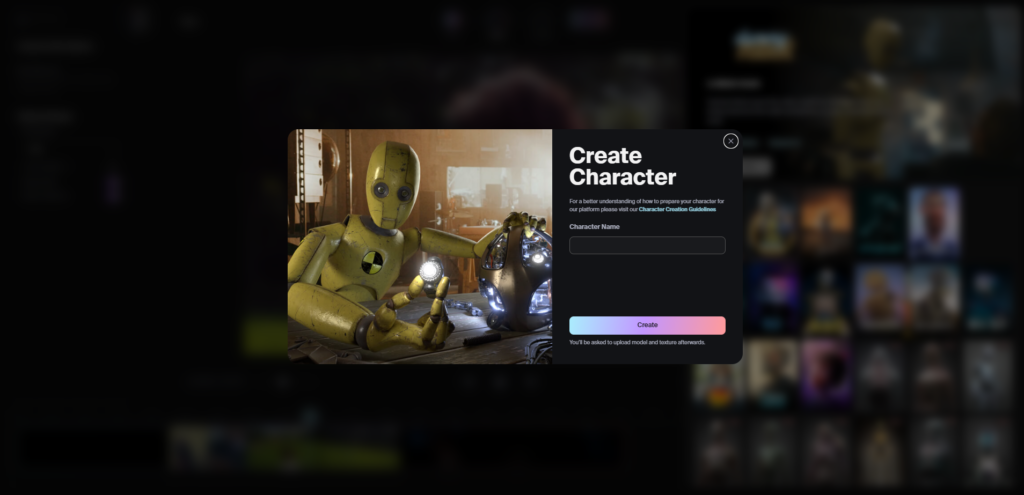
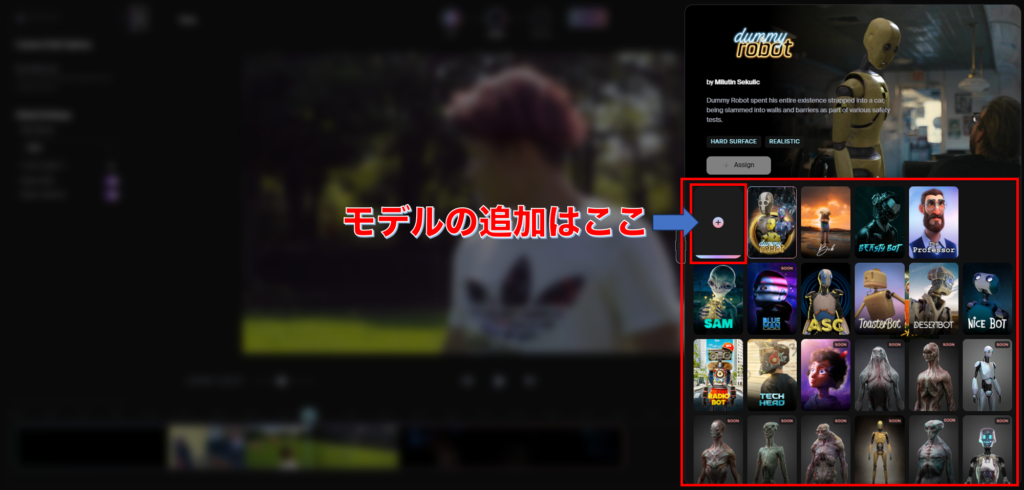
最後に、「My Characters」タブを選択し、「+」をクリックします。
アバターの名前を入力したら、「Create」をクリックします。
その後、「Mode & Textures」でオリジナルの3DCGキャラクターを指定します。ここで指定するキャラクターは、BlenderやMayaなどの3Dモデリングソフトウェアで作成し、Blenderファイル、またはFBX形式でエクスポートしたものを使用します。
以上の手順を踏むことで、Flow Studioにオリジナルキャラクターを追加することができます。
キャラクターモデルの作成は、モデリングとリギングの作業が必須になります。加えて、従来はFlow Studioが認識するために、命名規則に則った名称変更が必要でした。現在はアドオンでほぼ自動的に調整できるようになりました。
なお、アドオンはBlenderとMayaに対応しています。今回の解説はBlenderで調整する方法について解説していきます。
また、テキストでは分かりづらい部分もあるでしょう。Team HENSHINではYouTubeで簡単なチュートリアル動画も公開しているので、こちらを見ながら進めていってください。
※ チュートリアル動画準備中 ※
キャラクターモデリングとは、3Dキャラクターを作成するためのプロセスです。具体的には、キャラクターの形状、体型、顔の特徴などを詳細に設計し、物理的に形状を作り出します。これは、キャラクターの見た目や動きを決定する基礎となるステップであり、キャラクターの個性や特性を表現するためには、このモデリングプロセスが非常に重要となります。
キャラクターモデリングを進める際には、まずキャラクターの基本的な形状を作り出す「ベースメッシュ」の作成から始めます。ベースメッシュは、キャラクターの大まかな形状を定義する3Dモデルで、これを基に詳細な形状を作り出します。
ベースメッシュが完成したら、その上に詳細なテクスチャや色を追加し、キャラクターに色を与えます。このプロセスは時間と労力を要しますが、ここで作り出されたモデルがその後のリギングやアニメーションの基礎となるため、丁寧に作業を進めることが重要です。
また、キャラクターモデリングでは、キャラクターの動きや表情を自然に見せるために、トポロジー(メッシュの構造)にも注意を払う必要があります。適切なトポロジーを持つモデルは、リギングやアニメーションが容易になり、よりリアルな動きを表現することができます。
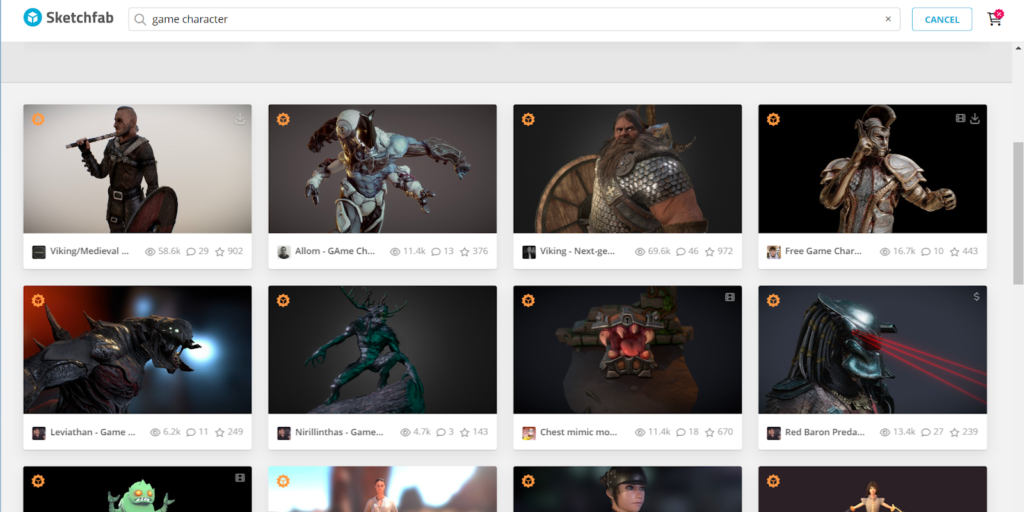
Sketchfabは、世界中のクリエイターが自分の3Dモデルをアップロードし、他のユーザーと共有することができるコミュニティです。ここでは、様々なスタイルやテクニックが用いられた3Dモデルが公開されており、これらを参考にすることで、自分自身のモデリングスキルを向上させることができます。
また、Sketchfabでは一部のモデルが無料でダウンロード可能となっており、これらをベースに自分のキャラクターを作り出すことも可能です。ただし、他人の作品を使用する際には、ライセンス条件を確認し、適切に使用することが重要です。
※具体的には、skechfabのCreative Commons を参考にて下さい。
必要に応じてSketchfabを活用してモデルを用意するのも有効でしょう。
リギングとは、3Dキャラクターモデルに動きをつけるためのプロセスです。具体的には、キャラクターの骨格(ボーン)を作成し、それに肌(スキン)を張り付ける作業を行います。このプロセスにより、キャラクターは動きを制御するための「骨組み」を持つことになり、アニメーションで動かすことが可能となります。
リギングのプロセスは、主に以下のステップで行われます。
まず、キャラクターモデルにボーンを追加します。ボーンはキャラクターの骨格を表し、キャラクターの各部位の動きを制御するものです。ボーンは、キャラクターの体型や動きに応じて適切に配置し、サイズを調整します。
ボーンが配置されたら、次にスキニングを行います。スキニングとは、ボーンとメッシュ(キャラクターの肌)を関連付ける作業です。これにより、ボーンの動きに合わせてメッシュも動くようになります。
スキニングが完了したら、ウェイトペインティングを行います。ウェイトペインティングとは、各ボーンがメッシュのどの部分をどの程度制御するかを定義する作業です。これにより、キャラクターの動きが自然に見えるようになります。
Blenderはリギングのための強力なツールセットを提供しており、ボーンの作成からスキニング、ウェイトペインティングまで、一連のリギング作業を効率的に行うことができます。
リギングは、キャラクターが自然な動きをするための基礎となる作業です。このステップを丁寧に行うことで、キャラクターはリアルな動きを表現することが可能となり、視覚的な魅力を高めることができます。
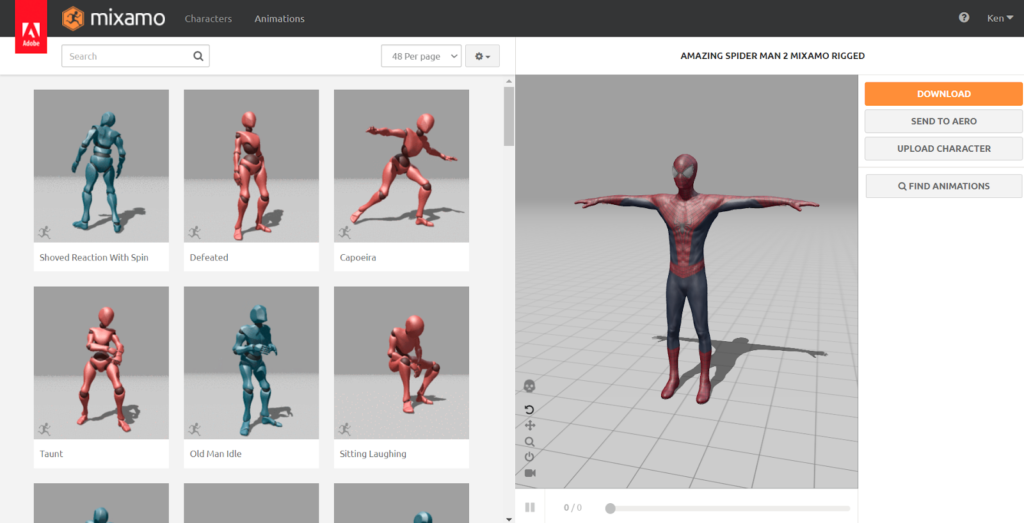
「mixamo」はAdobeが提供する3Dキャラクターのアニメーションサービスで、自動リギング機能を持っています。ユーザーは自分の3Dモデルをアップロードするだけで、mixamoが自動的にボーンを生成し、リギングを行います。
また、mixamoには多数のプリセットアニメーションが用意されており、これらを自分のモデルに適用することで、簡単にアニメーションを作成することができます。
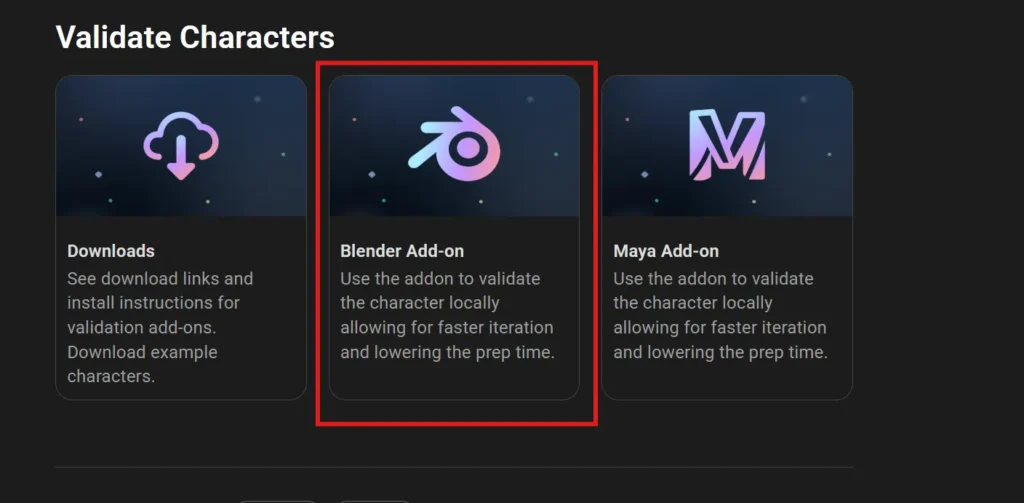
まず、Flow Studio公式サイトのヘルプページからアドオンを入手します。公式ヘルプページにアクセスし、ページ下部の「Blender Addon」をクリックします。「Download add-on here」ボタンからZIPファイル(wd-blender-tools-main.zip)をダウンロードします。
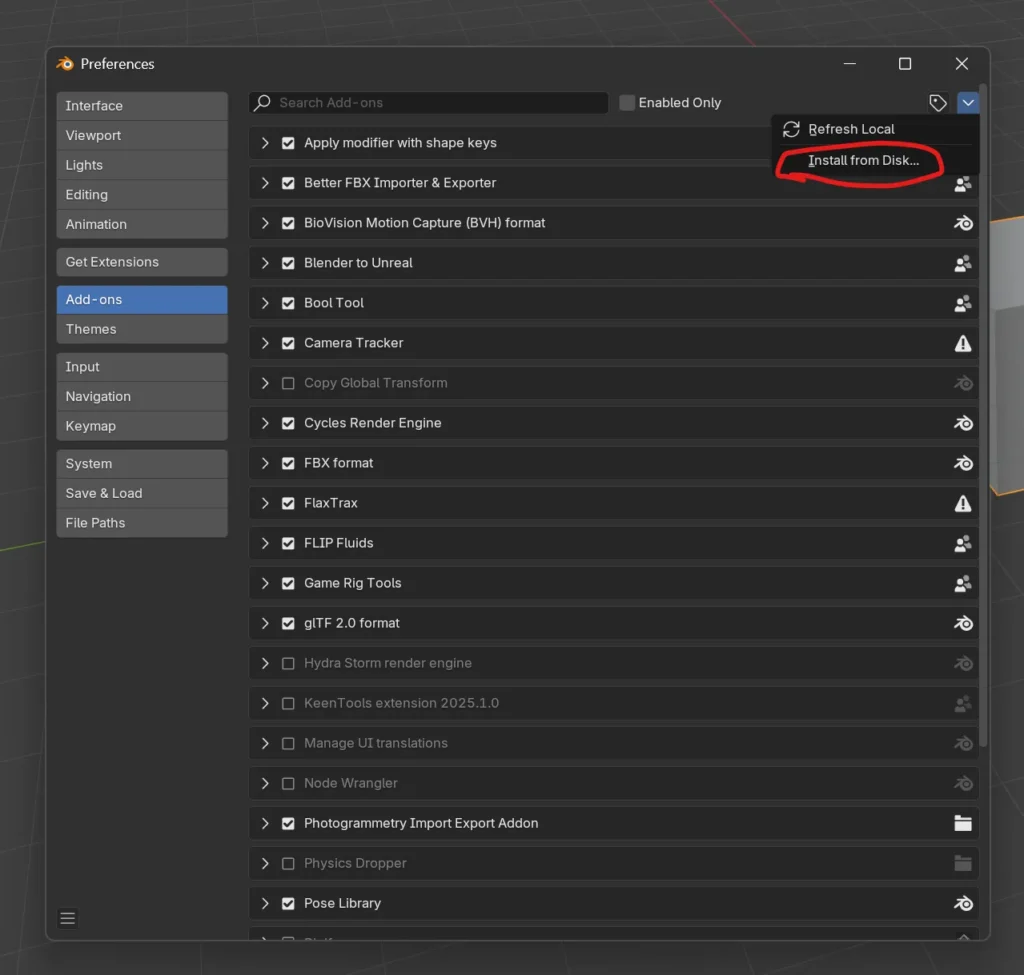
Blenderを開き、メニューの Edit > Preferences > Add-ons から「Install from Disk」を選択し、ダウンロードしたZIPファイルをインストールします。インストールが完了すると「Flow Studio Character Validation」という項目が追加されます。
アドオンのパネルを開き、リギング済みのキャラクターをFlow Studio用に紐づけます。
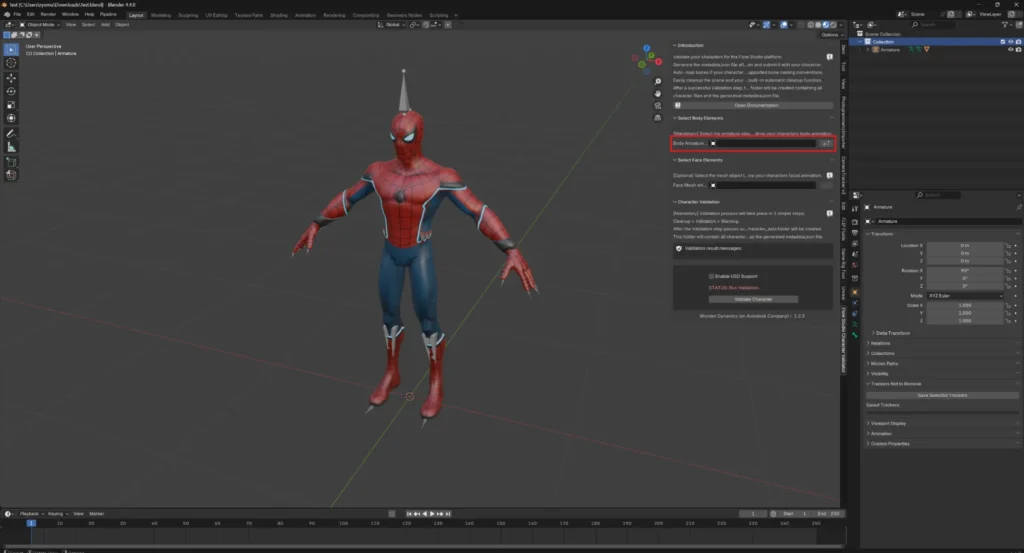
3Dビュー上のサイドバー(Nキー)から「Flow Studio」タブを開きます。対象となるキャラクターのアーマチュア(骨組み)を指定します。
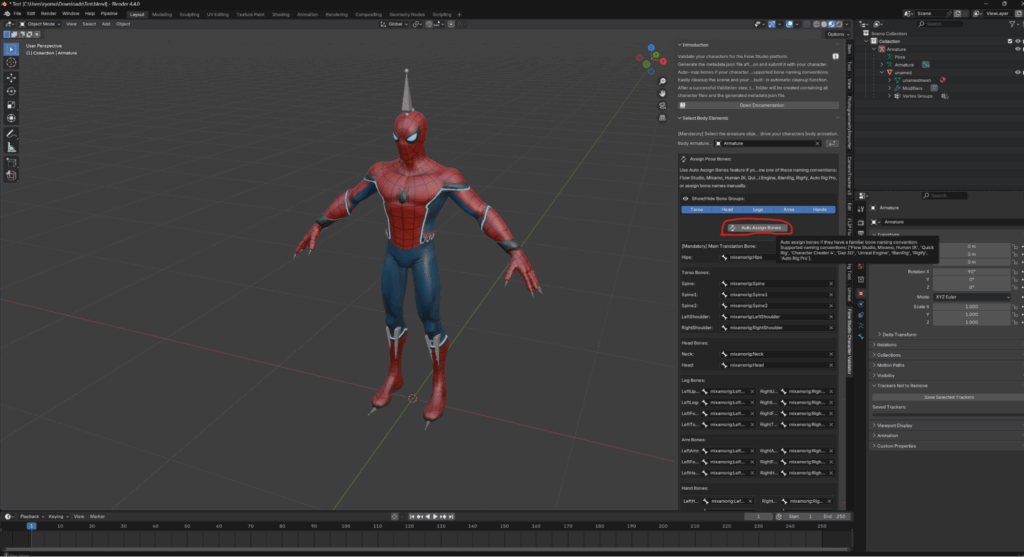
ボーンの一覧が表示されたら、「Auto Assign Bones」をクリックします。
一般的なボーン構造であれば自動的に割り当てられます。うまくいかない場合は手動で指定してください。
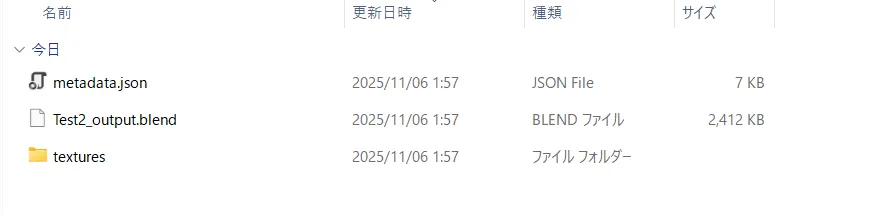
Blender fileが保存されているディレクトリに、json, blend, texturesのファイルができています。
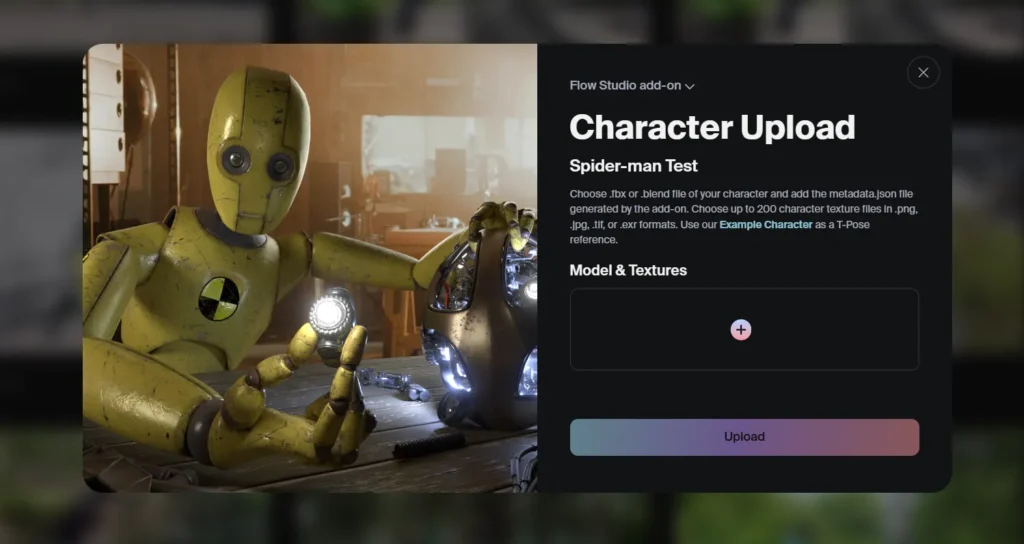
それら3つをFlow StudioのCharacter Uploadにドラッグ&ドロップしてモデルのアップロードは完了です。
実際に作業をしてみると、エラーが発生することもあります。今回は筆者が遭遇したエラーを参考に解決方法をご紹介します。
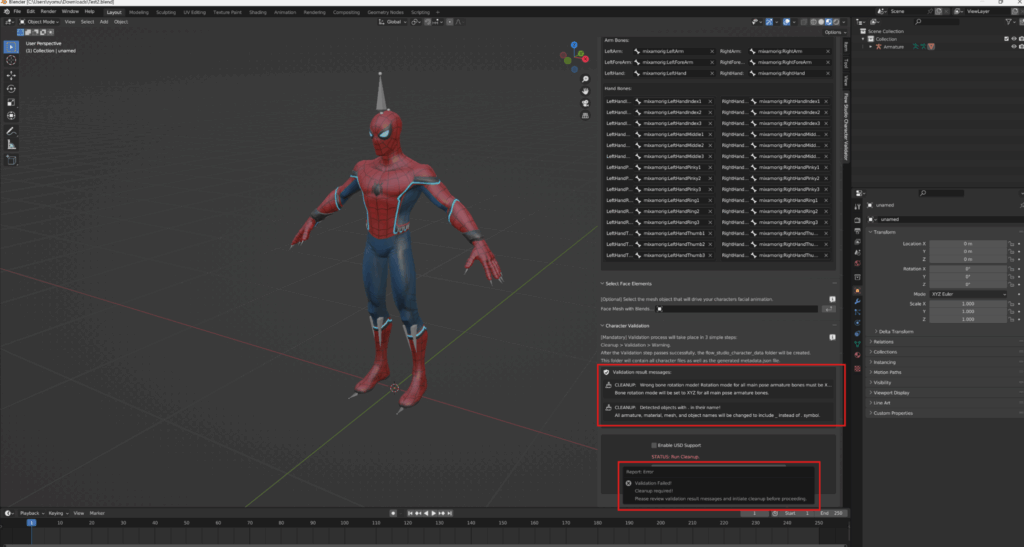
まず最初に発生したエラーは「Validation error」です。内容を見てみると次のとおりでした。
– Wrong bone rotation mode! (Boneの方向が間違っている!)
– Detected objects with . in their name! (オブジェクトに . を使わないで)
Clean up Characterをクリックしてエラーを自動で修正してもらいます。
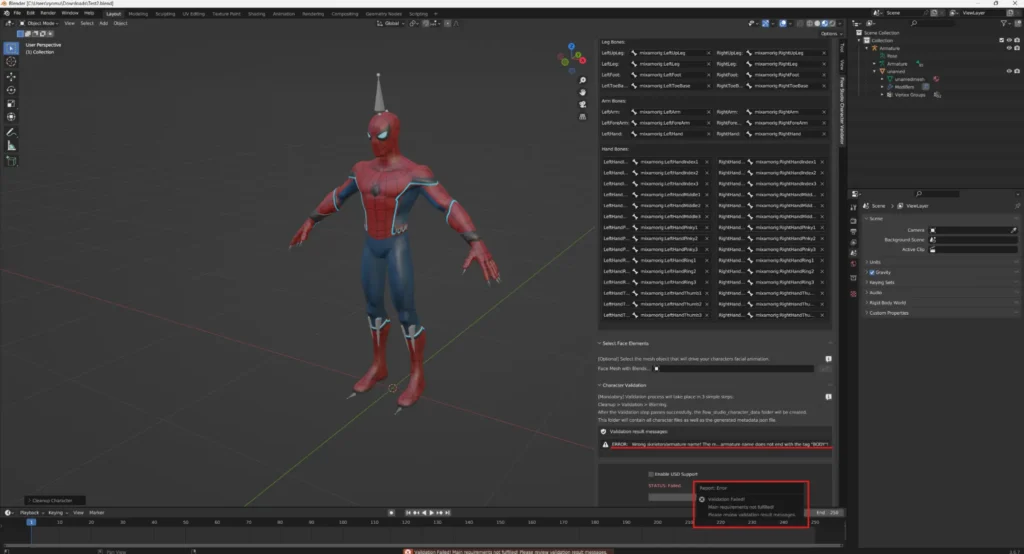
Clean Upが完了後、もう一度Validate Characterをクリックしましたが、またしてもエラーが発生しました。
Wrong skelton/Armature name …. “BODY”!
メッセージは上記で、Armatureに_BODYを入れる必要があるようです。そこで下記の画像のように名前をつけました。

これで再度Validate Characterを実行すると、StatusがPassed (合格)になっているので、これで完了です。
キャラクターモデルの追加方法や作り方については前述の通りですが、Flow Studioでモデルを追加する際にはいくつかの注意点があります。取り返しのつかない結果につながる場合もありますので、必ず把握しておくようにしましょう。
Flow Studioでは、プランによって追加できるオリジナルキャラクターモデルの数に制限が設けられています。
具体的には次の通りです。
このように制限があるため、どのモデルを優先するかなどを計画を立てて作業を進めていくことをおすすめします。
Flow Studioではプランによって書き出せる動画の秒数に制限が掛かっています。
具体的な制限は次の通りです。
なお、この制限は”完成した動画の秒数”であり、レンダリング(動画の出力)に関する時間ではありません。例えば、10秒の動画をFlow Studioにアップして処理させると、消費されるのは10秒です。その後、10回書き出しても100秒消費されるわけではありません。
Flow Studioでのキャラクターモデリングやリギング、さらには動画制作まで、一連のプロセスは複雑で、初めての方には難しく感じるかもしれません。そのような方向けに、私達Team HENSHINがサポートいたします。
Team HENSHINは、3DCG動画制作の専門家からなる経験豊富なチームです。Flow Studioのプラットフォームを最大限に活用できるよう、日々研鑽に励んでいます。Flow Studio公式ではありませんが、日本の映像制作業界を盛り上げるべく、お困りの方にTeam HENSHINの知見や様々なサポートの提供が可能です。
具体的には、Flow Studioで使えるモデルの制作や制作方法の指導、Flow Studioを活用した動画制作です。
Flow Studioがリリースされる前から実写合成動画を数多く制作してきたチームだからこそ、高品質なサービス提供が可能です。これまでの実績については、下記のページを御覧ください。
▶ AI制作 実績 | 3DCG・AIの動画制作なら『Team HENSHIN』
Flow Studioで使えるオリジナルキャラクターモデルの作成方法や、キャラクターモデルの追加方法について解説してきました。
キャラクターモデリングからリギング、そしてFlow Studioへの追加まで、一連のプロセスは複雑なものですが、それぞれのステップを理解し、適切なツールと技術を活用することで、あなた自身のオリジナルキャラクターをFlow Studioで動かすことが可能です。
Flow Studioでオリジナルキャラクターを用いて、感動的な実写動画を制作し、視聴者に強烈な印象を与えましょう。あなたの創造力と技術力を組み合わせて、未来の映像制作に革新をもたらしましょう。


.webp)


