Flow Studioの使い方のコツ!上手くできないときの対処法は?
ryo
HENSHIN Lab

Blenderは3DCG制作を主な用途とするpythonベースのソフトウェアです。3Dモデリング、スカルプトモデリング、ジオメトリモデリング、UV展開、テクスチャリング、レンダリングと様々な用途に使うことが可能です。
しかし、初心者の方にとってはどのように操作をすればよいかわからない、ショートカットキーを知らないという方も多いでしょう。
そこで、この記事ではBlenderの基本操作とその際に使用するショートカットキーをまとめています。ショートカットキーの早見表も用意しているので、ぜひ今後の制作活動にお役立てください。
Blenderのショートカット早見表になります。ダウンロードするなどしてご活用ください。


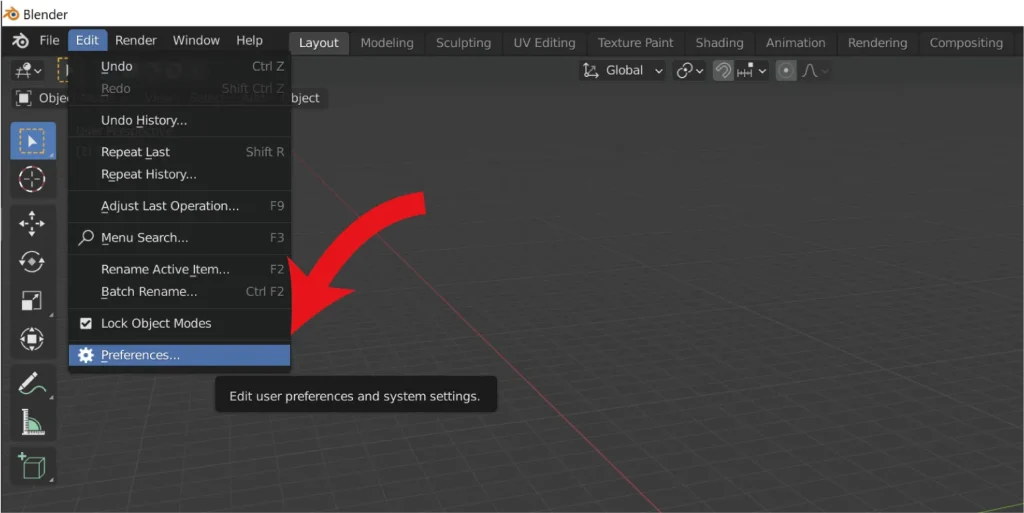
ここではBlenderを使う上で、最初に設定した方が使いやすくなる設定項目をご紹介します。Blenderの環境設定は”Editタブ”の”Prefrences”から行うことができます。
Blenderではデフォルトの英語以外にも日本語や中国語など多数の言語にも対応しています。本記事では日本語表記での解説となります。
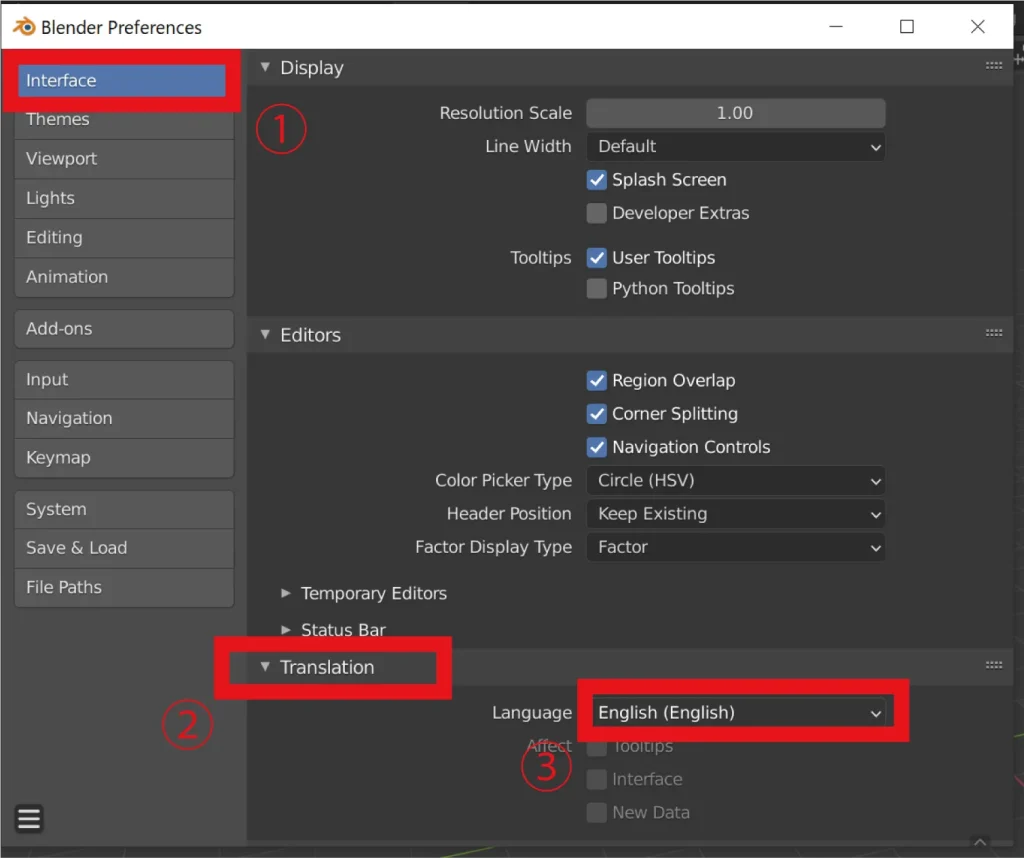
”Editタブ”から”Prefrences”を開いたら、”Interfaceタブ”の中の”Translation”という項目にある”Language”の横のタブをクリックしてみましょう。
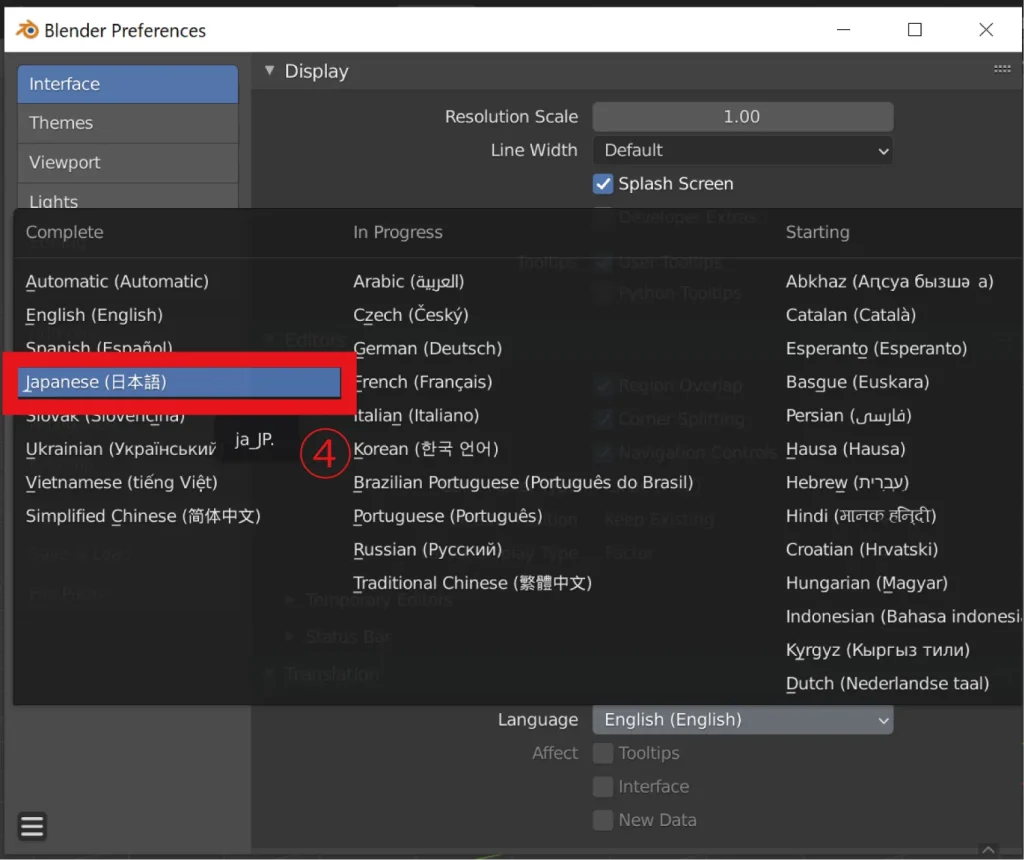
開いた画面から”Japanese(日本語)”を選択することで、全ての表示を日本語に変更することが可能です。
次に視点操作の設定について解説していきます。どの3D ソフトでも視点の操作は重要になるため、この辺の設定は自分のやりやすい設定やツールを使うと良いでしょう。
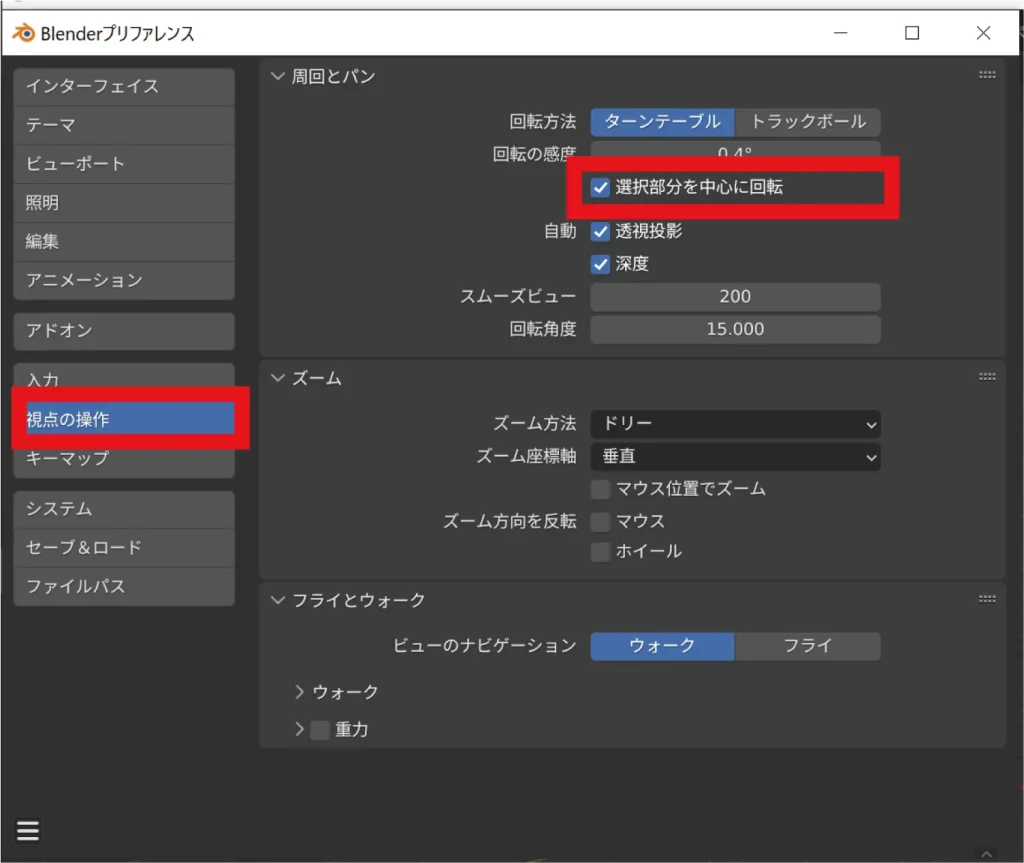
” 視点の操作” のタブにある”周囲とパン” の項目の” 選択部分を中心に回転” にチェックを入れてください。
この設定項目は、文字通り現在選択している部分を軸として、カメラや視点を動かすことができます。これにより3D 画面内で迷子になる確率がかなり減る便利な設定です。
ここからはBlenderの視点操作について、具体的に解説していきます。イラスト付きでわかりやすく解説していきますので、ぜひ参考にしてください。
なお、Blender の視点操作は、他の3D系のソフトとは操作感が多少異なります。設定から変えることも可能ですが、慣れてしまうと比較的楽な操作方法でもあります。ですので、初心者の方はデフォルトの設定で使うことをおすすめします。
まずはマウスを操作してできる視点操作のやり方です。
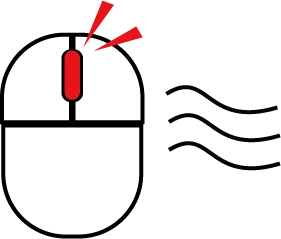
マウスのミドルクリック( マウスホイールクリック) でドラッグ。
クリックすると選んだポイントやオブジェクトを中心に、視点を動かすことが可能です。

マウスのミドルクリックホールド+SHIFT でドラッグ。
現在の向いてる方向から平行に、視点を動かすことが可能です。

マウスのマウスホイールでスクロール。
選んだポイントやオブジェクトを中心に、視点を近づけたり、遠のけたりすることができます。
マウスでの操作の方が直感的に作業が可能ですが、画面のインターフェースによる操作も可能です。
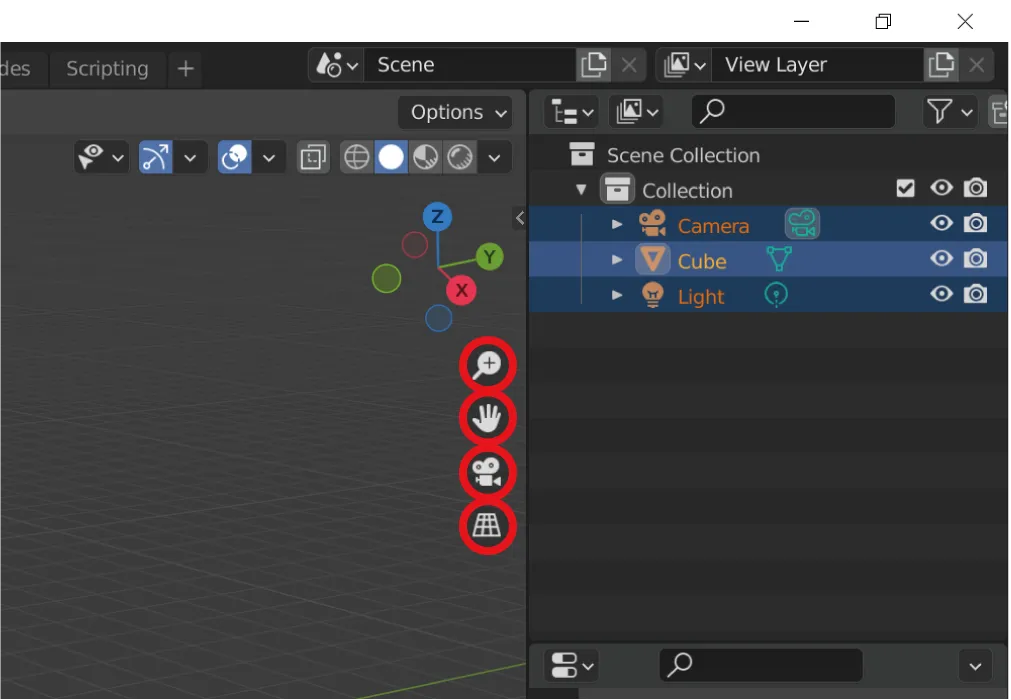
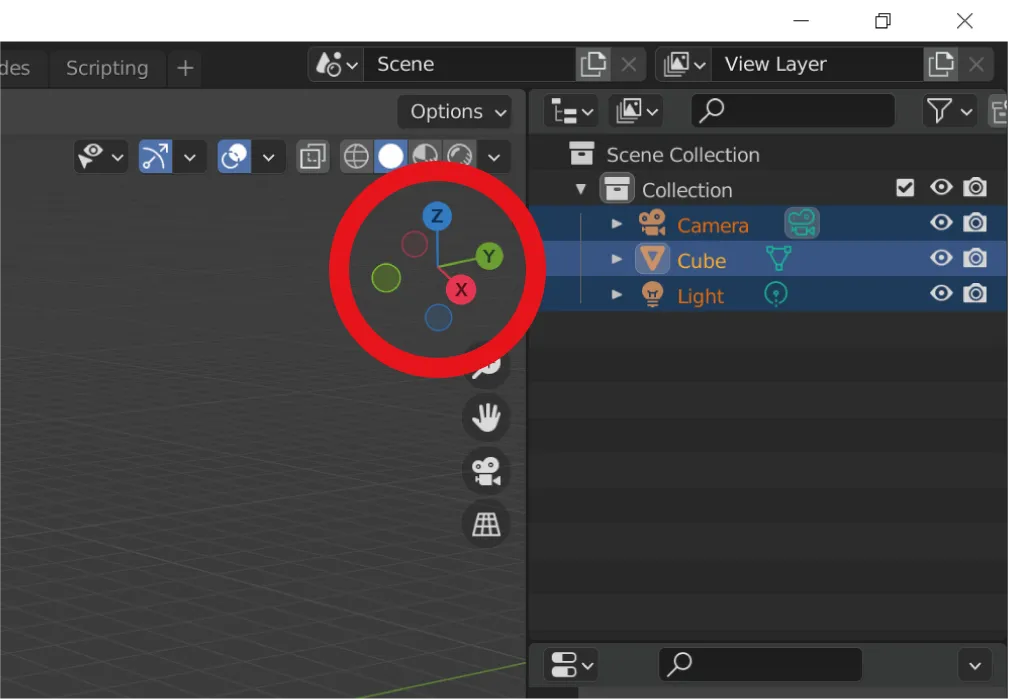
XYZ 軸インジケータでは、視点を動かした時に現在どの角度から見ているかを確認することが可能です。また、これらのXYZ の文字をクリックすることで、それぞれ正面図、上面図、側面図のビューで編集することができます。
Blender は直観的な操作でモデリングができることで有名ですが、それは多彩なショートカットキーや機能を覚えることで実現可能です。それを踏まえて、ここではショートカットキーでモデリングをする作業の操作方法を中心に解説していきます。
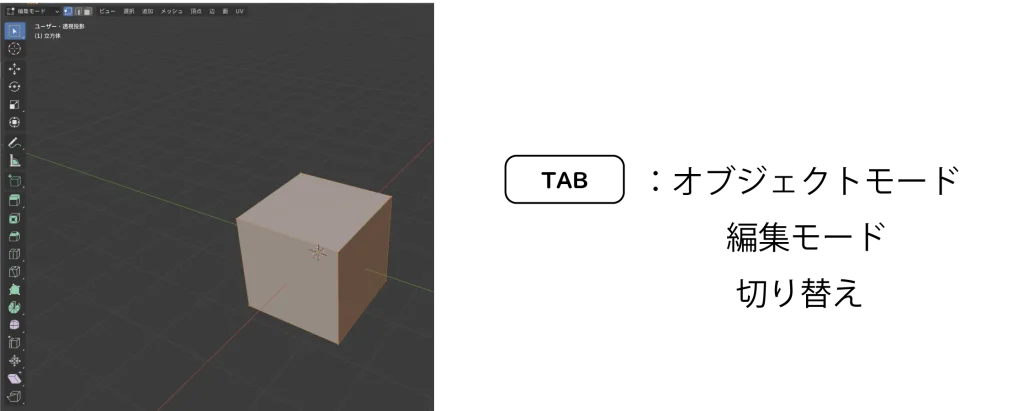
Blenderの基本的なモデリングでは、大まかに下記の二つのモードがあります。
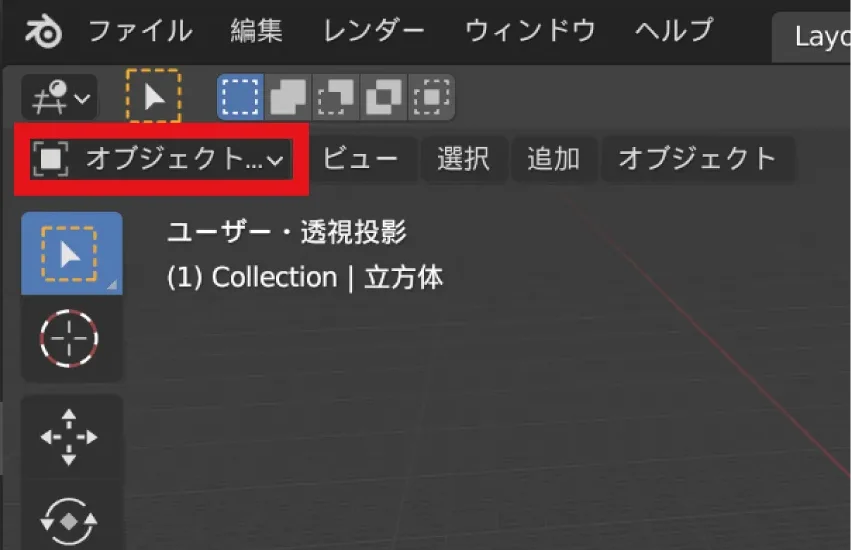
オブジェクトモード:立体図形(オブジェクト)の全体の位置やサイズなどの調整やその他の機能を使う際に使うモード
編集モード:主にモデリング時に使うモード。オブジェクトの形自体を点、辺、面の3要素を用いて作成したり編集することが可能。
上記の2種類のモードはキーボードの「TAB」で切り替えることができます。
はじめに編集モードの操作方法について解説します。先に現在のモードがオブジェクトモードである事を確認して操作を行うようにしましょう。
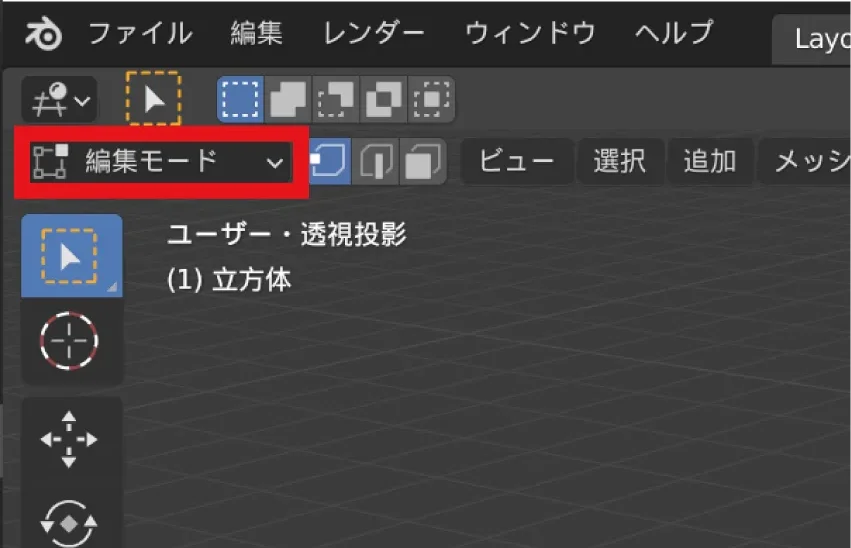
まずはまっさらな状態をつくるため、こちらの操作を行いましょう。
3D ビューモード内にマウスカーソルを置き、上記の順番でキーボードを押し、削除をクリックしてください。
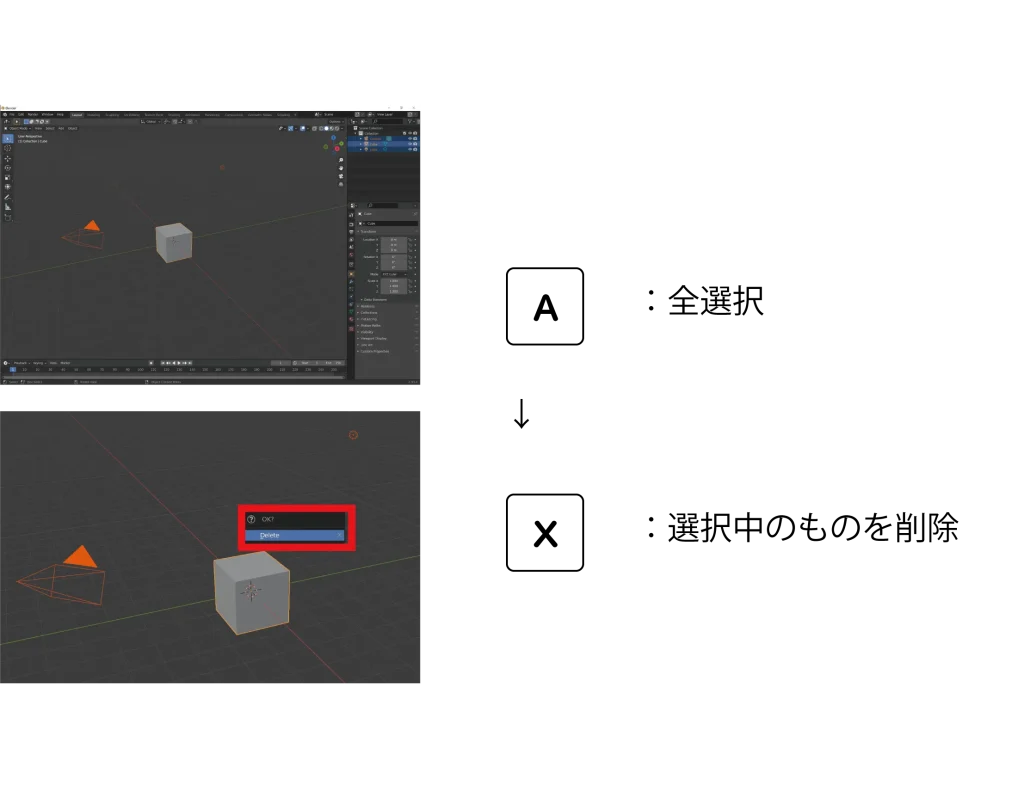
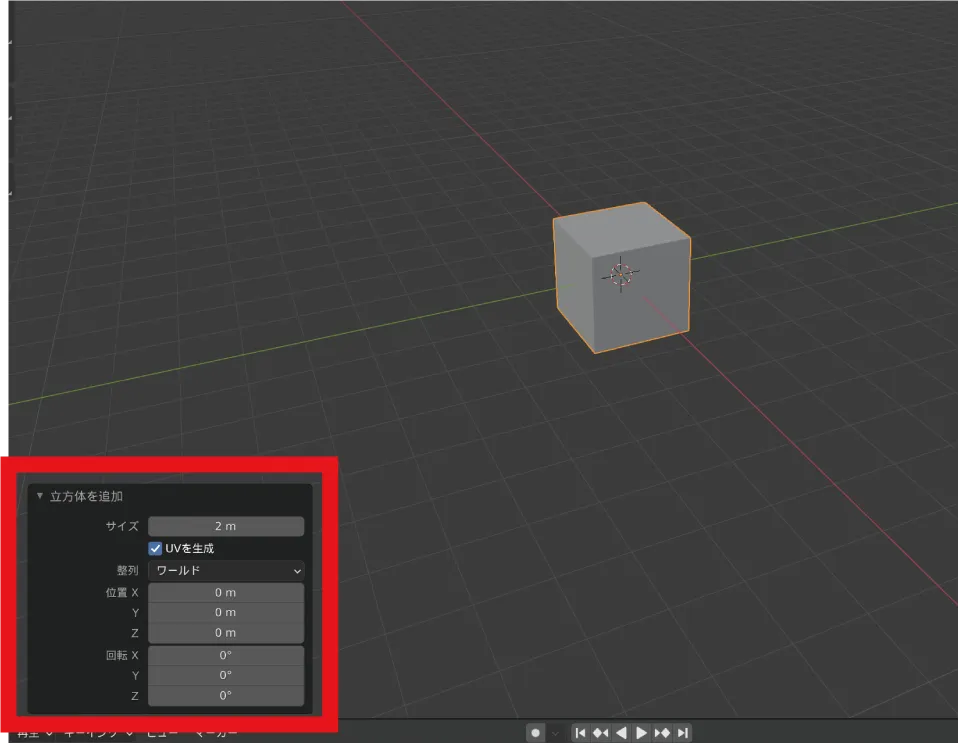
新しくオブジェクトを追加するため、下記のショートカットを入力してください。
そうすると、メニューが表示されるので、メッシュの中の立方体をクリックして画面に立方体を出現させます。
オブジェクトを追加すると、左下にそれぞれの設定項目が表示されます。閉じている場合は、クリックすると下記の画像のように開かれた状態になります。
オブジェクトが追加できたので編集モードに入ります。
「TAB」を押して編集モードに入ると左側にこのように様々なツールが表示されます。
今回は基本的なショートカットキーのみご紹介します。
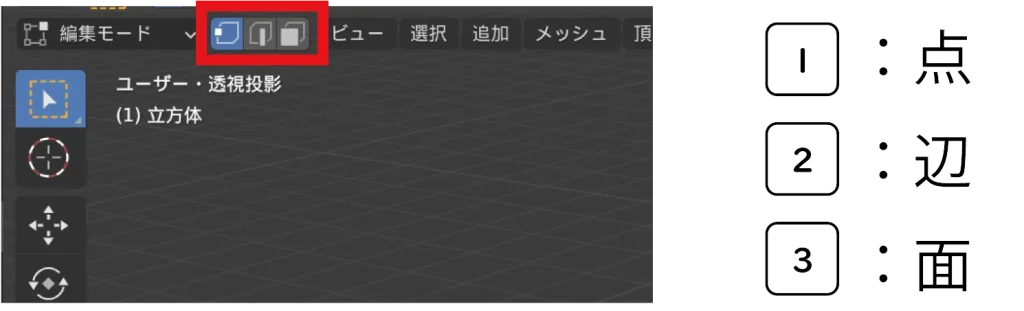
キーボードの上部にある方の数字で、立方体の点、辺、面それぞれクリックすると黄色で表示され選択できたことがわかります。画面左上の赤枠部分からも切り替えができます。
続いて主要なショートカットキーをご紹介します。面に切り替えて、オブジェクトのどれか一つの面を選択しましょう。
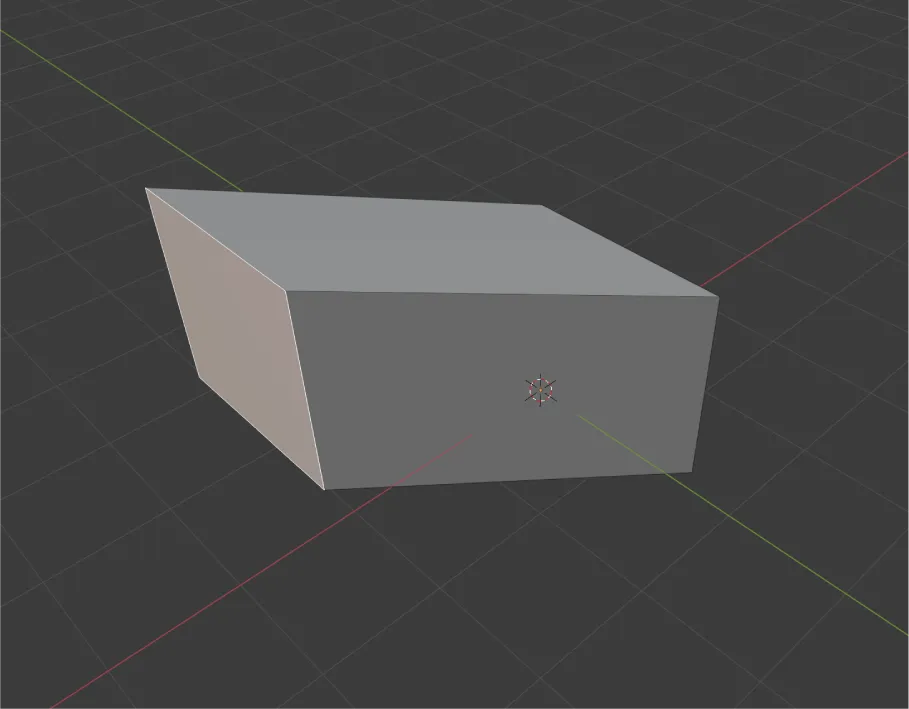
まずは移動のショートカットです。キーボードの「G」を押してマウスを移動させてみてください。現在の視点の方向と平行に選択した面をマウスの操作で動かすことができます。クリックすることで、その場で確定することができます。
操作を誤った際には「Ctrl+Z」で操作を1つ前に戻すことができます。
「G→X」「G→Y」「G→Z」とGを起点にX,Y,Zのいずれかを押すと、軸を固定して移動することが可能です。
「R」を押すと、選択した面が現在の視点の向きを中心に回転します。こちらもクリックで確定できます。回転もRキーを押した後にX,Y,Zを押すことで軸の固定をすることができます。また、回転を押した後に再度Rを押すと、軸の固定なく自由回転が可能です。
続いて拡大縮小を紹介します。「S」を押すとサイズを変える事ができます。こちらもX,Y,Z の軸固定が可能です。
ご紹介したそれぞれの操作は点、辺、面のどの状態でも利用することが可能です。また、選択時に範囲選択や「SHIFT」を利用した複数選択をした後に、それぞれの操作をすることも可能です。
最後に押し出しを紹介します。どれか好きな面を選択してから「E」を押してください。
こちらは少し特殊で、選択した面の角度を維持したまま同じサイズの面を押し出すことができます。
ここまでで紹介したショートカットを利用することで、すでに基本的なモデリングをすることができます。
またこれらの操作はすべて左下のメニューから数値入力で調整する事も可能です。
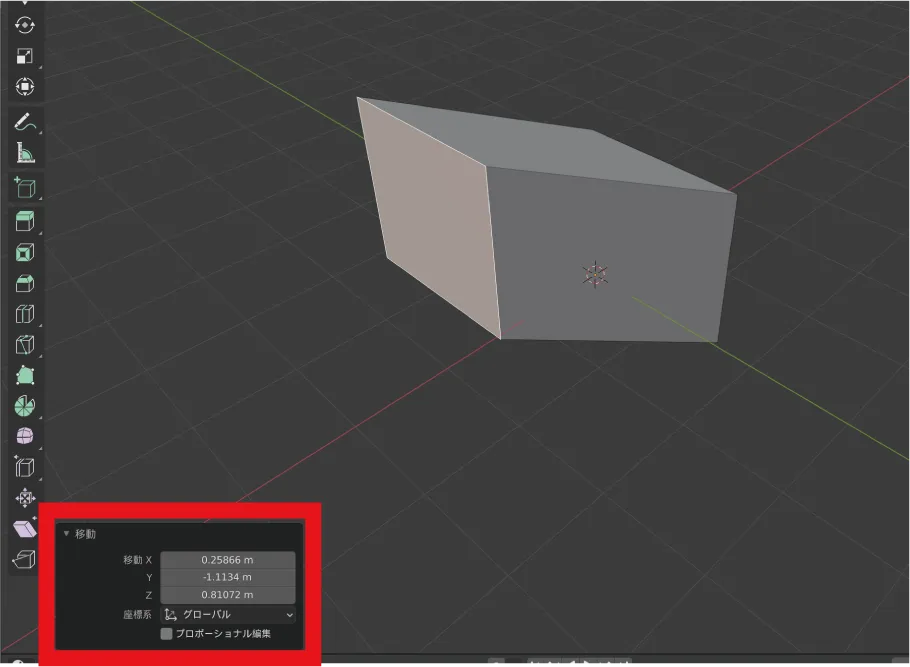
※ Blender では初期状態で単位はm(メートル)になります。出力する形式によって調整しましょう。
続いてオブジェクトモードのモディファイアの導入について解説していきます。モディファイアとは、エフェクトのように編集モードで作ったオブジェクトを、追加で変形させたりすることができる便利な機能です。
なお、オブジェクトモードでも基本的な操作である移動、回転、拡大縮小は同じ操作ですることができるためここでは割愛します。
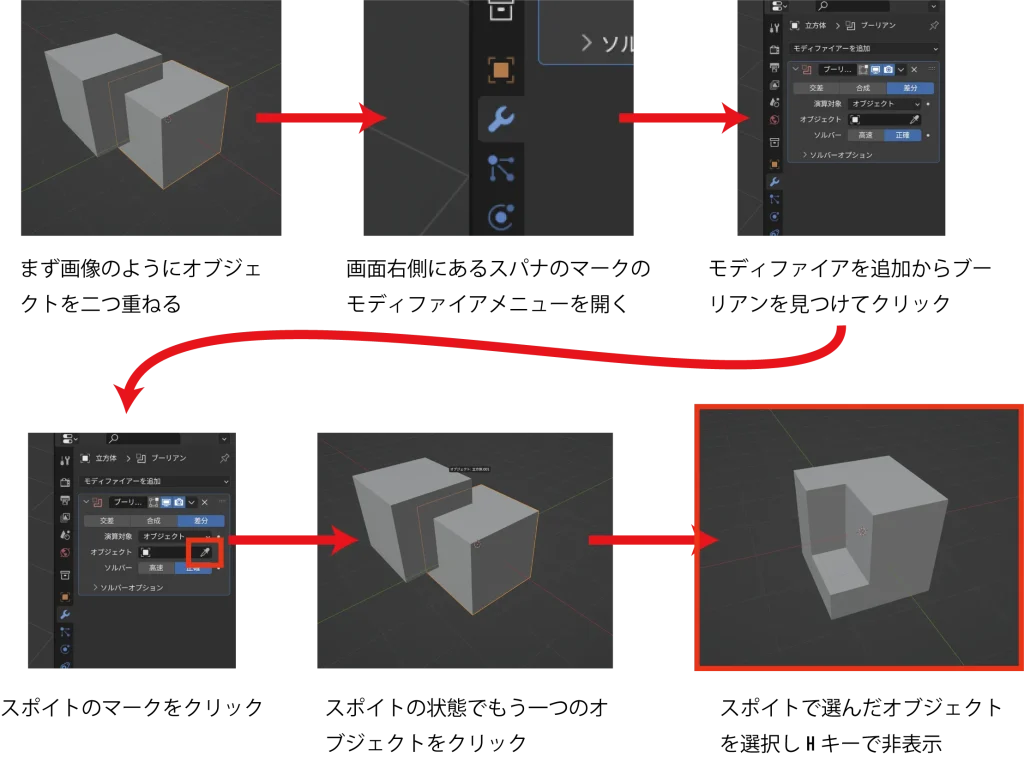
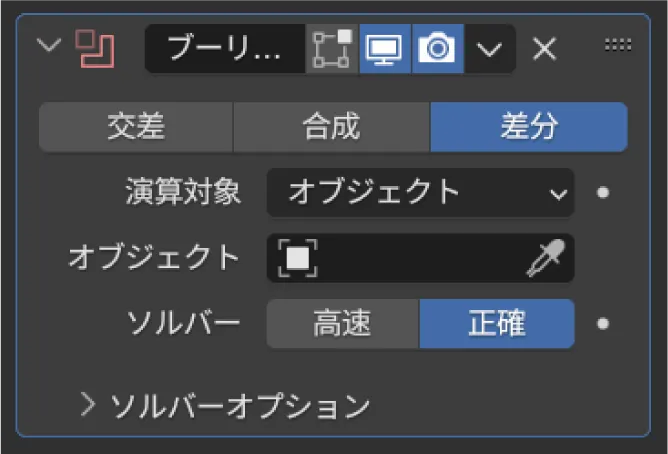
ここでは、「ブーリアン」というモディファイアの導入を例に挙げて解説します。ブーリアンについては、記事の後半でも改めて解説しているので、詳しくはそちらをご覧ください。
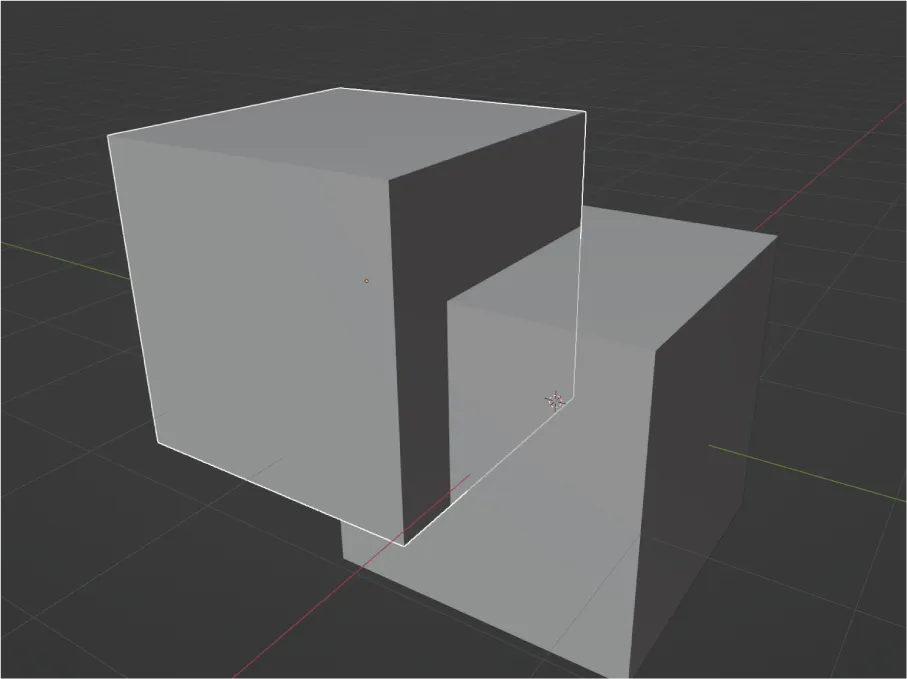
先ほどの立方体を選択して「Shift+D」を押すと複製することが可能です。半分ほど重なる場所に配置してみましょう。
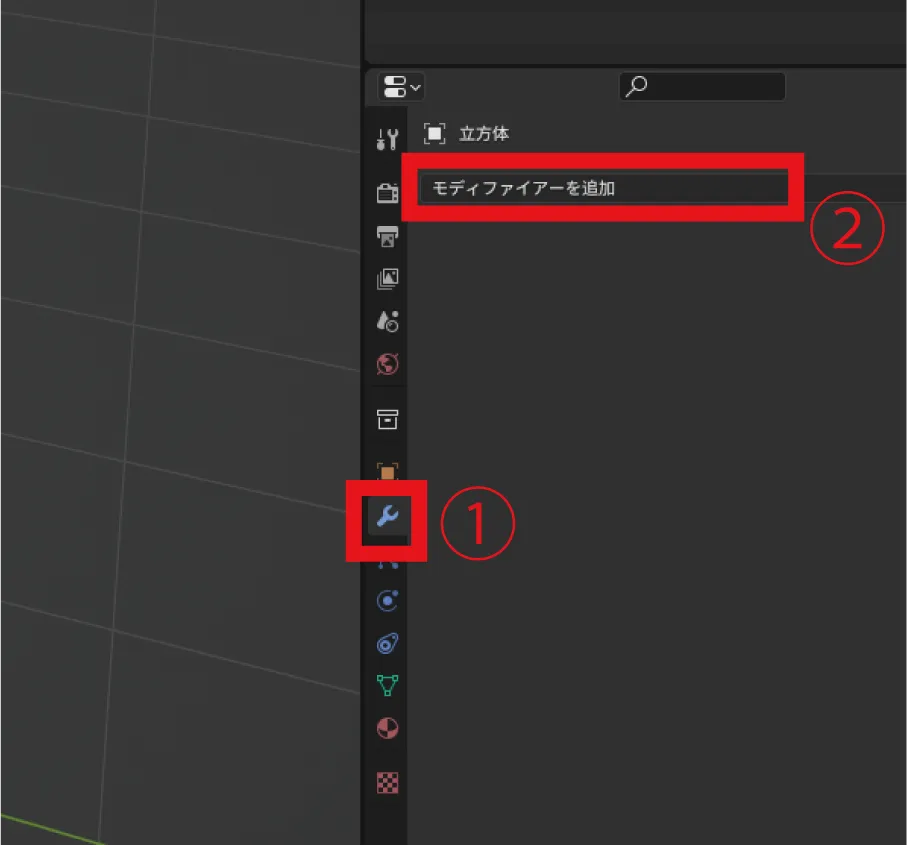
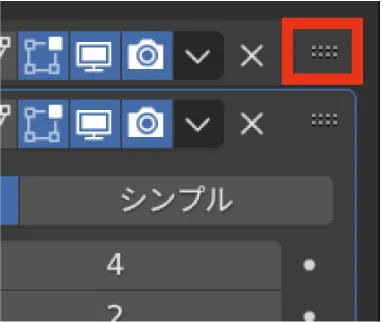
先に作った方の立方体右側に一覧表示されているメニューのスパナマークをクリックするとモディファイアのメニューが表示されます。
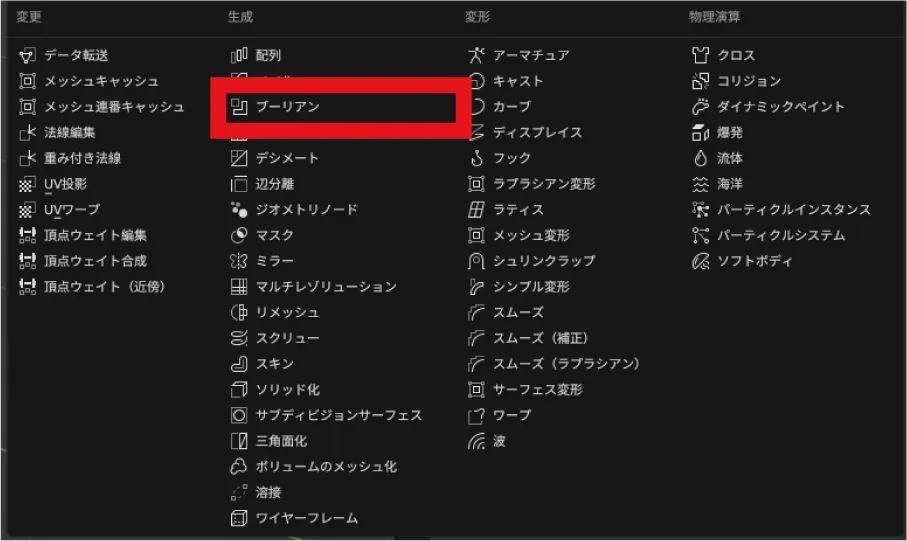
モディファイアを追加をクリックすると様々な機能が表示されます。今回はブーリアンを選択してください。
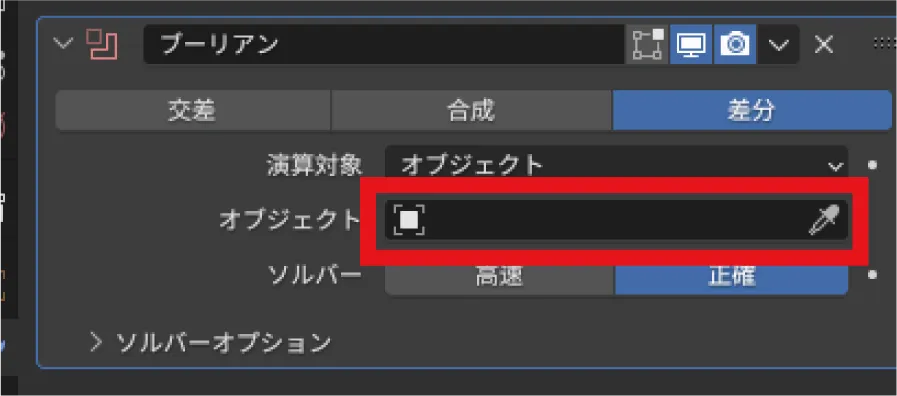
”オブジェクト”と書かれた枠のスポイトをクリックすると、マウスカーソルがスポイトになります。その状態のまま先ほど複製した立方体をクリックしてください。
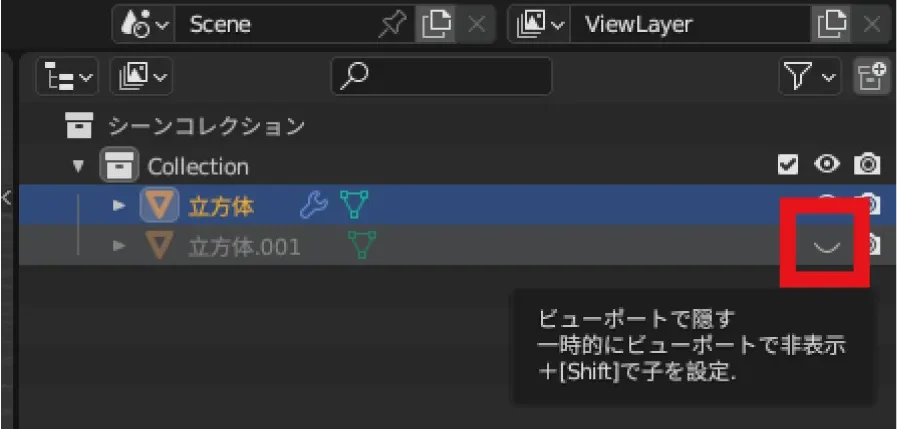
そのままだとわかりづらいため右上にある一覧の立方体.001 の目のマークをクリックし非表示にしてください。
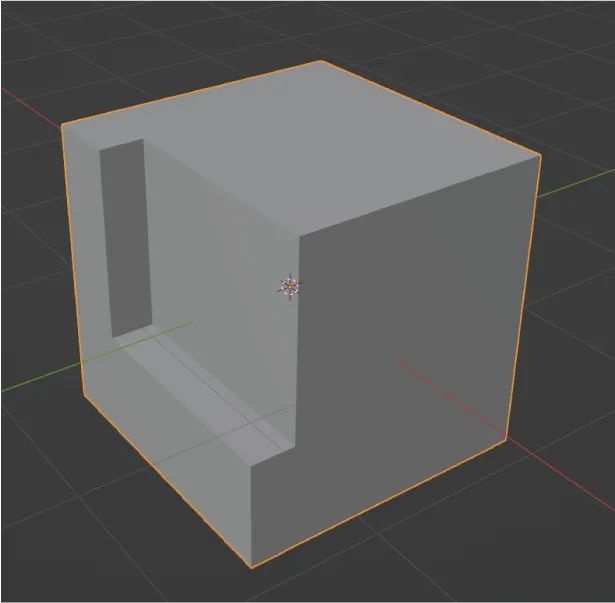
そうすると、上記のように複製した立方体の形で削られます。
モディファイアの便利なところはここからさらに別のモディファイアを上乗せできるという点です。
を追加.webp)
先ほどの「モディファイアを追加」から今度はベベルを選んでみてください。先ほどの削れた状態に上からベベル(面取り)を追加する事ができました。
数値をいじることで幅や丸みを変える事もできます。
他にも様々なモディファイアがあるので試してみると良いでしょう。
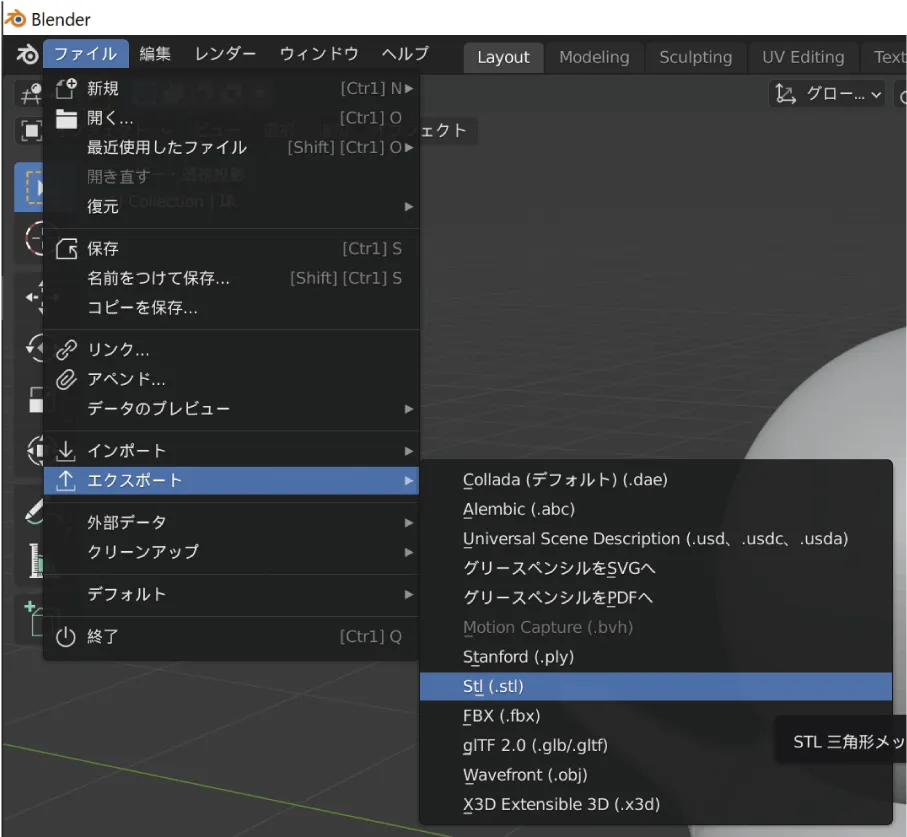
ファイル→エクスポートをクリックして、書き出し形式を選ぶことができます。
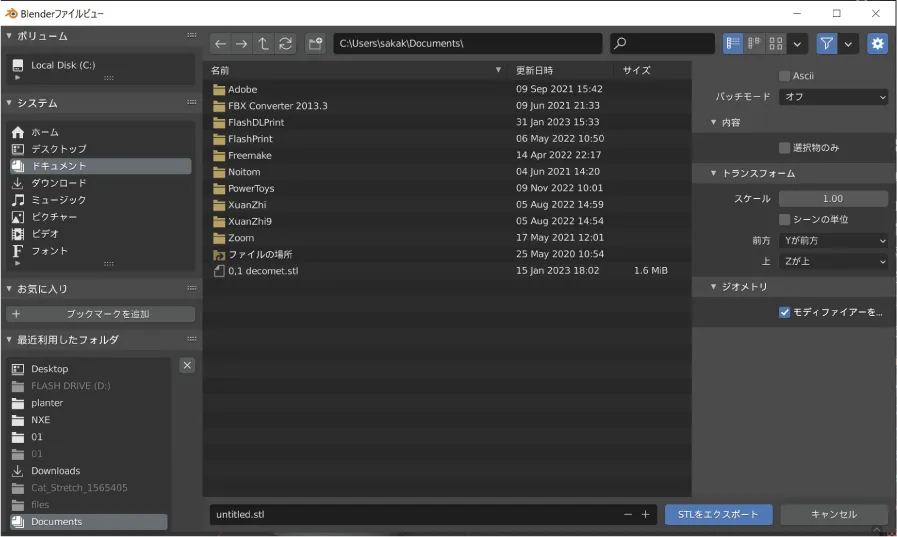
保存したい場所を選びエクスポートをクリックすると書き出されます。
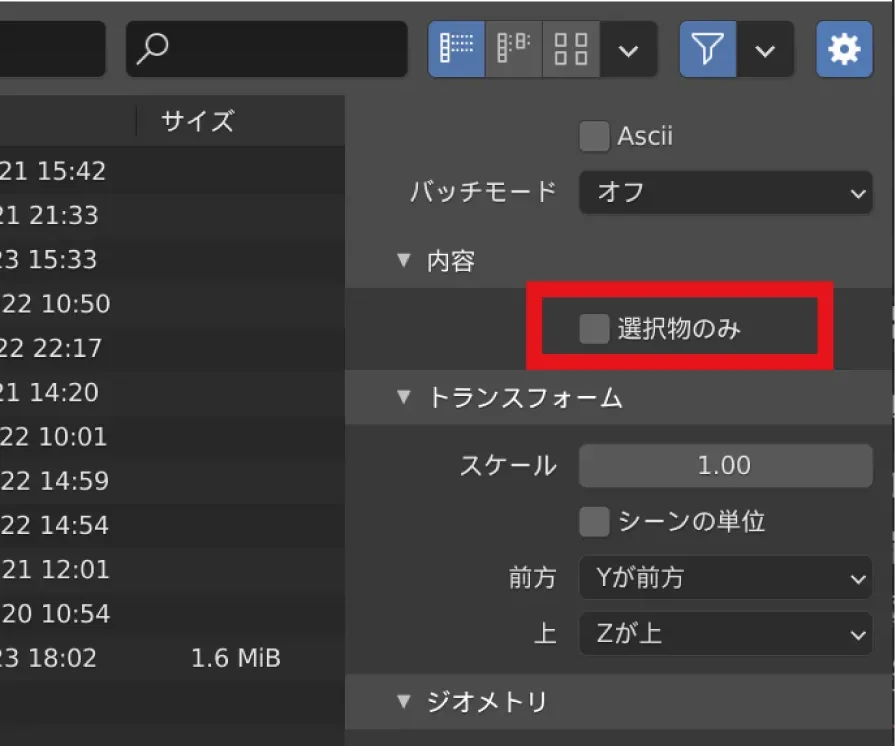
データ内に複数のオブジェクトがあり、どれか1つで書き出したい時は「選択物のみ」の項目にチェックをしてからエクスポートしましょう。
基本操作は前述のとおりですが、ここからはBlenderを使う上で覚えておくべき操作についてご紹介していきます。
応用としてありますが、難しい操作ではなく、あくまで基本操作の延長と考えていただければスムーズに理解できるでしょう。
まずは編集モードでよく使う効率的な選択方法についてご紹介していきます。
ループ選択とは通常の選択とは異なり、一定の方向に繋がっている辺や面を一気に選択することができる便利な方法です。
例えば、輪になった辺や面、流れが見える続いた辺や面を一個づつ選択せず、一度に選ぶことができます。

最短距離で選択はループ選択とは異なり、選んだ2つの場所の間を全て選択できる方法です。選んだ2つの場所の最短距離で選ばれるのが特徴です。
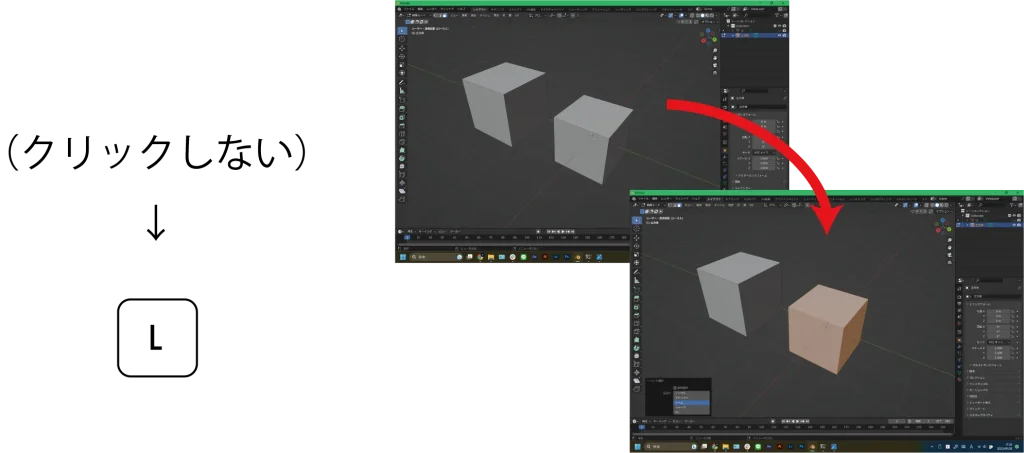
編集モード中に複数のオブジェクトがある時、連結していない別々のオブジェクトを一つずつ選ぶことができます。クリックせず、選びたいオブジェクトにマウスカーソルと持っていくことで可能です。
「Lキー」を押すと選びたいオブジェクトのみがすべて選択できます。
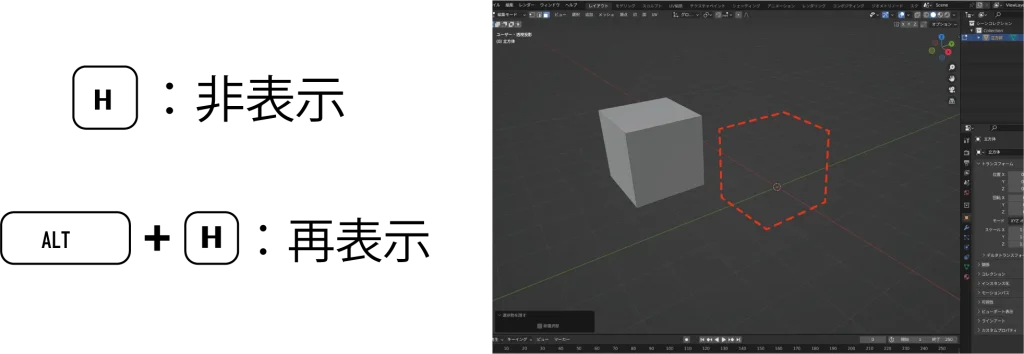
「Hキー」を押すと選んでいる点、辺、面、オブジェクトを一時的に隠すことができます。
「ALT+H」で非表示にしたものを元に戻す事ができます。
※ オブジェクトモードでも同じショートカットを使用する事ができます。
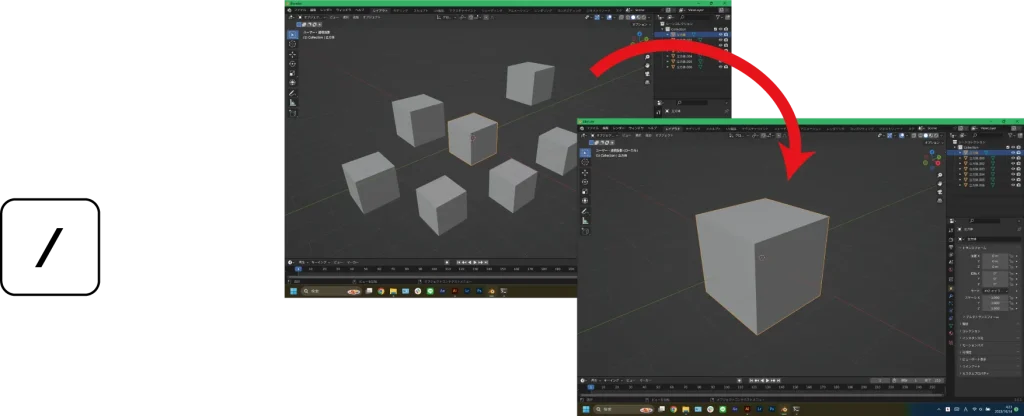
選択したオブジェクトを見やすくしてくれるショートカットです。選択したオブジェクト以外を非表示にし、視点を近くに持ってくることができます。
この機能をオンにすると、選択した場所を中心に移動、回転、スケールの基本的な編集を範囲的に操作可能です。
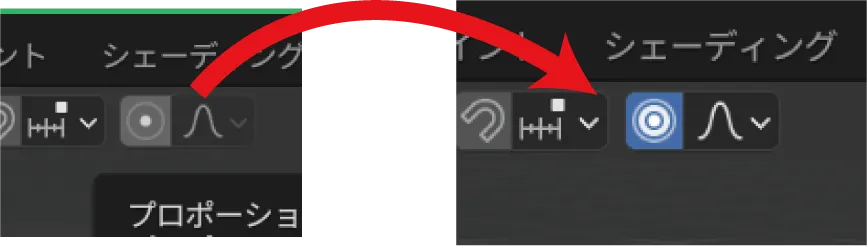
まずは画面上部にある”◎”のマークをクリックし、プロポーショナル編集をオンにしてください。

その後に点、辺、面のいずれかを選択して移動、回転、スケールの操作をしてください。効果の範囲はマウスホイールを回すことで指定できます。
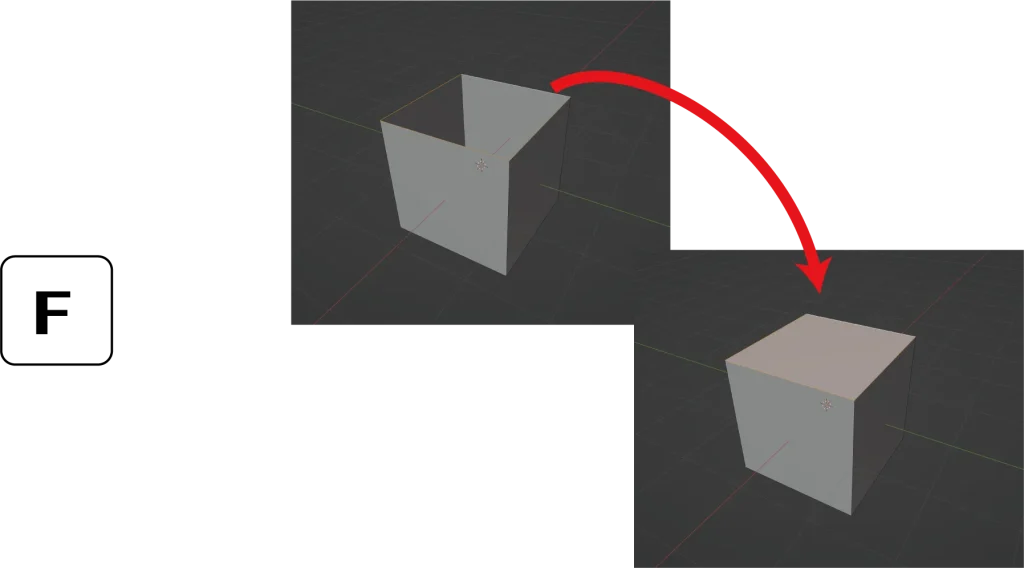
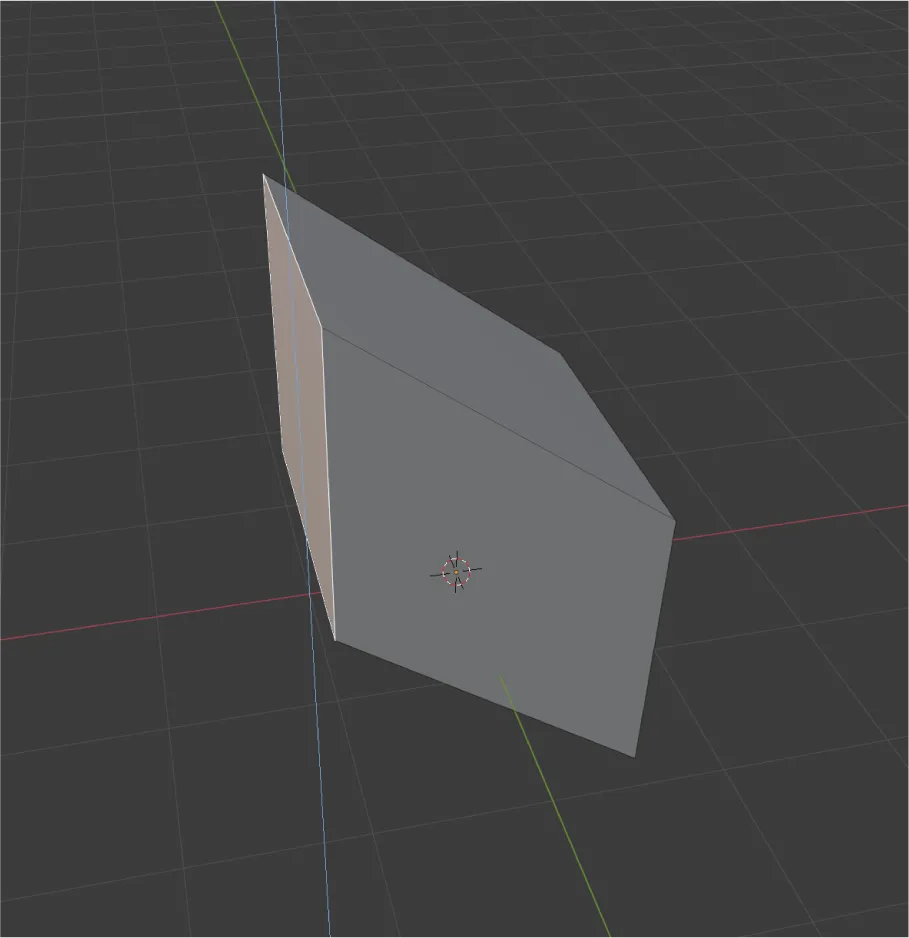
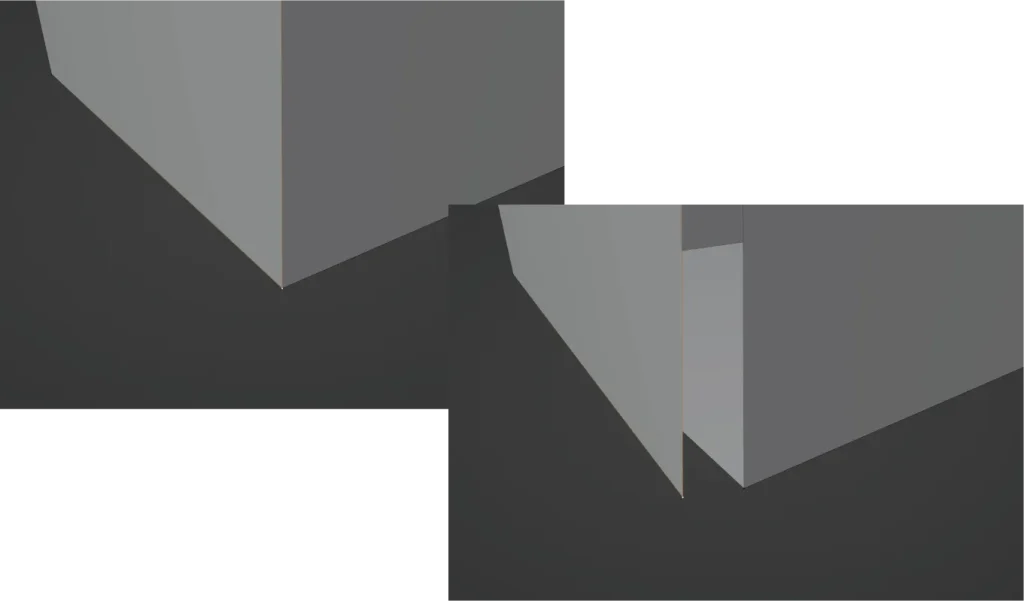
面の削除など、オブジェクトの一部を削除すると上記のように穴が空いたモデルになります。
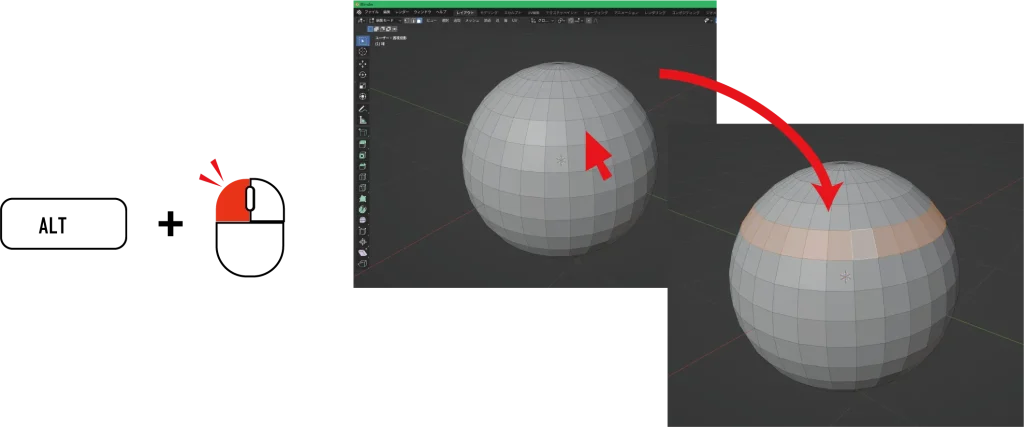
ふさぎたい穴の周りの辺をすべて選択(Alt+クリック)。キーボードの「Fキー」で塞ぐことが可能です。
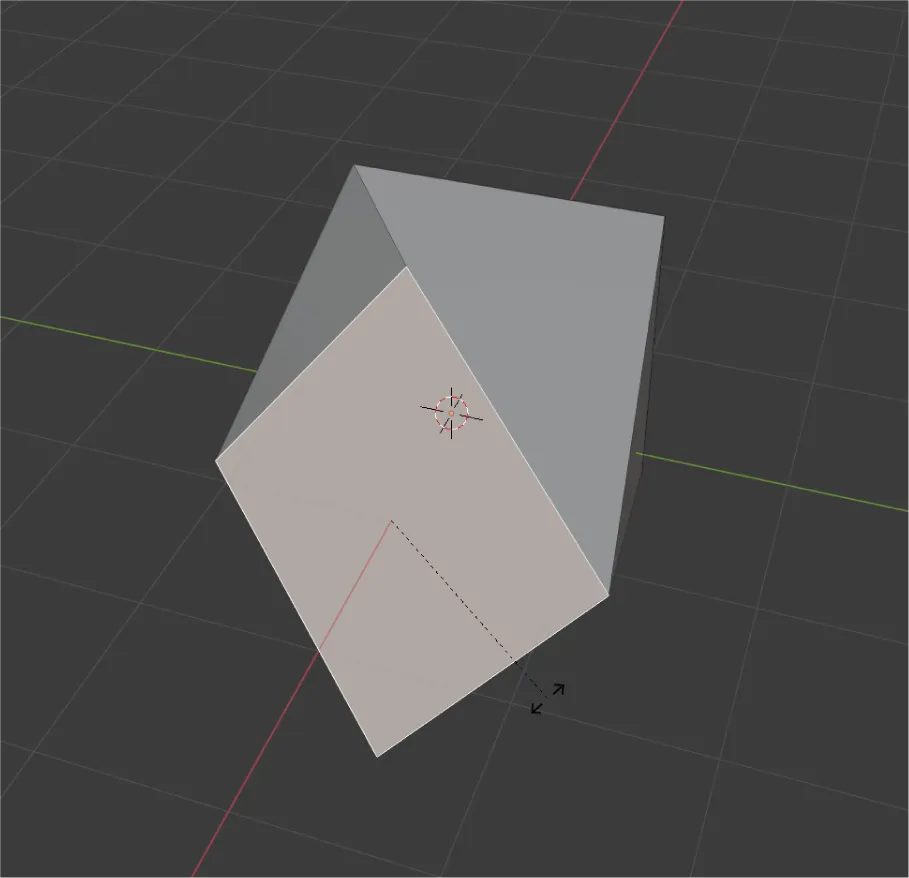
ブリッジは連続した空いてるポリゴンを埋めることもできます。
まず先ほどと同じように一面だけを埋めます。その後に、埋めた面の空いてる方の辺を選択します。最後にキーボードの「Fキー」を長押しすると連続して面が埋まっていきます。
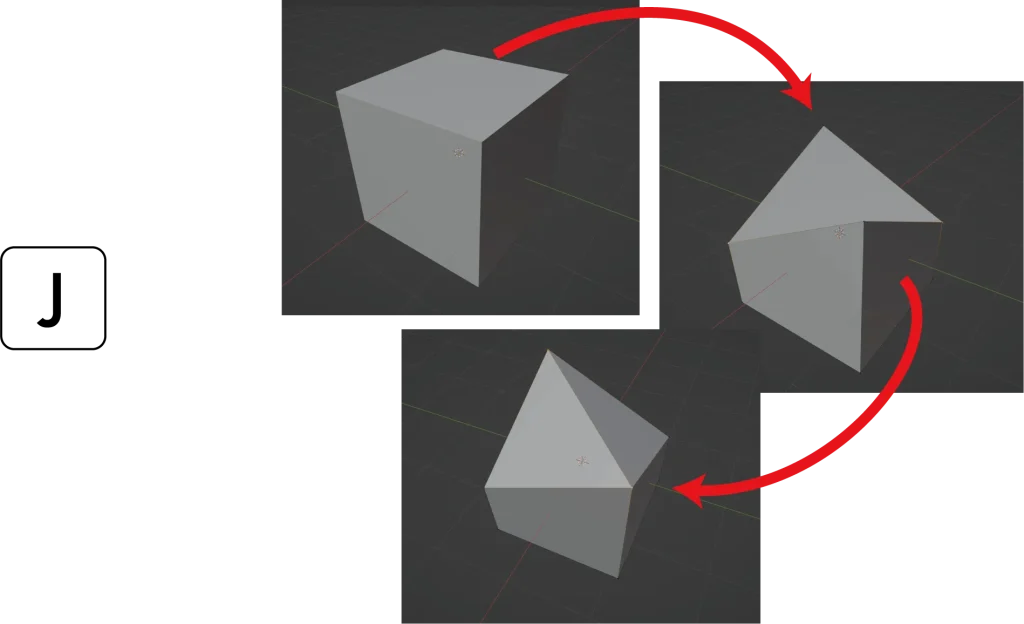
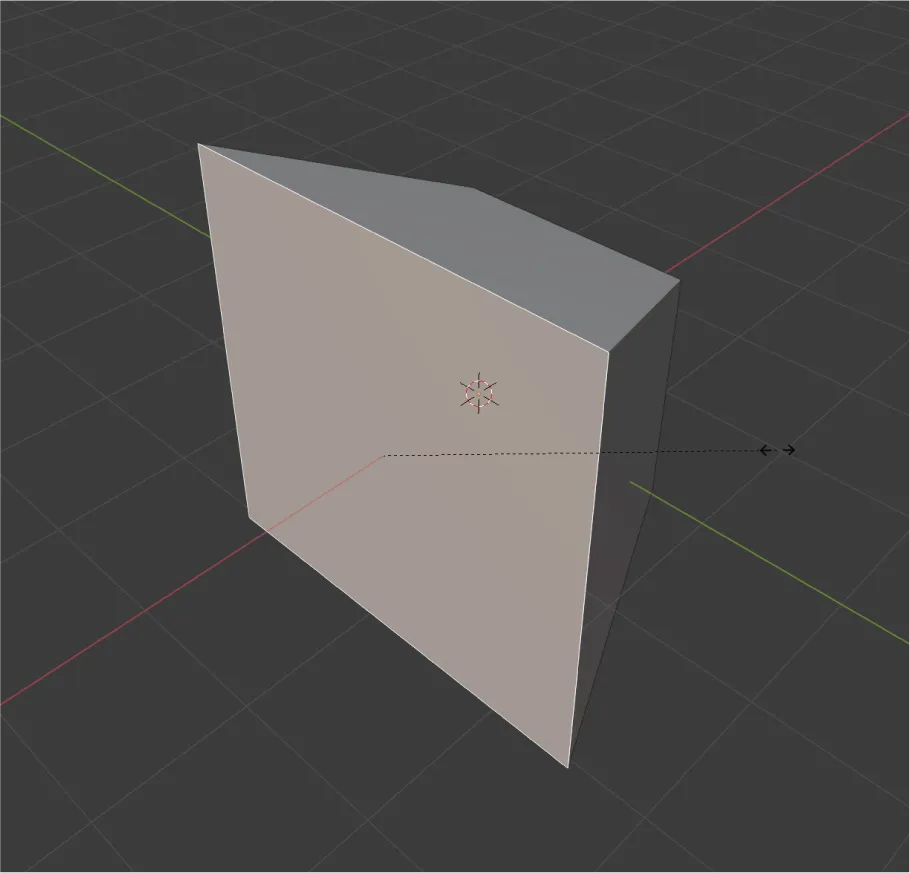
画像のように点と点に辺がない状態で編集すると、どのような形かわからないオブジェクトになってしまうため、辺を足す必要があります。
辺を足すには繋ぎたい点を2つ選択し「Jキー」を押すと、辺で繋ぐことができます。
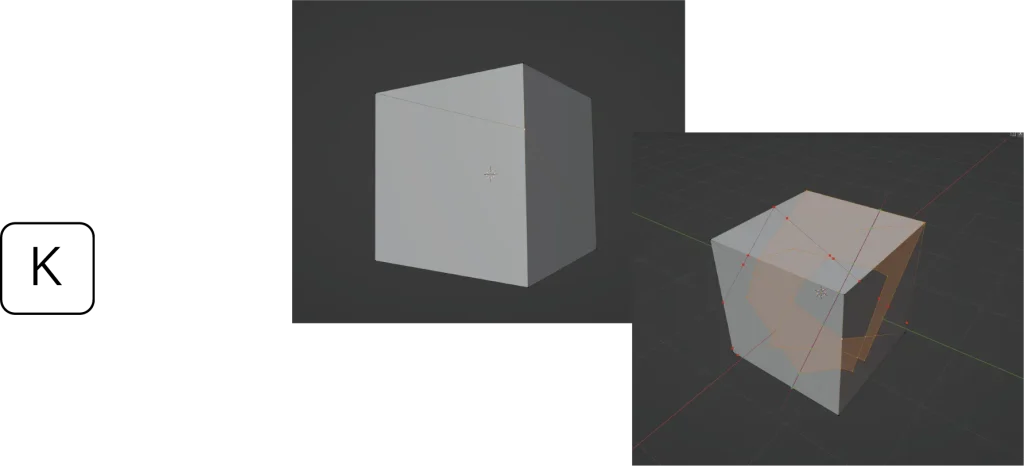
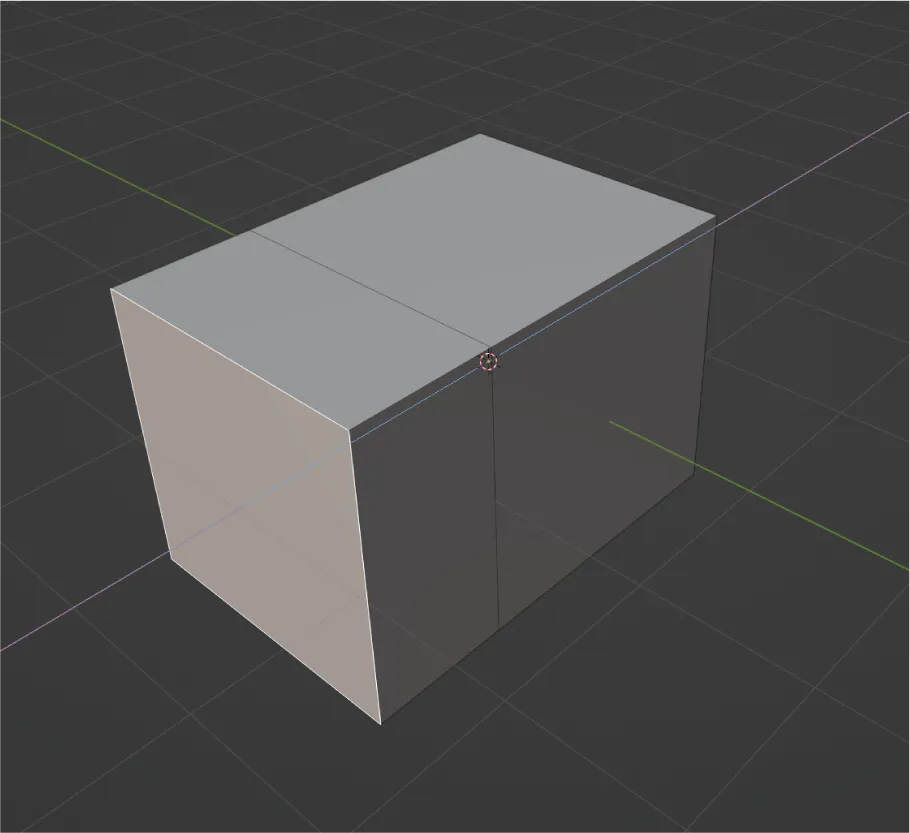
「Kキー」を押すと、マウスカーソルがナイフツールに変わります。
その状態で辺を追加したい点や面などの場所をクリックすると、画像のように追加することができます。
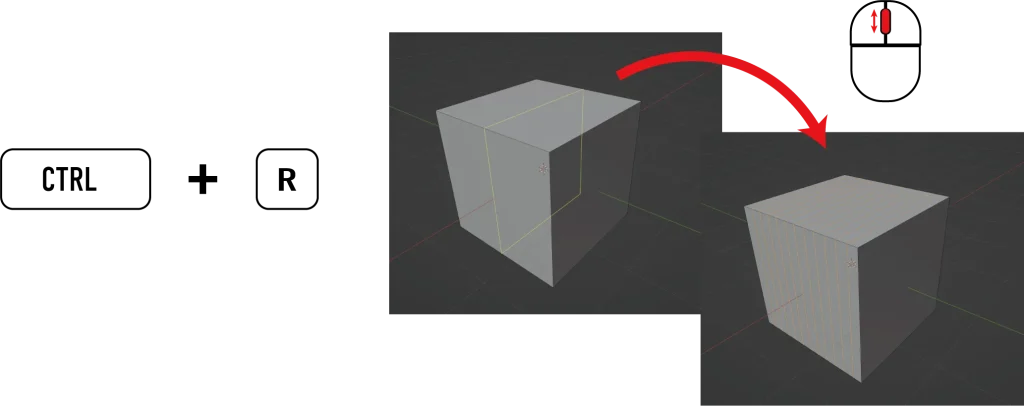
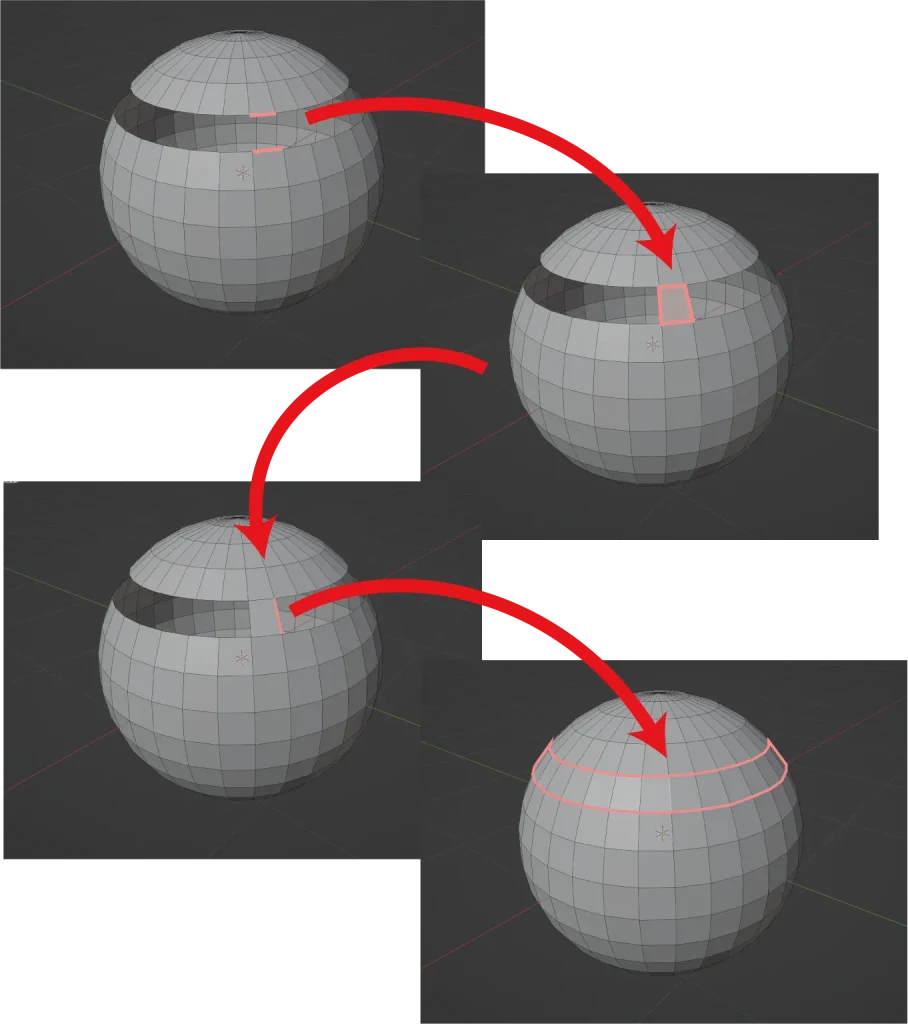
ループカットでは、ループしている面に辺を追加することができます。
「CTRL+R」を押して、追加したい面にマウスを近づけましょう。そうすると、画像のように辺を一周追加することができます。
マウスを動かすことで位置を微調整できます。さらにマウスホイールを回すことで追加する辺の数を増やしたり減らしたりすることができます。
※ 基本的には、ループ選択と同じように面が一周繋がっていたり、流れが見える続いた面に使用できます。
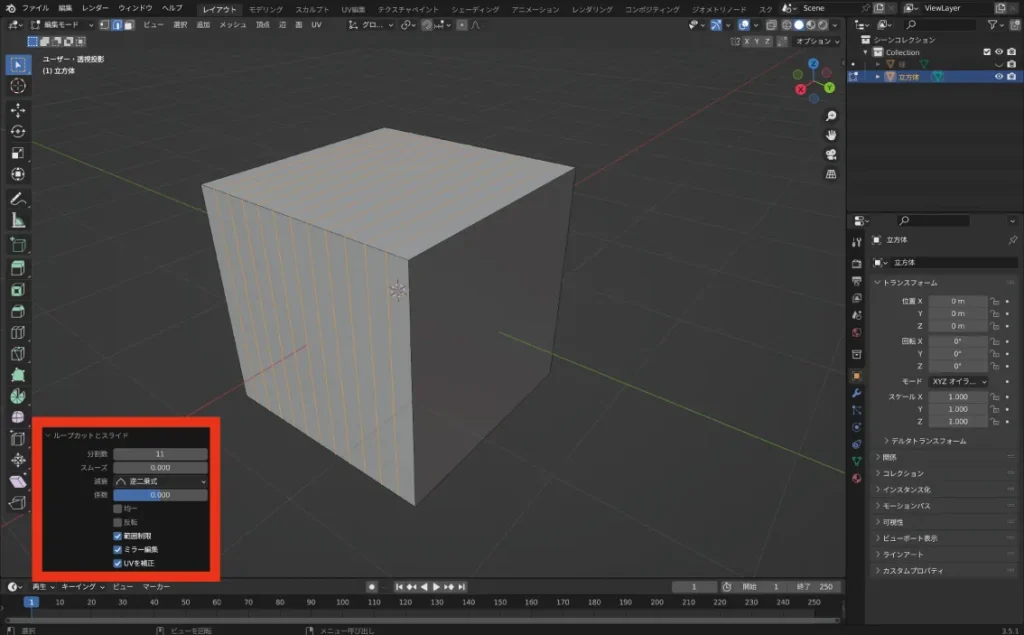
※ 赤枠の部分について、メニューから詳細を決めることも可能です。
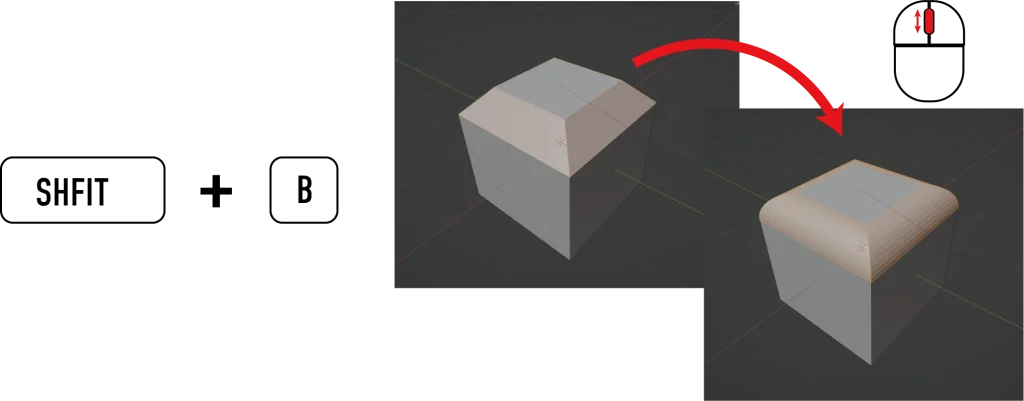
ベベル(面取り)を追加する事ができるショートカットです。まずはベベルをつけたい辺を選択します。
「SHIFT+B」を入力してマウスを動かすと、画像のように角にベベルを追加することができます。さらに、マウスホイールを回すと角を丸めることができます。
※ ベベルを多用するとオブジェクトが歪んだり、エラーを起こすことが多いため、必ずモデリングの最後にすることをおすすめします。
※ 赤枠の部分について、メニューから詳細を決めることも可能です。
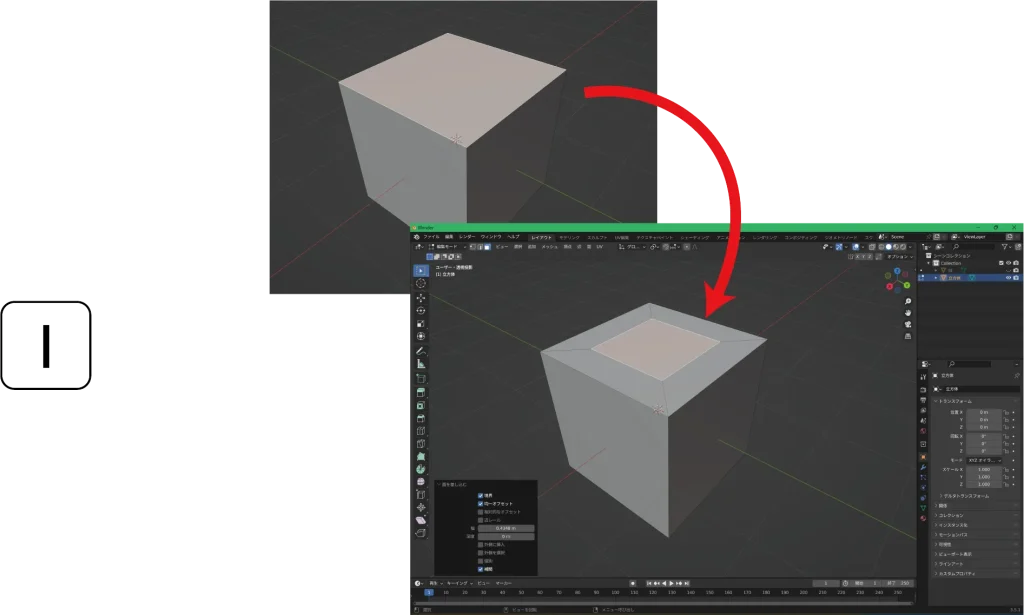
インセットでは、面の中に小さい面を追加することができます。
まずは面を追加したい面を選択してください。「Iキー」を押してマウスを動かすと、面を追加することができます。
マージでは、選択した点を1つにまとめることができます。
まずはまとめたい点をすべて選択します。
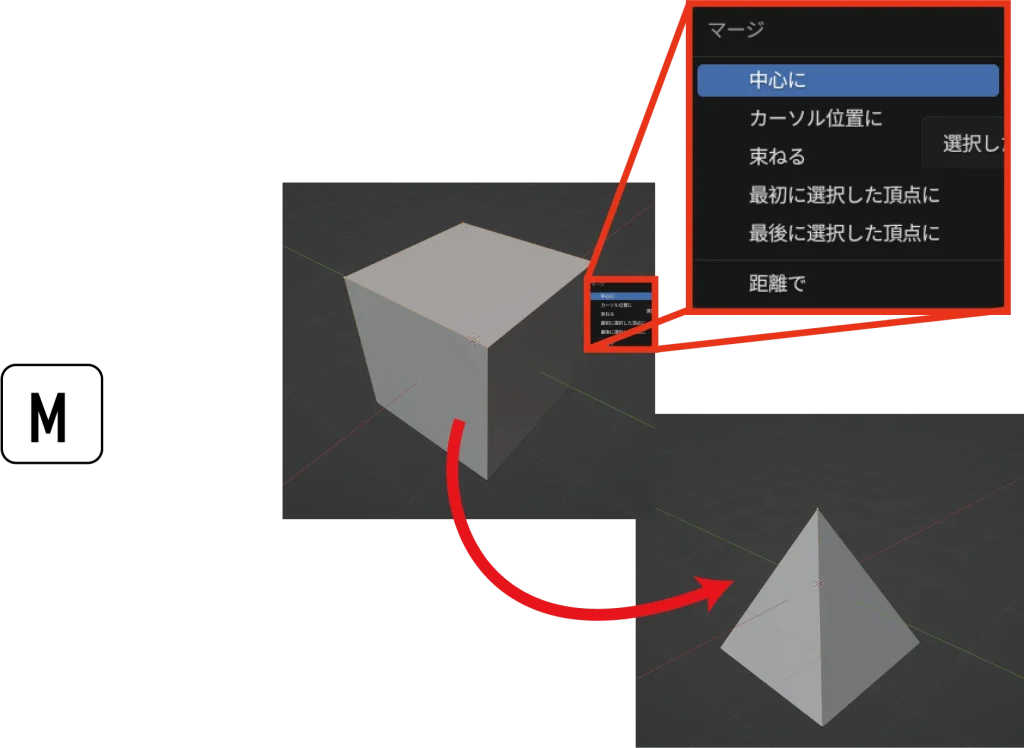
「Mキー」を押すと画像のようなメニューが出てきます。ここでは分かりやすく「中心に」を選びます。そうすると、選択したすべての点の中心の位置で1つの点にまとめられます。
点を全選択した後に適用することで、上記のように実は重なっていない点などを見逃すことなくくっつけることが可能です。
また、距離でマージの数値を上げることで、徐々に点をまとめていき不要な点を減らすこともできます。
Blenderでは、制作中の明確な寸法やサイズを表示することもできます。まずは辺の長さや面の面積、辺の角度を表示する方法について解説します。
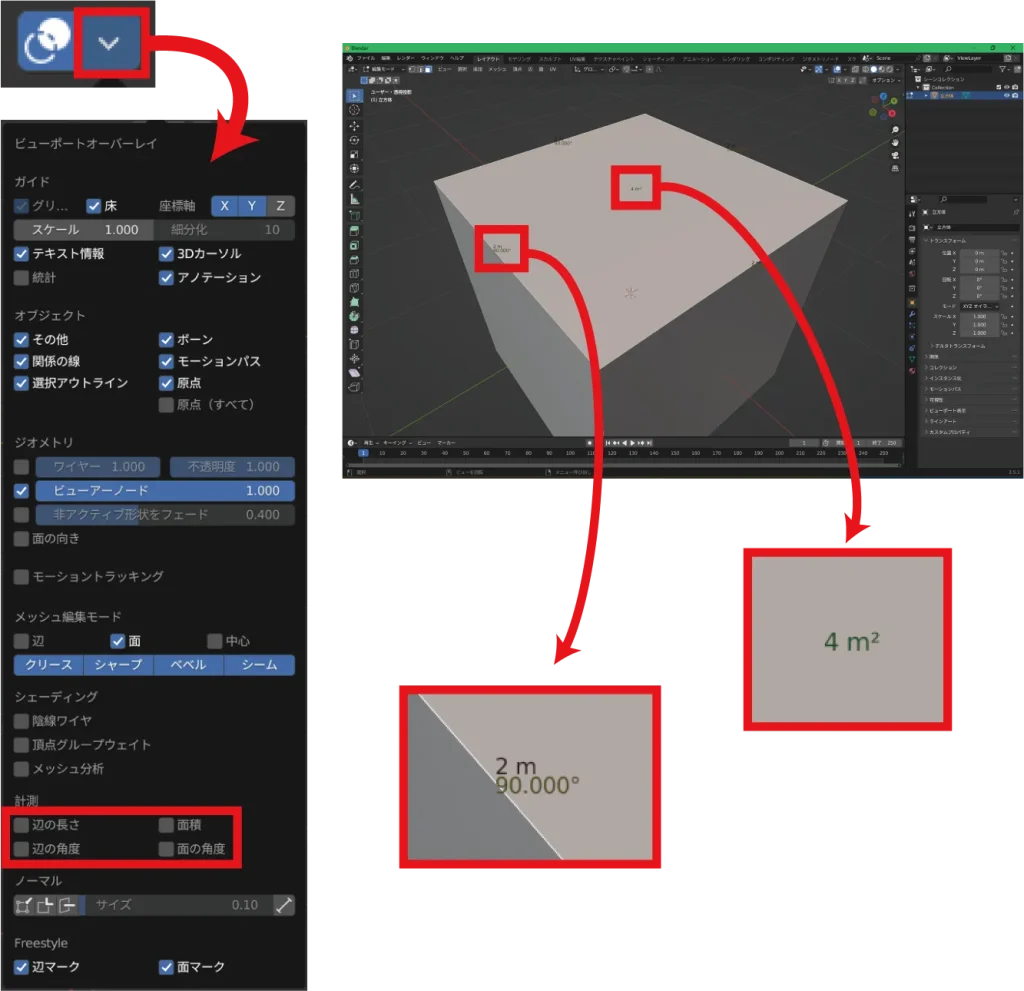
編集モードに切り替え、3Dビューの画面右上にあるオーバーレイを表示のボタンのVをクリックします。
そうすると、ビューポートオーバーレイのメニューの下の方に計測という項目があります。
それぞれの見たい項目のチェックボックスをクリックすると、現在選択しているオブジェクトの部分の長さや面積、角度がそれぞれ表示されます。
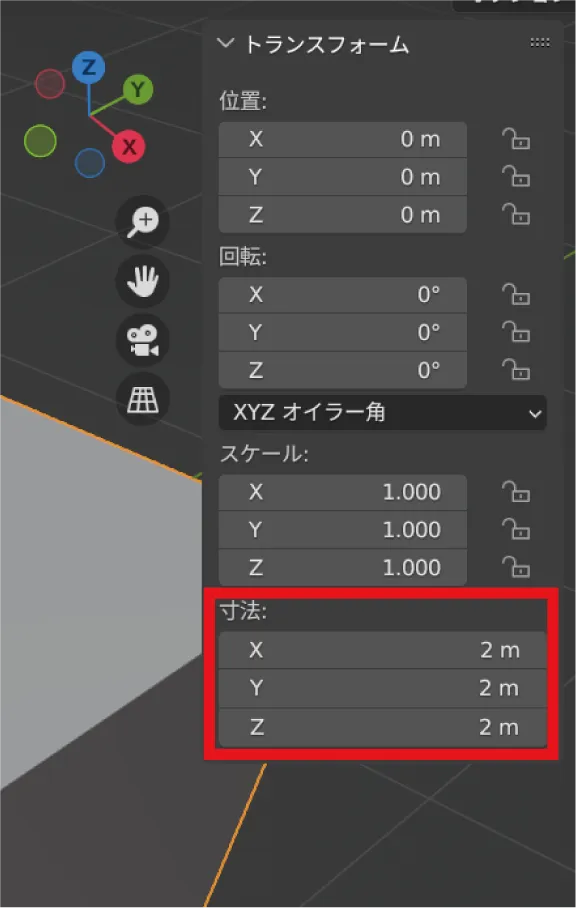
続いて、オブジェクト全体の寸法を表示する方法をご紹介します。
オブジェクトモードに切り替え、寸法を見たいオブジェクトを選択し、キーボードの「Nキー」を押します。
そうすると、3Dビューの画面の右側からトランスフォームという項目のメニューが表示されます。こちらの寸法という表記が実際の寸法になります。
こちらの寸法の数値を直接修正することで、オブジェクト自体の大きさを変えることができます。しかし、本来の形から拡大縮小するということになるので、編集モード内の辺の長さなどには適用されません。
精密に大きさを変えたい場合は、寸法の1つ上のスケールがすべて1.000になっていることを確認してから編集モードで調整することをおすすめします。
ここからはオブジェクトモード時に使えるモディファイアという便利な機能について紹介します。数が多いためこちらでは比較的便利なもののみ紹介します。
なお、モディファイアはパソコンによっては重い処理が必要なものもあるため、使用時はこまめに保存してください。
ブーリアンは、別のオブジェクトでオブジェクトを削ったり、オブジェクト同士を合体させたりするのに使います。
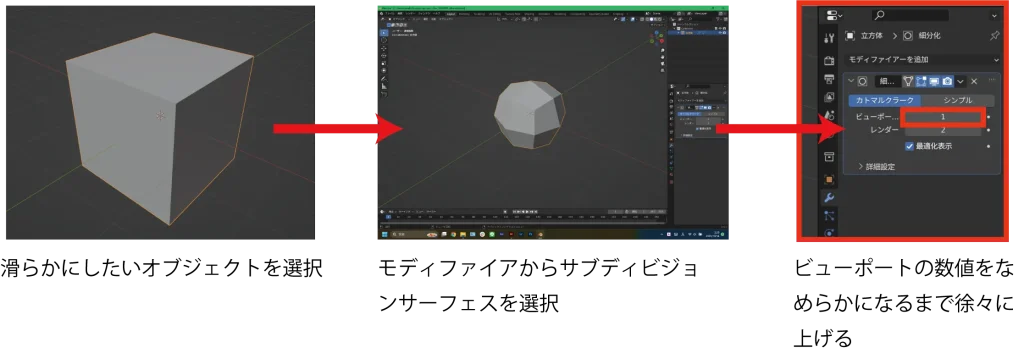
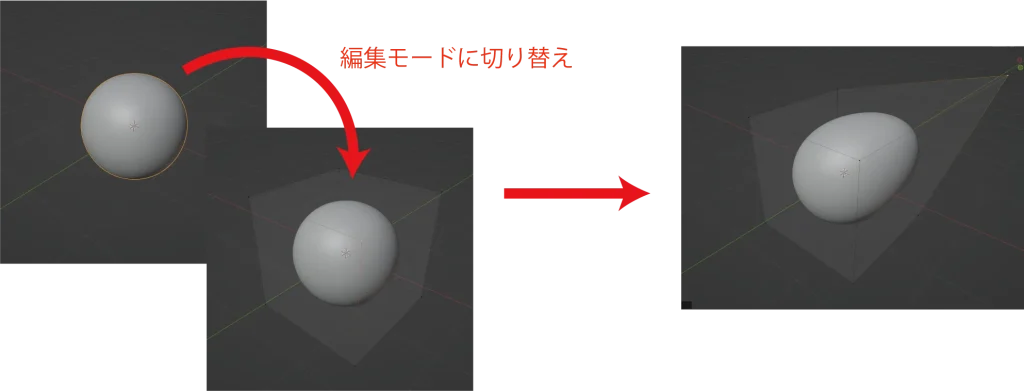
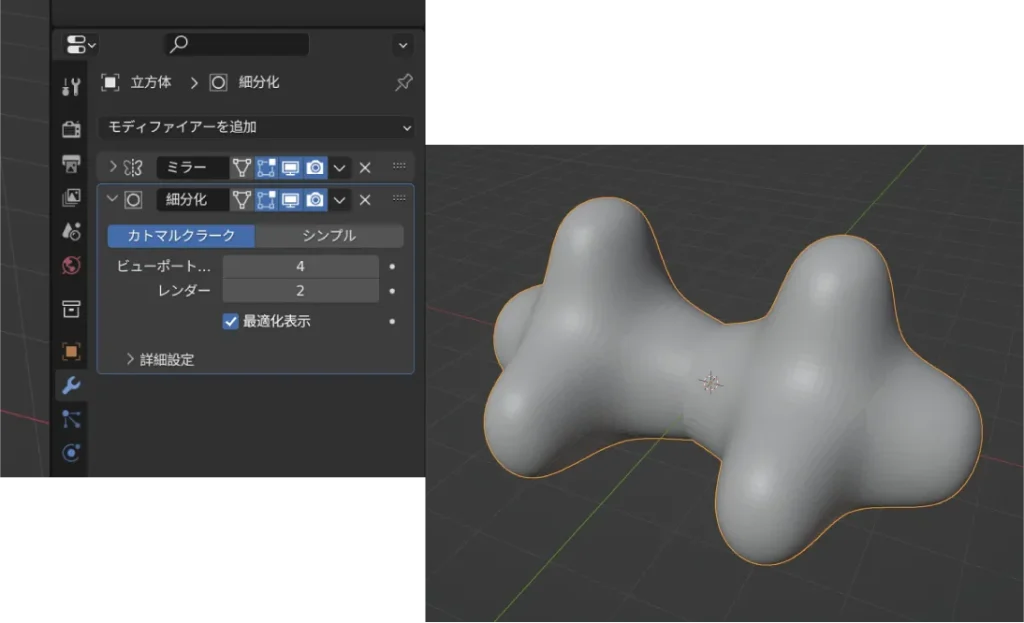
サブディビジョンサーフェスは、荒いポリゴンを滑らかにすることができるモディファイアです。手っ取り早く滑らかなオブジェクトを作ることができますが、処理が重くなりがちなため気を付けて使いましょう。
モディファイアの利点は、原型の形は変わらないため、そのまま原型を編集することが可能な点です。また、失敗した場合はモディファイアを消すことで元に戻すこともできます。
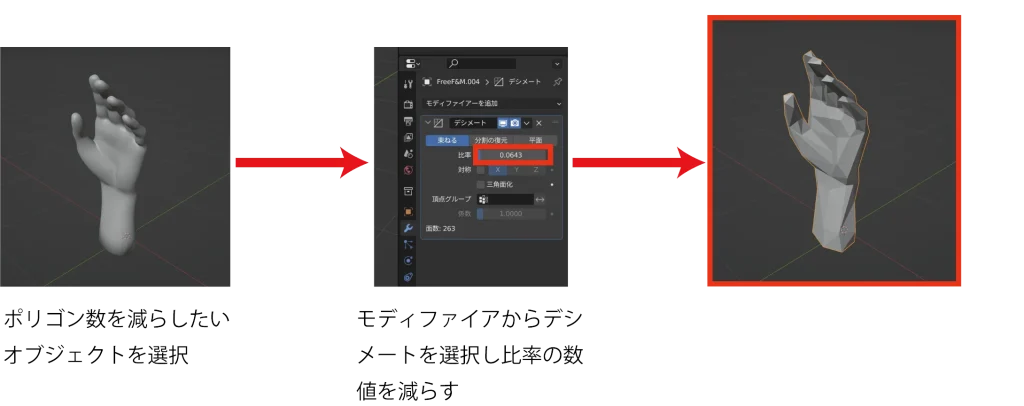
デシメートは、点が多いハイポリゴンのオブジェクトにおいて、ポリゴン数を減らすことができるモディファイアです。
オブジェクトを荒くすることができ、ネットからダウンロードしたデータの重いオブジェクトを軽くすることができます。
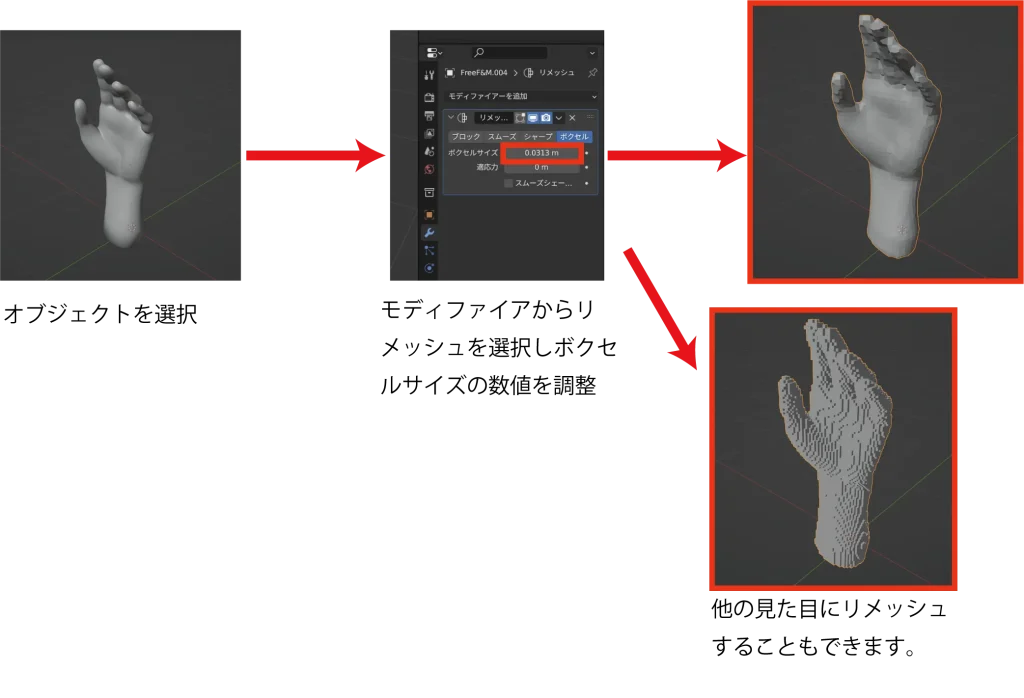
リメッシュは複雑になってしまったオブジェクトのメッシュを再構築するためのモディファイアです。スカルプトツールでも使用したリメッシュのモディファイアバージョンです。
デシメートと同じく、リメッシュでもポリゴン数を減らすこともできます。
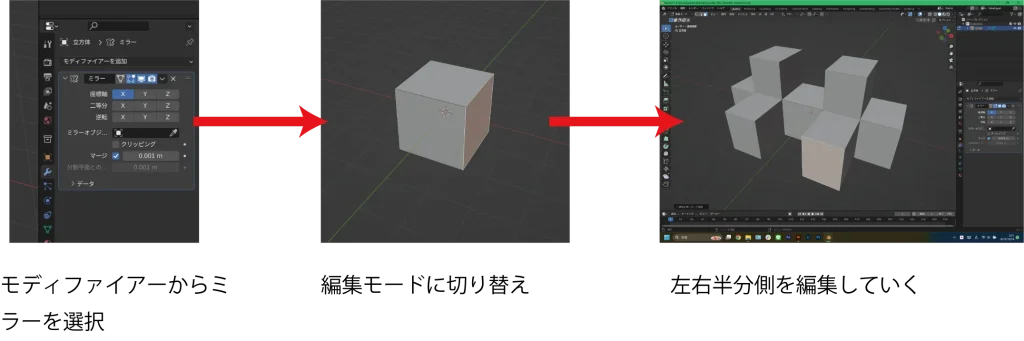
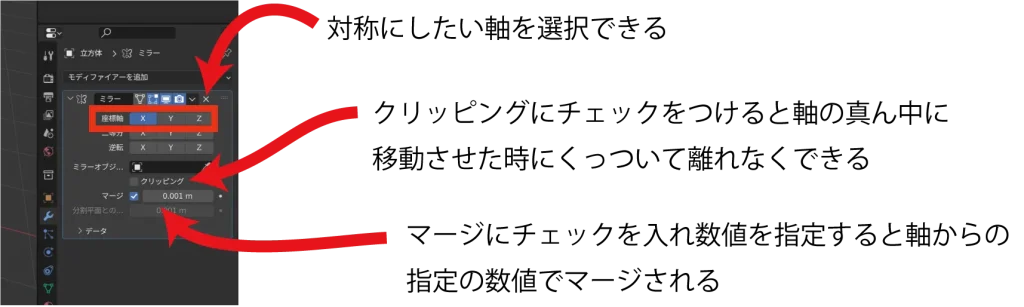
ミラーは、左右上下対称にモデリングできるモディファイアです。半分を編集すると反対側も反転して同じようにモデリングされます。
モディファイアは同時に複数使うことができるため、重ね掛けするとより効率的にモデリングをすることができます。
下の画像は、ミラーをした後にサブディビジョンサーフェスをかけているため、左右対称にモデリングして同時に滑らかにすることができます。
モディファイアは上から順番に使用されるため、順番を間違えると上手くいかないことがあります。その場合は、右側の点々をドラッグすると順番を変えることが可能です。
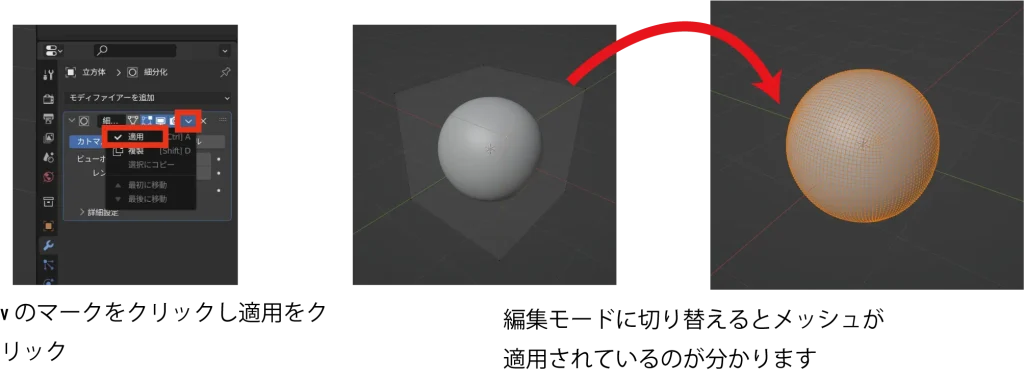
モディファイアは便利な機能ですが、使用時は点、辺、面の移動など直接的な編集ができないため、不便になることがあります。
そのため、時と場合に応じて適用をすることで、その形で確定させる必要があります。
一度適用するとモディファイアを戻すことは困難なため、どうしてもという時にだけ使うようにしましょう。
アドオンとは拡張機能のことで、Blenderには様々なアドオンが標準でついています。ネット上にも様々なアドオンが公開されていて中には有料のものもあります。
ここではアドオンがどういったものかをご紹介します。
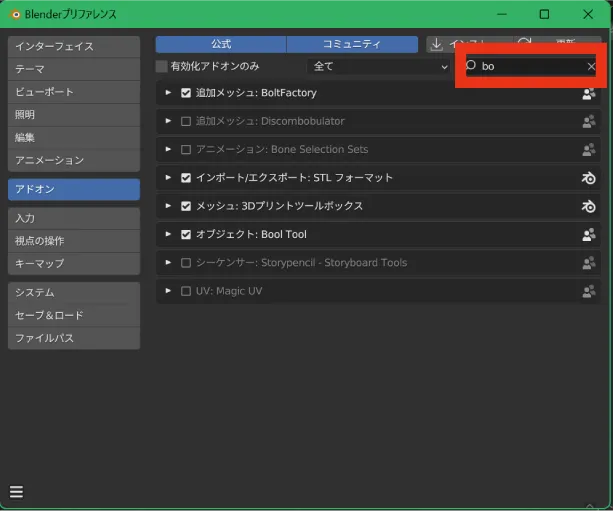
アドオンを有効にするには、初期設定の時に使った「プリファレンス」のウィンドウから「アドオン」の項目を開きます。
右上の検索窓からアドオンの名前で検索することが可能です。その後、使いたいアドオンにチェックを入れると有効にできます。

今回はBoltFactoryというアドオンをご紹介します。アドオンを有効にすると、オブジェクト追加の画面にボルトが追加されます。これで細かいモデリングなしでボルトやナットを追加できるようになります。
左下のメニューで正確な数値を入力し、実際のボルトと同じ形を作ることができます。
Blenderの基本的な操作について解説してきました。無料で使える3DCGの王道ソフトのBlenderですが、初心者の方には操作が難しく感じることもあるでしょう。
迷った際は、ぜひこの記事を見返して操作方法をマスターしてみてください。マスターするための一番の近道は、Blenderをたくさん触って覚えることです。実践しつつ、覚えていきましょう。
Team HENSHINでは、Blenderを使った3DCG制作をはじめとするCGやVFXなどの編集に精通した動画制作チームです。本サイトで様々な情報を発信しているので、ぜひ他の記事もご覧ください。
また、今後はYouTubeでの発信や講座の配信なども進めていく予定ですので、ぜひブックマークなどしていただけますと幸いです。