What is "Wonder Studio" that can synthesize CG characters with live action? Explanation of fees and functions
ryo
HENSHIN Labo


The world of video production will be transformed by the power of AI. What if you could easily add realistic CG characters to your videos? That is the innovative potential offered by Wonder Studio.
In this article, we will thoroughly explain how to use Wonder Studio and what to do when you can’t get it right. We will explain in detail, step by step, from shooting the material to rendering and output. In addition, we have compiled a list of frequently asked questions and their solutions, which we hope you will find useful if you want to make the most of Wonder Studio.
Wonder Studio is an innovative AI tool that can automatically animate, light, and composite CG characters onto live-action video. It enables the production of high-quality CG images with a significant reduction in effort and cost.
Its greatest feature is that it does not require expensive motion capture equipment, complicated 3D software, or expensive production software; all you need is a camera. Artists can spend their time being creative.
For a detailed explanation of Wonder Studio, please see the following article

To get the best results with Wonder Studio, it is helpful to remember a few techniques when shooting your material. Some of these techniques are listed below.
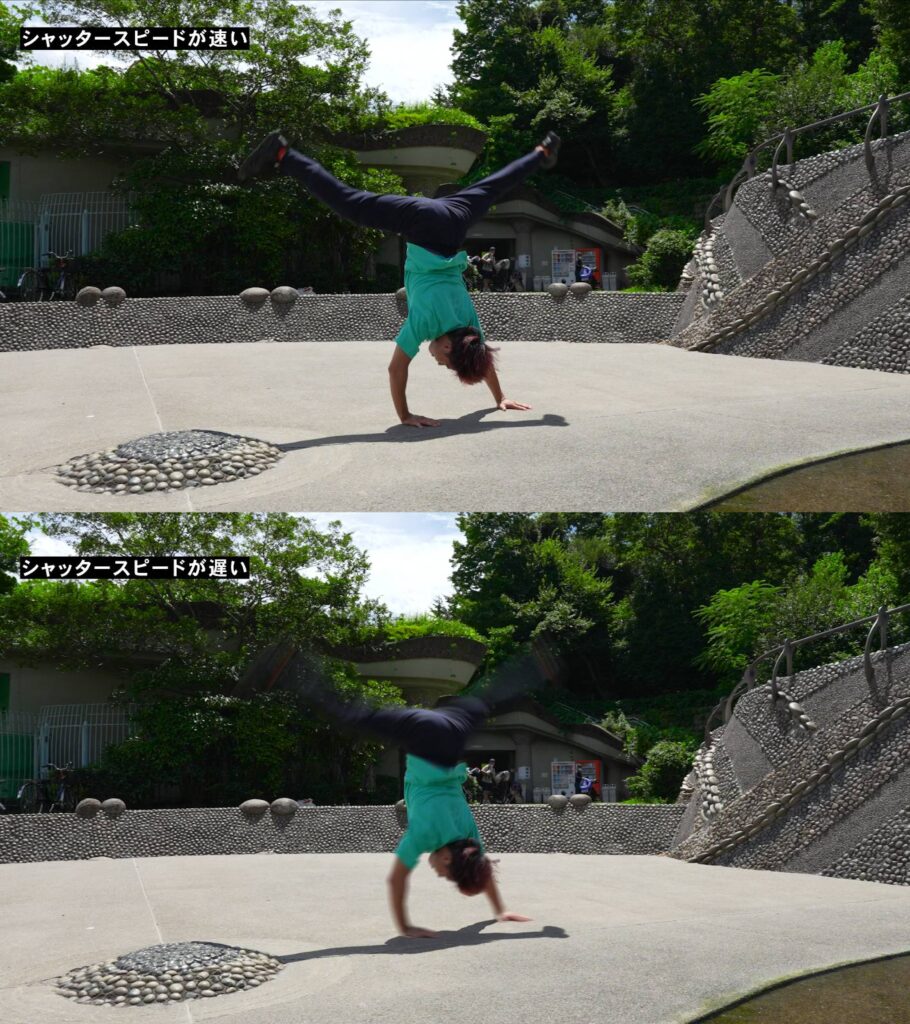
Shutter speed refers to the amount of time the camera shutter is open. The higher the shutter speed is set, the shorter the time the shutter is open. This allows you to capture clear images of moving subjects without blurring or blurring. In particular, Wonder Studio analyzes the subject from live-action video to generate CG characters, so the less blurring and blurring, the more accurate the results.
The specific shutter speed setting value depends on the scene to be shot and the amount of ambient light, but 1/500 or higher is easy to track.
However, setting a higher shutter speed than necessary will result in darker images or too high ISO sensitivity, which will result in more noise.
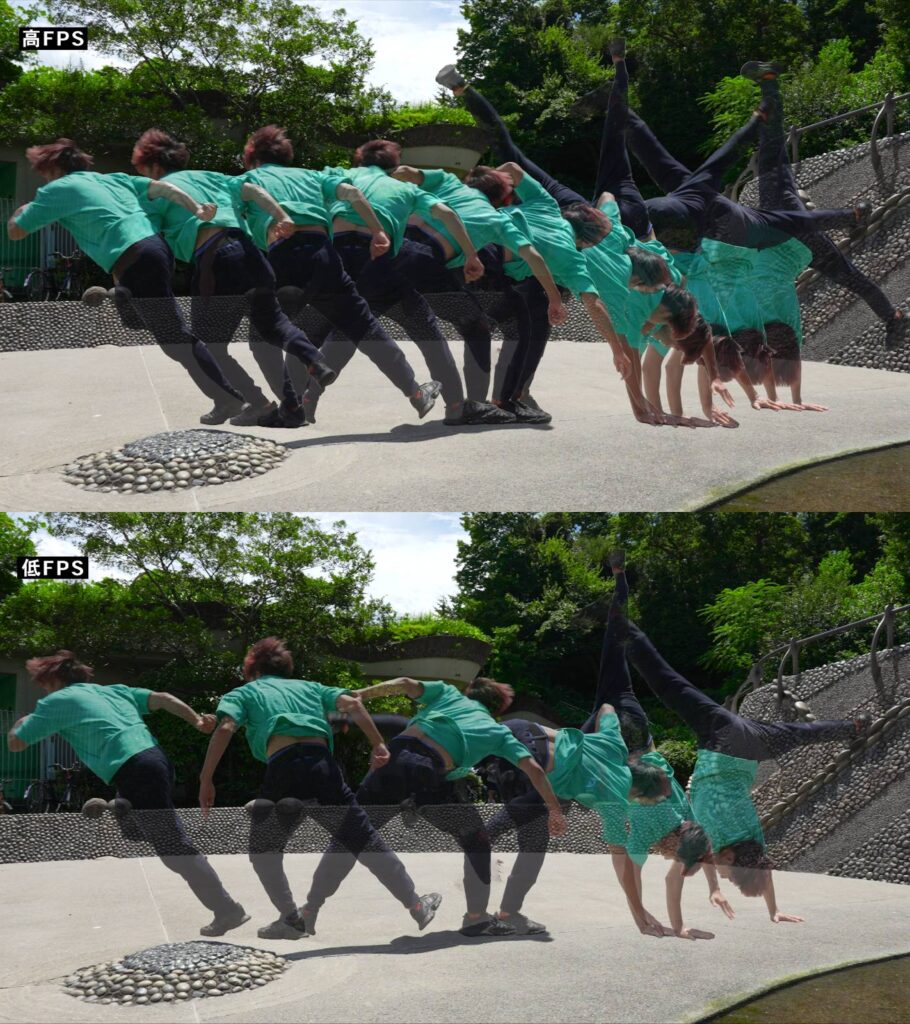
FPS (frame rate) refers to the number of frames (images) displayed per second; the higher the FPS, the smoother the motion appears and the more realistic the video can be.
Wonder Studio creates CG characters from live-action images. Therefore, a high FPS makes it possible to accurately capture even the smallest details of movement and create CG characters with more realistic movements. In addition, video shot at a high FPS is also advantageous for slow motion.
As with shutter speed, the specific FPS setting value depends on the scene and purpose of shooting, but 60FPS is the recommended range.
However, if smoother motion is desired or slow motion is considered, higher settings such as 120FPS or 240FPS may be selected.
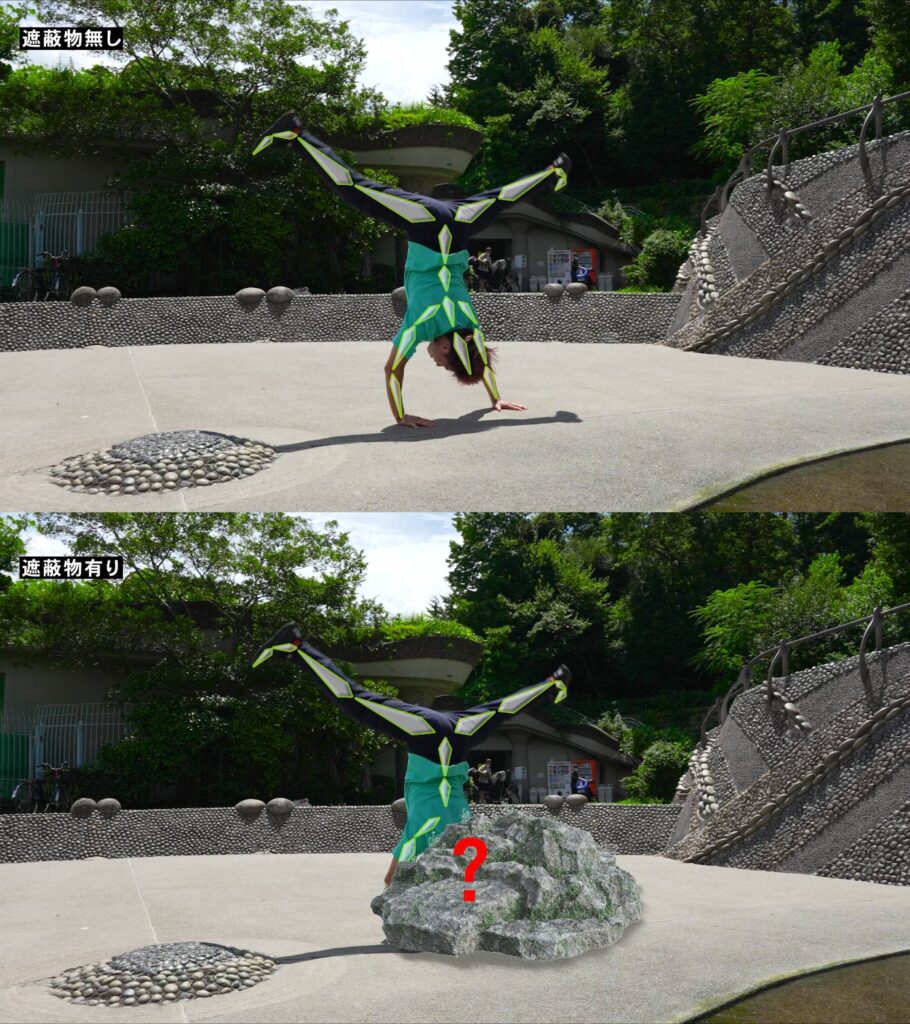
In Wonder Studio, AI generates CG characters from live-action video. Therefore, if the actor to be replaced by the CG character is shot without being hidden by obstructions, it will be easier for the AI to accurately analyze the subject’s movement and obtain more accurate results.
In addition, if there are many obstructions, each one must be manually edited in 3D software such as Blender. This can be a time-consuming and labor-intensive task, especially in complex scenes or when many obstructions are present.
Therefore, it is recommended that the actors be clearly visible during the shoot, with as few obstructions as possible.
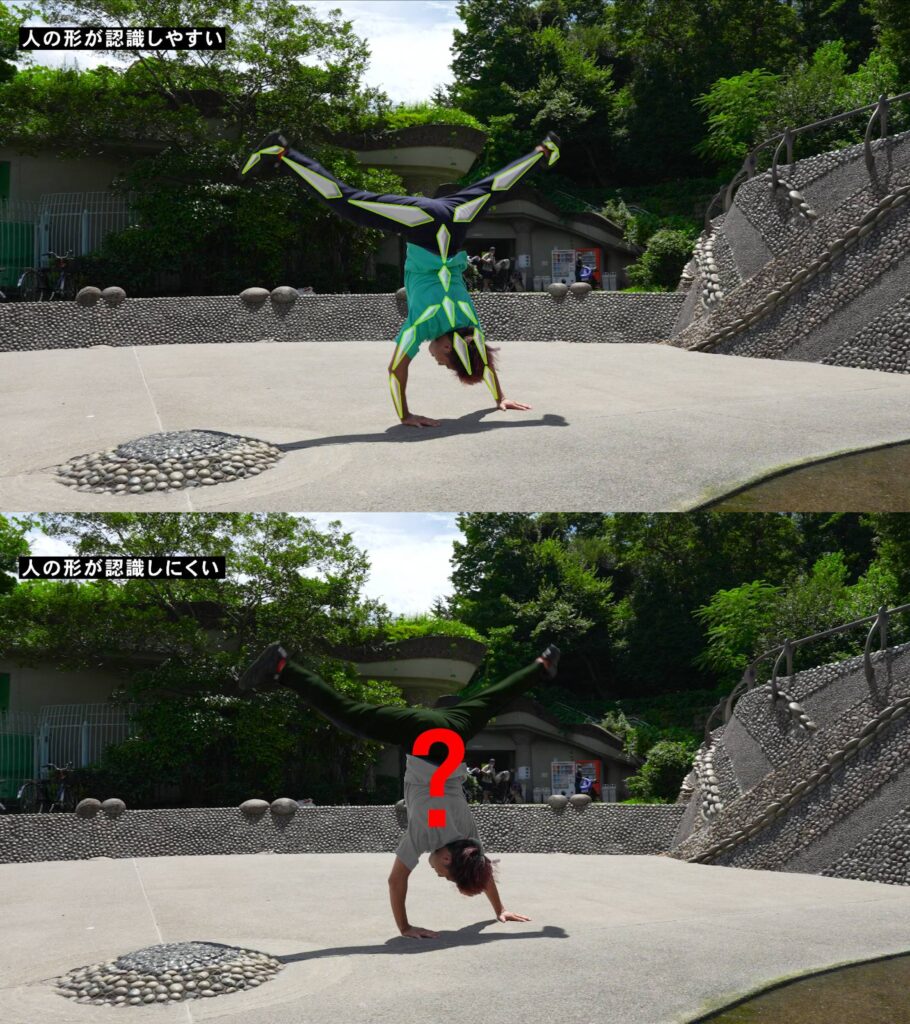
Wonder Studio generates CG characters from live-action video. Therefore, the clearer the human figure is captured, the more accurately the AI can analyze its movements and replace it with a realistic CG character.
Specifically, the entire human figure should be captured in the frame, and especially the hands, feet, head, and other distinctive parts should be clearly shown.
It is also important to adjust the lighting and background, as the subject may not show up clearly if the subject is in a dark place or if the background and subject are similar in color.
If the human figure does not show up clearly, it will need to be edited manually in Blender later. This can be a time-consuming process, especially if the pose or movement is complex.
Therefore, it is a good idea to pay attention to clothing, background, etc. and adjust lighting and background as necessary so that the subject is clearly visible during the shoot.
Once you have shot material that is easy to handle in Wonder Studio using the aforementioned techniques, you can proceed with the actual editing process.
When replacing actors with CG characters, there are some detailed settings that you should keep in mind.

First, create a new project: After logging into the Wonder Studio dashboard, click on the “Create New Project” button.
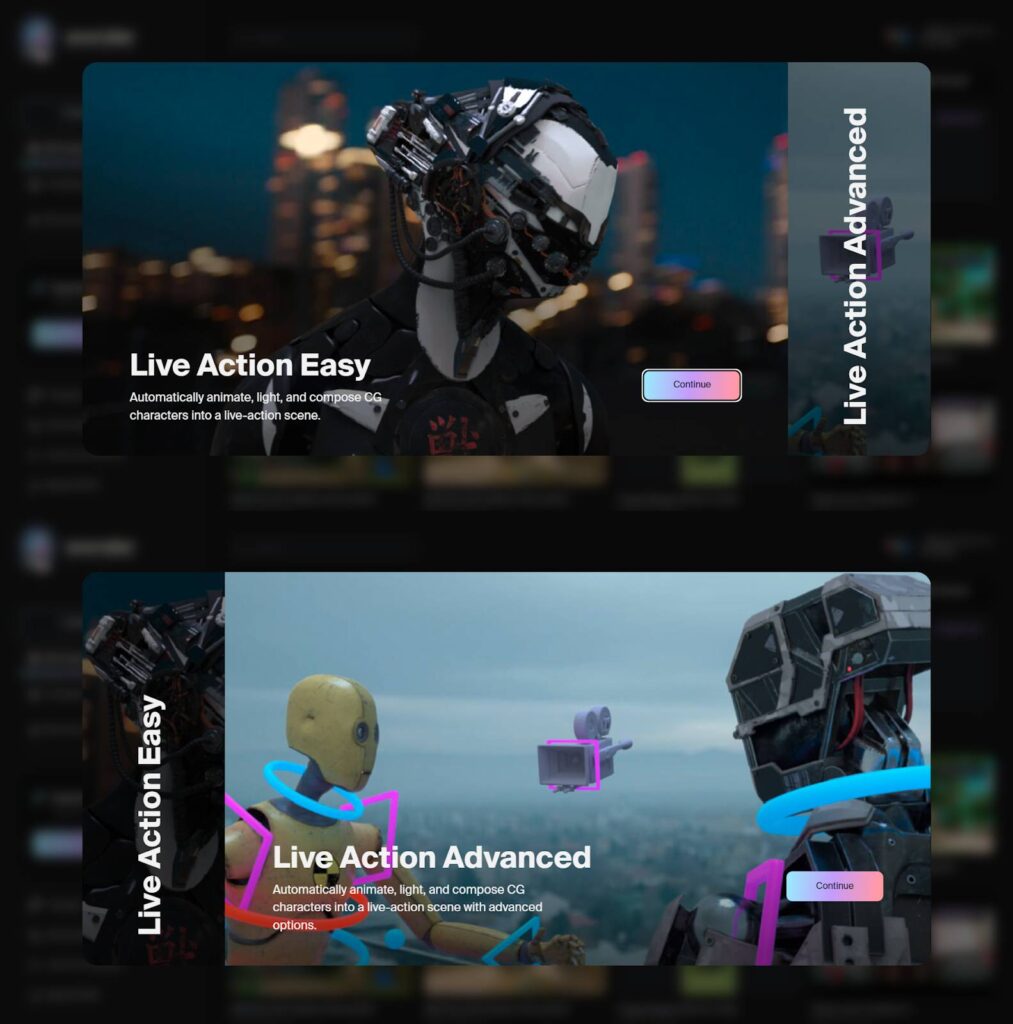
The next step is very important: you can choose between Live Action Easy and Live Action Advanced.
Team HENSHIN recommends Live Action Advanced for more flexible replacement.
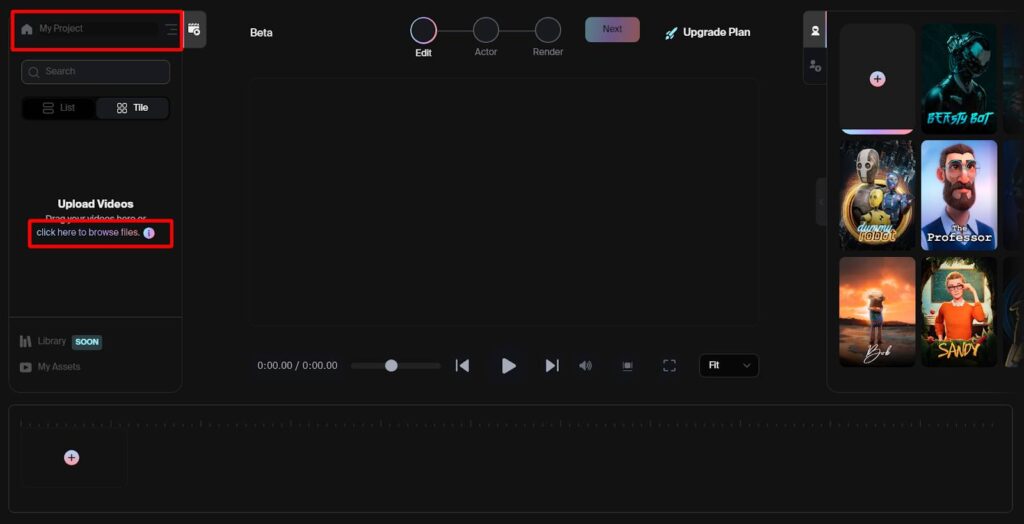
Next, decide on a project name and upload the files you wish to composite your character with by dragging and dropping or selecting Click here to browse files. Now you are ready to create.
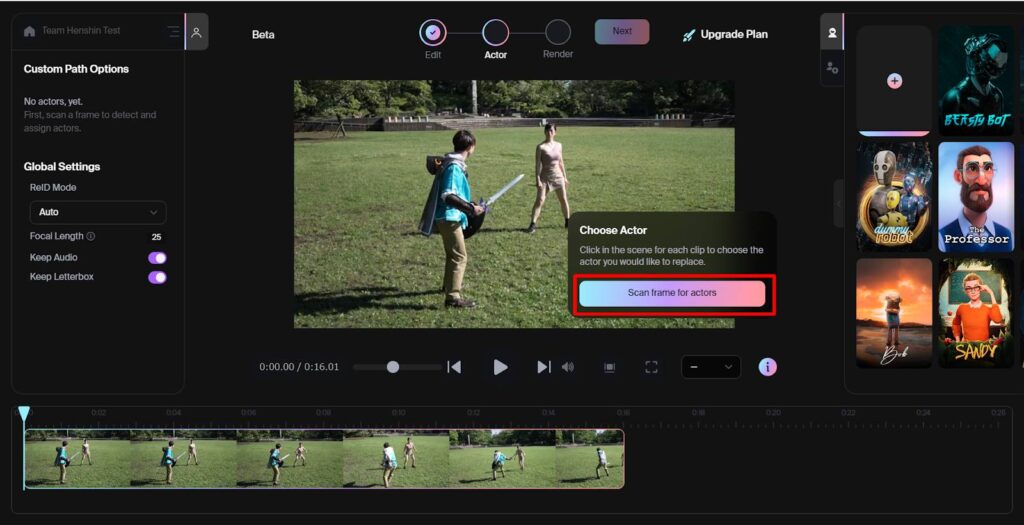
First, select “Scan frame for actors” to analyze the actors. This will allow Wonder Studio to automatically analyze and select the people in the video.
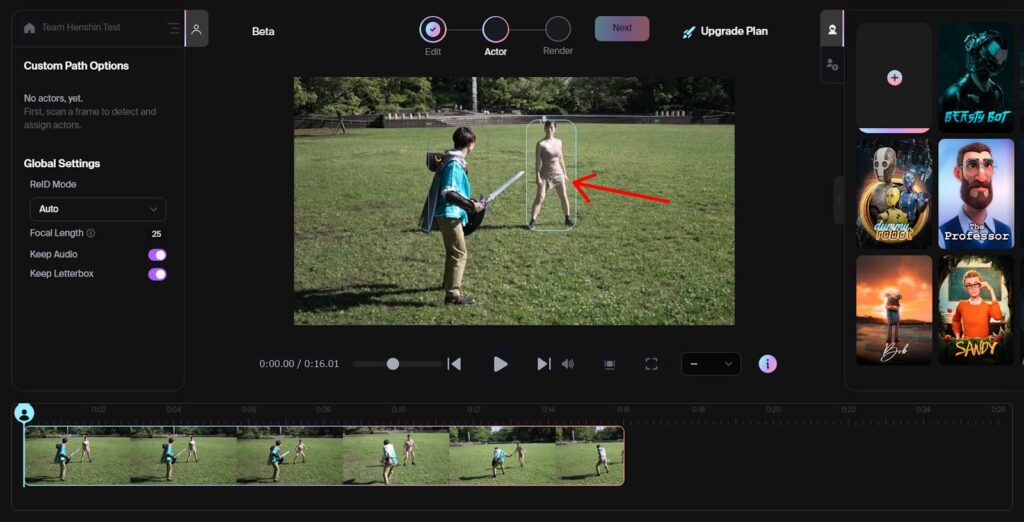
Next, select the actors to be replaced by CG characters. This is the process of specifying the person from the live-action video whom you wish to convert into a CG character.
Wonder Studio also allows you to select multiple actors from a single image and replace each with a different CG character.
However, when selecting multiple actors, it is preferable that each actor is clearly visible and that the actors do not overlap each other. This is so that the AI can accurately analyze the actor’s movements and replace each of them with a different CG character.
Therefore, for fight scenes, etc., it is necessary to edit the data output by Wonder Studio in Blender afterwards.
Step 3: Select CG characters and render
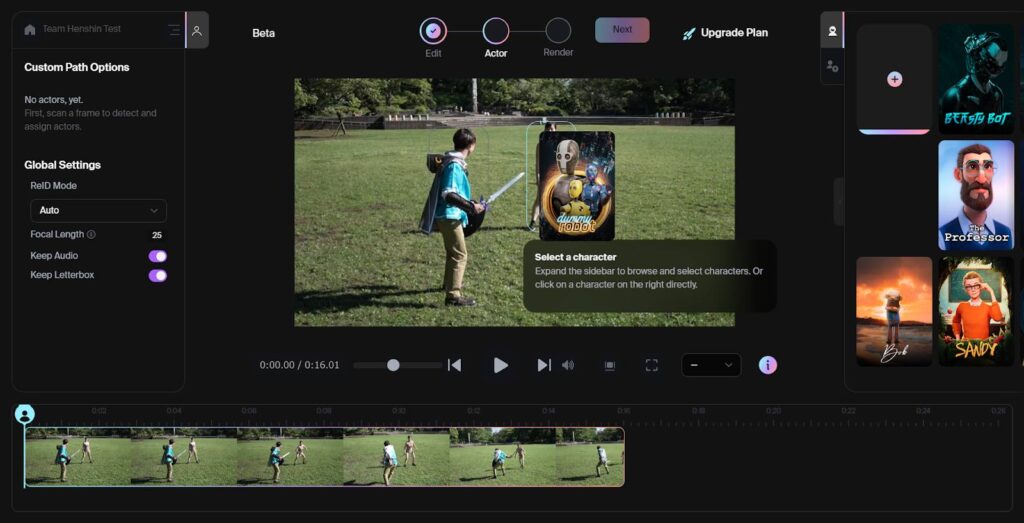
Once the actor selection is complete, the next step is to choose a CG character; Wonder Studio allows you to select a character from a pre-prepared library. You can also upload your own custom characters for use.
Select an actor, then Select a character.
From the displayed character library, select the character you wish to use and drag & drop. Or, from “My Characters”, select a character you have created and drag & drop it.
After completing the character selection, click the “Next” button. This will replace the selected actor with a CG character and begin rendering.

At this time, remember to set the Resolution to the highest possible quality and turn on the Export indivisual elements option.
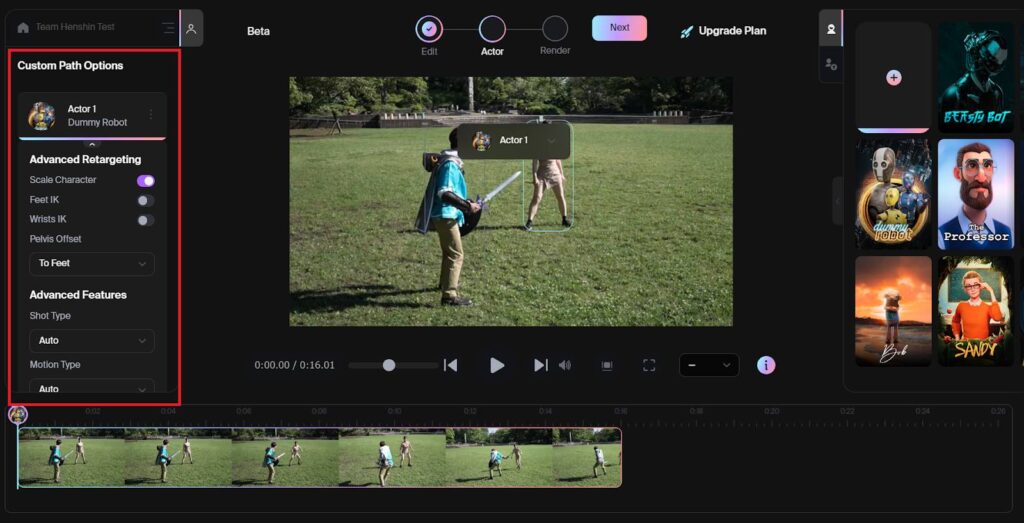
After selecting a character, its scale (size) and alignment (position and orientation) can be adjusted. This allows you to adjust the character so that it fits naturally with the image.
After selecting a character, click the “Adjust Scale Alignment” button on the screen
Use sliders and input boxes to adjust character size, position, and orientation
Specific adjustment options include
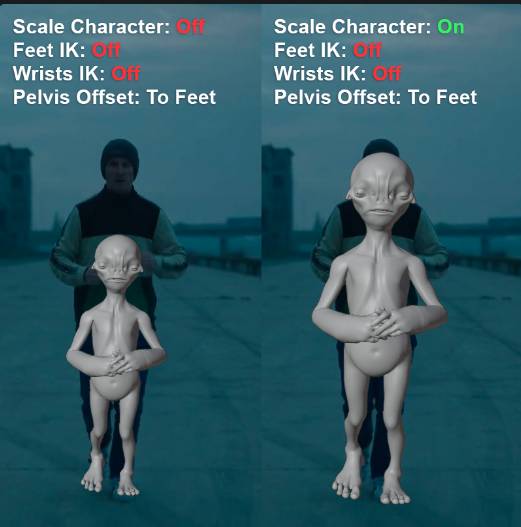
This option allows you to scale the selected CG character to the size of the actor it is replacing.
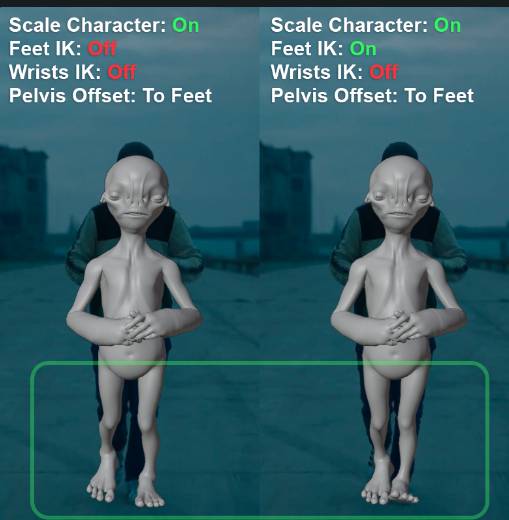
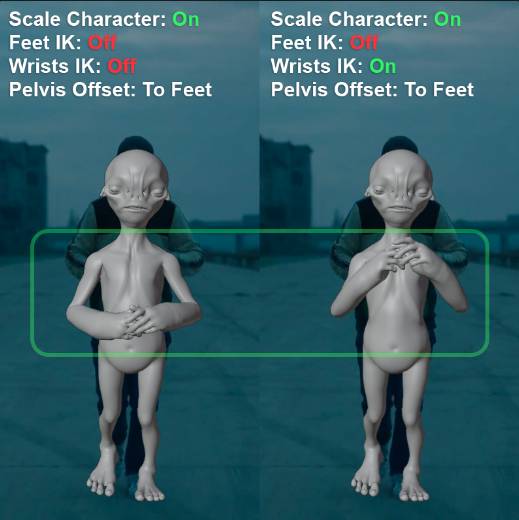
When Feet Inverse Kinematics or Wrists Inverse Kinematics is enabled, the character’s feet and wrists are adjusted to match those of the actor. This is useful when the character and actor’s systems are different and you want the character’s feet and wrists to be positioned exactly where the character’s feet and wrists are.
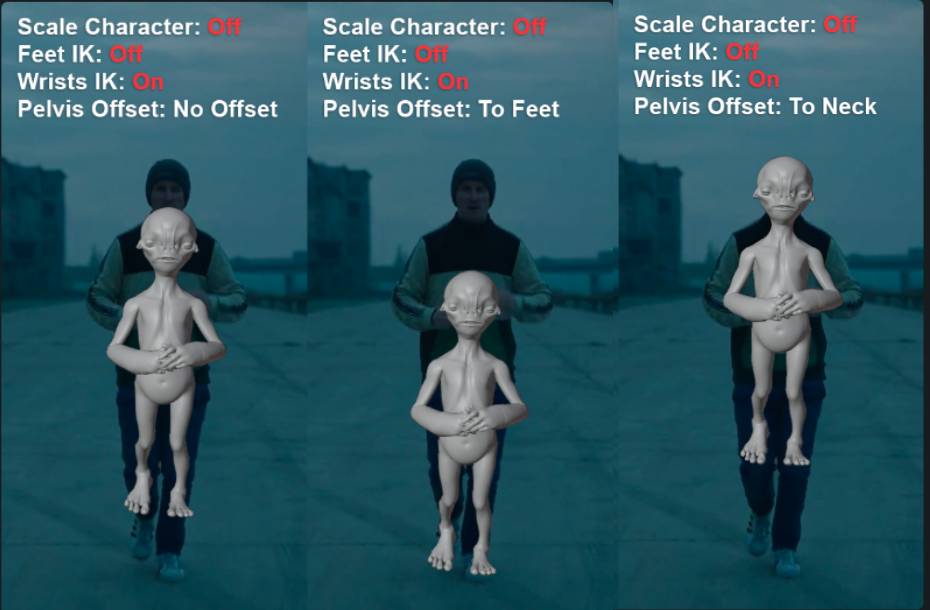
Pelvis Offset allows you to move the entire character and place it in a more self-preferred position. These operations allow you to adjust the CG character so that it fits naturally in the video. This allows for more realistic video production.
Once rendering is complete, download the output results; Wonder Studio allows you to download the output results in a variety of formats, including
Once a project is completed, go to the “My Projects” page. Completed projects are displayed in the “In Progress” section, and once displayed, go to the “My Projects” section
Click on the project to open a window that displays the video and exports the elements enabled in the rendering settings. Click on the element you want to export to download.
Blender Data allows you to export the 3D scene of your project in Blender format. This makes it possible to further edit the project in Blender or import it into other 3D software.
Motion capture data can be exported that captures the actor’s movements. This makes it possible to apply the same movements to other CG characters or to analyze their movements in detail.
Alpha Mask can export mask data to separate CG characters and backgrounds. This makes it possible to edit CG characters and backgrounds separately in post-processing, or to composite CG characters into other images.
Videos with people removed (empty stage) can be exported with the actors removed. This makes it possible to combine it with other video material.
The following is a list of questions frequently asked by users and their solutions when using Wonder Studio for video production.
If loading fails when uploading a character, it may be due to the file format, size, or structure of the character.
Check the file formats and sizes supported by Wonder Studio and try uploading characters accordingly.
Also, if the structure of the character is too complex, it may also fail to load, so try simplifying the structure of the character if necessary.
For more information, please see this article.

If a CG character disappears in the middle of a shot, the actor’s movement may be too rapid or the actor may have disappeared from the camera’s field of view. Try to smooth out the actor’s movements or shoot in such a way that the actor is always in the camera’s field of view.
Another option is to select the actor and increase the number of points that reflect the character. It is a good idea to specify when the actor’s movement changes.
If the actor inevitably disappears in the middle of the image, it is necessary to adjust it manually after outputting the image as a Blender file.
If the characters do not blend in with the background, it is most likely that the lighting or compositing in Wonder Studio is not working properly; export the Blender file, review the lighting, etc., and render again.
Download an empty video without people and use a compositing tool such as After Effects to composite the characters exported in Blender.
If you shoot with the actor holding something, it often does not work well, as even that part disappears or is attached to the character’s forearm.
If you have the model hold the item, the video will be completed with the model holding the item. However, note that the item does not move.
The best way to be sure is to export the data in Blender and add items to it.
If you are facing any problems or difficulties with your video production in Wonder Studio, we, Team HENSHIN, are here to help you. We are not Wonder Studio official, but we are working hard to collect information and perform various tests to better understand the tool.
We can help you add models, configure them in Wonder Studio, advise you on how to use Wonder Studio effectively, and much more.
We can also provide support related to VFX and computer graphics outside of Wonder Studio.
Please take a look at our achievements below and feel free to contact us if you have any questions or concerns.
▶ 3DCG works produced by Team HENSHIN
This article details how to use Wonder Studio and the techniques for getting the most out of it.Wonder Studio is a powerful tool that allows you to easily composite CG characters into live-action footage. However, to take full advantage of its capabilities, it is important to shoot the right material, select and adjust characters, and properly use the output results.
We have also discussed some of the problems you may encounter when using Wonder Studio. These problems can be solved by understanding the proper procedures and precautions. And if you face any problems, we, Team HENSHIN, will do our best to support you.
Wonder Studio is a tool that opens up new possibilities in video production. By understanding its functions and utilizing them appropriately, your video production will evolve to a new dimension. Please make use of the knowledge you have learned in this course and maximize the effects of Wonder Studio.