How to add facial expressions in Wonder Studio! A detailed explanation of how to create a model

Wonder Studio is a tool that uses AI to analyze live-action video and replace it with a 3D model of a person. However, the process is complicated, requiring the creation of a model, and the only explanations available are in English.
Here, we will explain in detail how to create a model so that Wonder Studio can add facial expressions to a face. Since there are almost no explanations in Japanese, please refer to this page if you are using Wonder Studio or want to use it in the future.
Wonder Studio Basics
Wonder Studio is a tool that analyzes the motion of a person from live-action video and applies the motion to a prepared 3D model to create a live-action synthesis of a CG character.
What Wonder Studio can do, its fees, and how to use it are explained in other articles. Please read these articles first to deepen your knowledge of the tool.


How do I add facial expressions in Wonder Studio?
Wonder Studio enables face tracking (facial recognition) and can project a person’s facial expression onto a 3D model. In other words, even facial expressions can be reproduced in CG characters.
Note that face tracking may not work well if the camera is positioned too far away. It is important to take pictures with a strong focus on capturing facial expressions.
For this reason, it is desirable to shoot in 4K or other high-resolution video.
Creation of models with facial expressions (FACS)
To create facial expressions in Wonder Studio, it is necessary to prepare models with facial expressions. Creating a model with facial expressions is called “FACS (facial action coding system). In Japanese, it is called “facial action coding system.
Simply put, this system creates patterns of facial expressions in advance and combines these patterns according to the facial expressions in the video to reproduce facial expressions.
There are 90 different patterns, and examples include “facial expression looking to the right,” “facial expression looking to the left,” “facial expression looking troubled,” and so on.
Patterns of FACS
The following patterns are available for models with facial expressions (FACS).
For more information about the patterns, you may want to check the page provided by Wonder Studio official.
引用元:Creating Facial for Characters

Points to note when creating models
As mentioned above, there are 90 patterns, but you do not necessarily need to have all of them to do this. It is no problem to create only the patterns you need.
For example, if a character does not smile at all, there is no need to prepare an expression such as a pout.
However, it is best not to skimp on the character’s distinctive features.
For example, if a character has large eyes that move a lot, you should have all the necessary expression patterns for the eyes.
How to create a model with facial expressions compatible with Wonder Studio
From here, we will explain in detail how to create a model with facial expressions in accordance with FACS.
If you have not created a model of the body to begin with, please refer to the following article to create a model. This article will only focus on the model with facial expressions.

Method 1: Create a shape key in edit mode.
The following is an explanation of the operation in Blender.
The first method is for the case where no rigging has been done. If you have already completed face rigging, we recommend the method described in the next section.
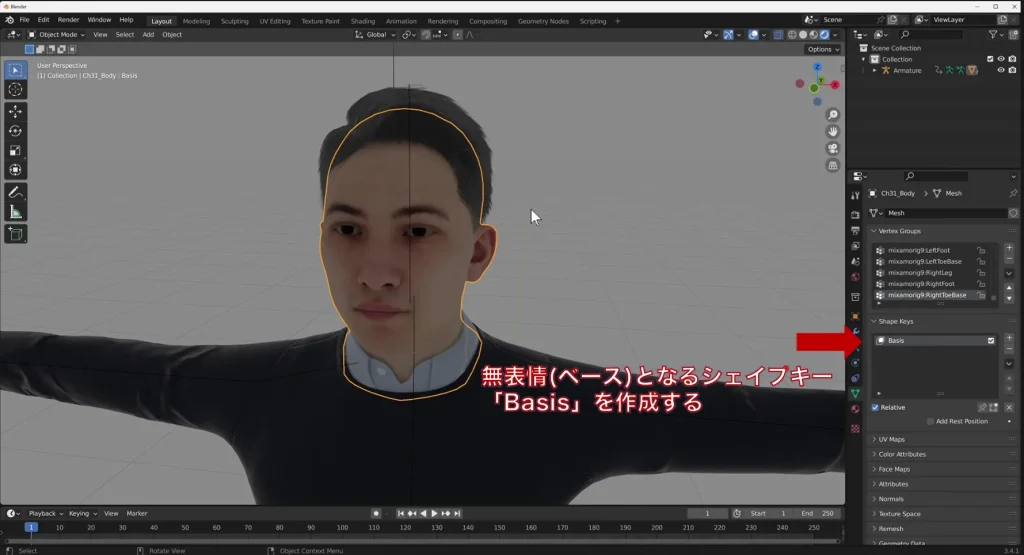
BasisFirst, select the face you want to edit and create the first shape key. A shape key is a record of movement, such as how the eyes move, how the eyebrows move, etc. It is used to record changes in facial expressions.
Create a shape key for the expressionless state and name it Basis.
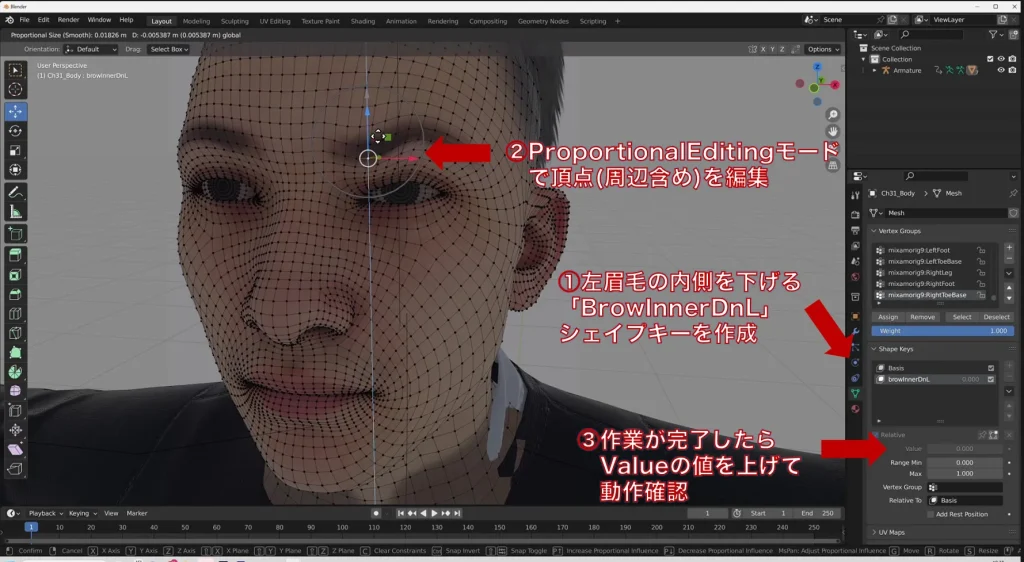
Next, create a new shape key. Name it “browInnerDnL”. This is the shape key for the lowering motion of the left eyebrow.
(This is the first one listed in the FACS defined by Wonder Studio earlier.)
Move to edit mode and manipulate the inner side of the left eyebrow to lower it. Since we are only manipulating a single vertex, let’s use the Proportional Editing mode to lower all the surrounding vertices together.
At this point, it is recommended to check the specific values of how much the eyebrows were moved. When creating a down movement for the opposite eyebrow, make sure to lower it by the same value, so that the movement of both eyebrows is targeted.
When you have completed the work, try increasing the Value value of the “browInnerDnL” you created and see if there are any problems with the movement.
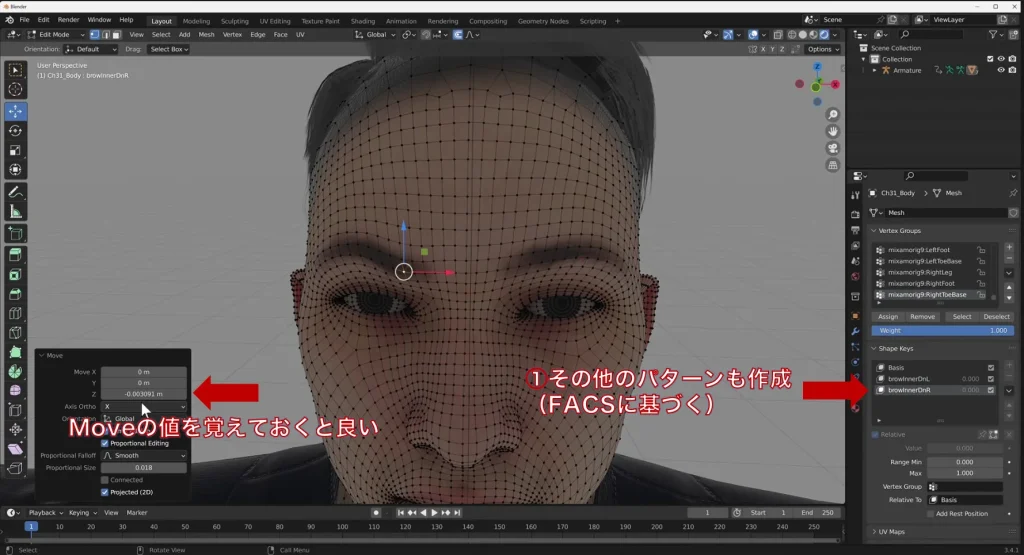
Next, create a new shape key. The rest of the process is the same as step 2, creating expression patterns.
When all is complete, save and exit.
Method 2: Utilize a model with a face rig.
The next method is to use a model with a face rig. Working with shape keys, for example, moving the eyes requires selecting all vertices related to the eyes, which can be a bit tedious.
If you have a face rigged model, try this method.
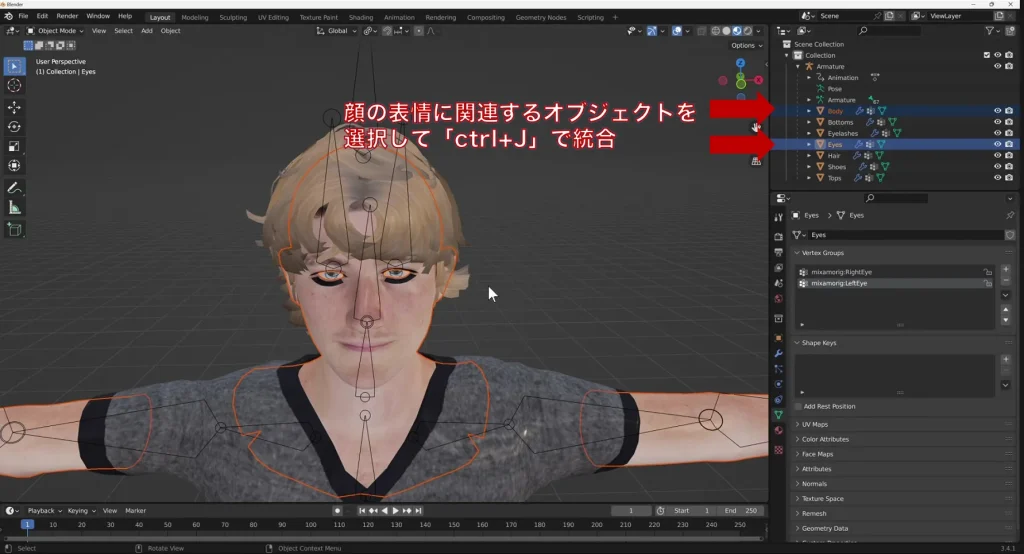
Wonder Studio can only recognize one object with a FACS shape key in it. Therefore, it is necessary to merge them into one.
If you have multiple objects related to faces, select them and merge them. The merging can be done with “ctrl+J”.
Then, rename the merged objects according to the naming convention defined by Wonder Studio.
The name of the object is “(model name)_FACE”. By adding the tag “FACE” after it, Wonder Studio will be able to recognize it.
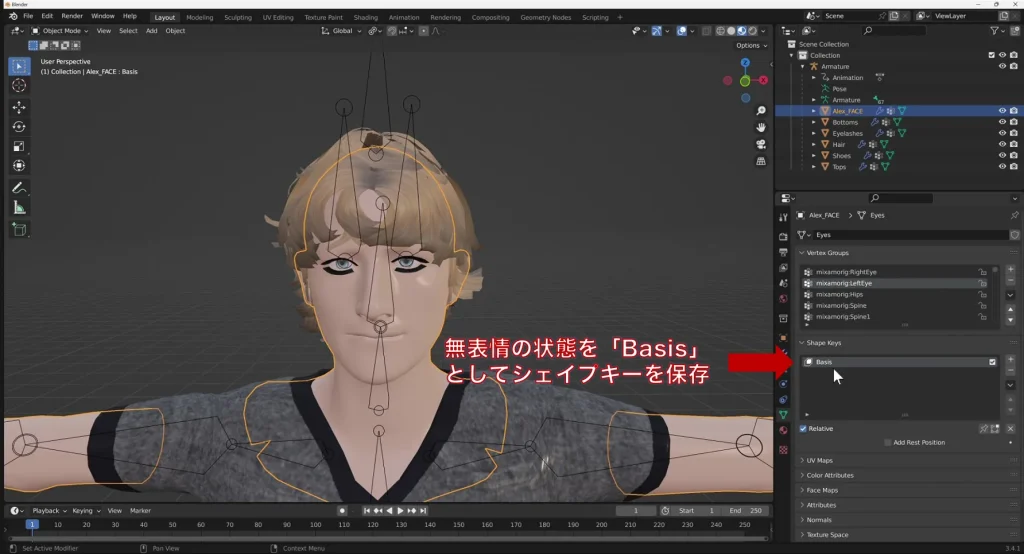
Create a “Basis” shape key that remains expressionless, similar to how it is created with a shape key.
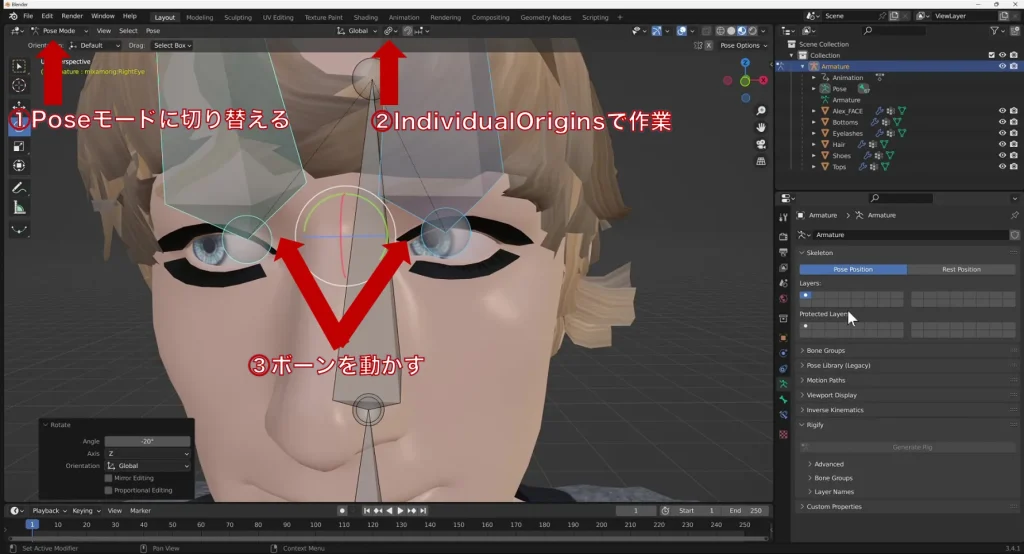
Switch to Pose mode and select the eye bones. At this time, we want to move each eye bone independently without changing its center of gravity, so select it with Individual Origins.
Move the selected bones and adjust them so that both eyes face left.
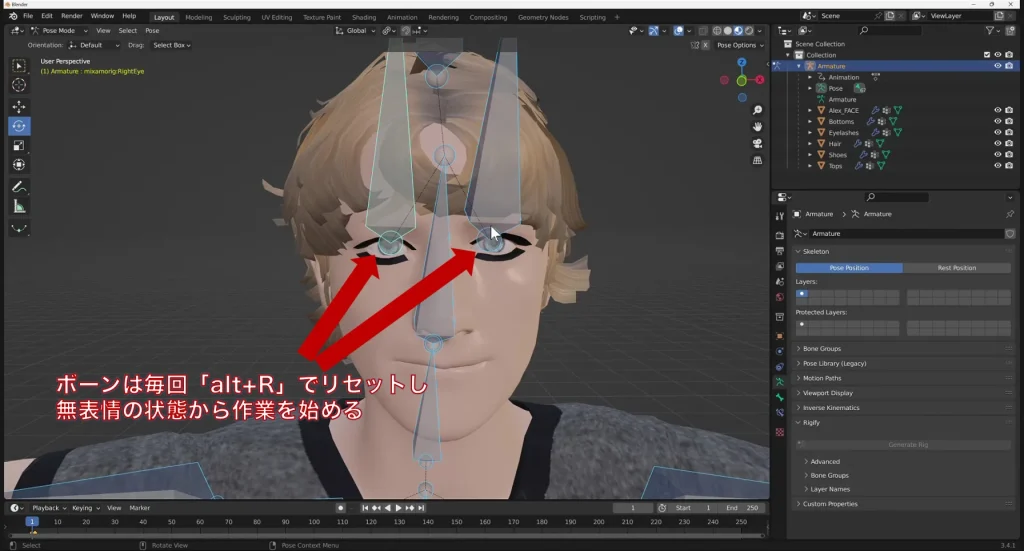
Now we can create the pattern in the same way.
The previous work has left the bones moving, so you must reset them to their initial expressionless state each time. Rotation can be reset by pressing “alt+R” with the moved bones selected. The position can also be reset by pressing “alt+G”.
Be sure to reset before working.
When all is complete, save and exit.
Cannot create a model with facial expressions… For those who have trouble using Wonder Studio
Creating a model with facial expressions is a moderately arduous task. If you fail to create a model, of course it will not work in Wonder Studio, and you will have to spend the credits allocated for checking the model’s operation.
Team HENSHIN provides support for those who have trouble with Wonder Studio.
We can provide flexible support such as creating models with facial expressions, lectures on how to use the tool, etc. Please feel free to contact us for more information.
We are not an official support for Wonder Studio, but since the official support is not available in Japanese, we support the tool with the meaning of expanding the tool.
Using Wonder Studio to turn CG characters into live action
Wonder Studio is an innovative tool for easily creating live-action composites, allowing you to add facial expressions to CG characters for a more realistic effect. It will be easier than ever to create Vtuber videos, which are very popular these days.
Please use Wonder Studio to expand the range of your content.
As we mentioned above, if you have any problems with Wonder Studio, please contact Team HENSHIN, where you will find professional staff who are well versed in 3DCG and can provide you with a wide range of advice.
In some cases, the use of Wonder Studio may not be the best solution, so we will answer your questions based on this point.

